Business Rules - Email
Return to Service Automation
Service Requests are automatically generated from emails that are sent to a system email account in ServicePRO. Email Business Rules monitor one or more system email accounts and act on requests generated from incoming emails to create automations such as auto-routing of requests, work assignments, categorization, prioritization and automated notifications.
Navigation
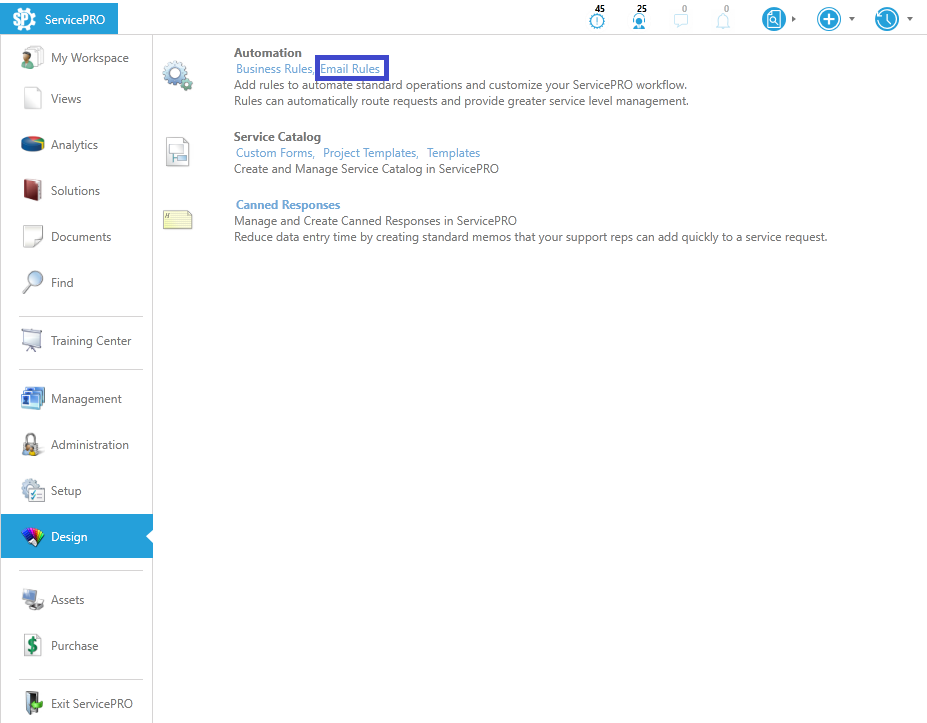
- Navigate to the backstage menu by clicking on the ServicePRO icon.
- From the Design tab, click on the Email Rules option as highlighted below.
Using Business Rules
The Email Rules designer appears as shown below.
Toolbar Overview
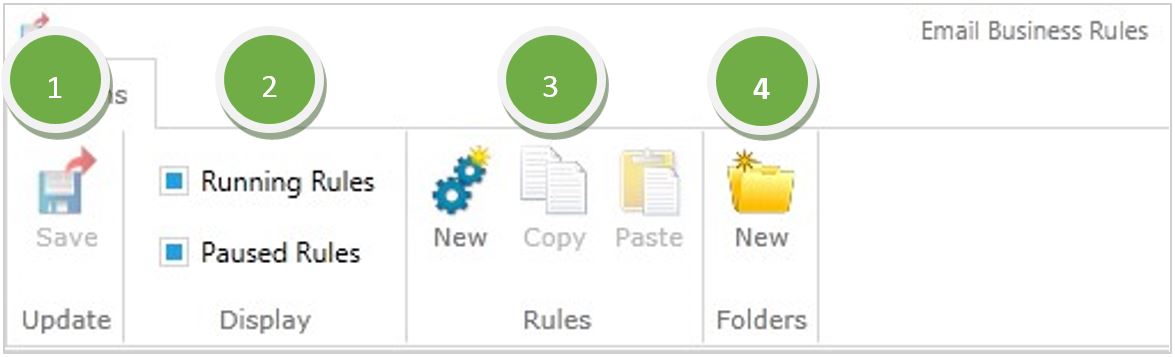
The Options toolbar contains four task groups:
- Update Task Group
• Save – Save changes that have been made - Display Task Group -
Filter what type of rules you want to display:
• Running Rules – Rules that are currently active
• Paused Rules – Rules that are currently not active - Rules Task Group
• New – Create a new email rule.
 Email Business Rule Toolbar
• Copy – Copy the selected rule
• Paste – Paste the copied rule in the selected location - Folders Task Group
• New – Add a new folder to help organize business rules
Creating an Email Rule
Let’s create a rule for the following scenario:Oceanhouse, Inc. would like ServicePRO to monitor incoming emails from users requesting a change.
When an email comes in with the subject “Change Request,” Oceanhouse would like a request to be created of type ‘Change Management’. Also, when this request has been logged, the user should receive an email requesting they log in to the Self-Service Portal to complete additional required fields.
To create an email rule for this scenario, complete the following steps in the 4 tabs listed below:
General Tab
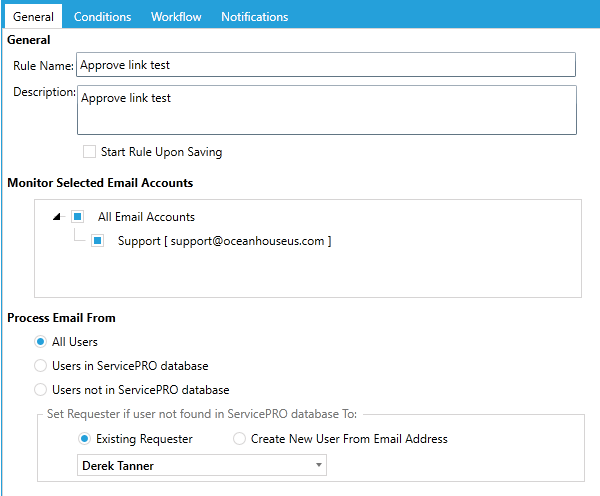
- Enter a relevant name in the Rule Name field.
- Briefly describe the rule's purpose in the Description field.
- By default, a rule will automatically start running as soon as it is created. If you prefer that the rule be paused upon creation, uncheck the Start Rule Upon Saving checkbox before you save the rule.
- Use the checkboxes under the Monitor Selected Email Accounts work area to specify the system email accounts that you want to monitor. You can select more than one System Email Account.
- The radio buttons in the Process Email From work area allow you to select users from whom ServicePRO will process emails for this rule:
- All Users - Process Emails from all users irrespective of whether their email address is in ServicePRO
- Users in ServicePRO Database - Only process Emails from users whose email address is in ServicePRO (the default).
- Users not in ServicePRO Database - Only process Email from users whose email address is not in ServicePRO.
If you select option 1 or 3, a frame appears below the radio buttons, as shown in the following graphic. The purpose of this section is to indicate how ServicePRO should handle users that are unknown (new). Process Emails From - Options
For handling email from users who are not in the ServicePRO database, you can either select an existing user as the requester (the default), or you can create a new requester based on their email address.
- If you click on the Existing Requester radio button, a drop-down list appears to help you select an existing user or add a new user who will become the requester. When the rule runs, for each email message received from an unknown user, a new service request is created with the selected user set as the requester. Note that Email must be enabled in this user’s properties.
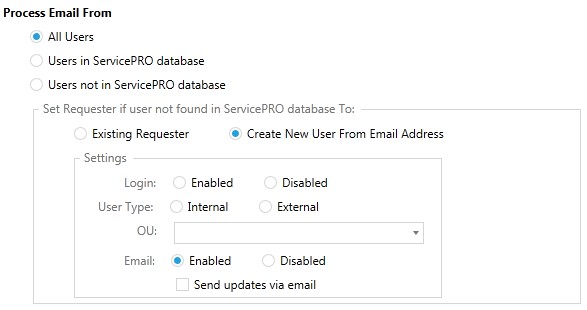
- If you click on the Create New User From Email Address radio button (as shown in the figure below), for each email message from an unknown user, the rule uses the email address to add that user to the ServicePRO database, and creates a new service request with that user as the requester.
 Create New User Settings
- In the Settings work area, for Login click on the Enabled radio button if you want to allow the new user to log in to ServicePRO (Self-Service Portal – the default password will be “helpstar”).
- Click on the appropriate User Type radio button to define whether the new user is Internal or External and select the desired Organizational Unit or Company, respectively.
- Check the Send updates via email box if you want ServicePRO to automatically send email updates to the user when their requests are updated.
Conditions Tab
This tab allows you specify the conditions that an email must meet in order to trigger the email rule. Please note that this tab is optional. If you don’t want to set any conditions but simply have the email rule process all emails coming in to the chosen system email account then you can skip this step.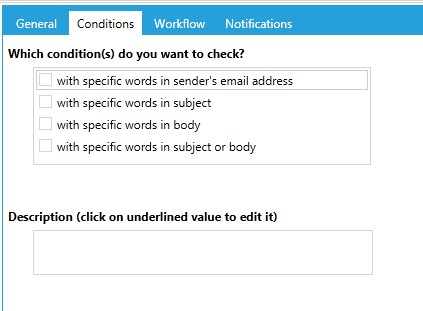
Under Which condition(s) do you want to check?, click on one of the following:
- with specific words in sender’s email address
- with specific words in subject
- with specific words in body
- with specific words in subject or body
For our scenario, we will use specific words in the subject of the email.
- In the Description work area, click on the underlined value to edit that value. (The underlined value is a hyperlink that will pop up a Search List window like the one shown below.)
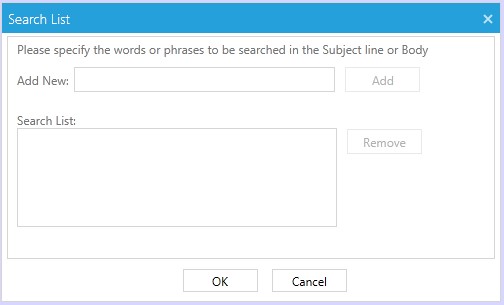 Search for Specific Subject Words
 - In the Add New field, add words or phrases that you expect to appear in the email’s subject line and click on the Add button.
- Add as many words/phrases that are needed and the list of words and phrases will appear in the Search List work area.
For our scenario, we will add “Change Request”. - Click on the OK button when you have completed adding words.
NOTE: The email must satisfy all conditions listed in the Search List to be processed by the rule.
Workflow Tab
The Workflow tab helps you define the best workflow, including routing, for a selected request.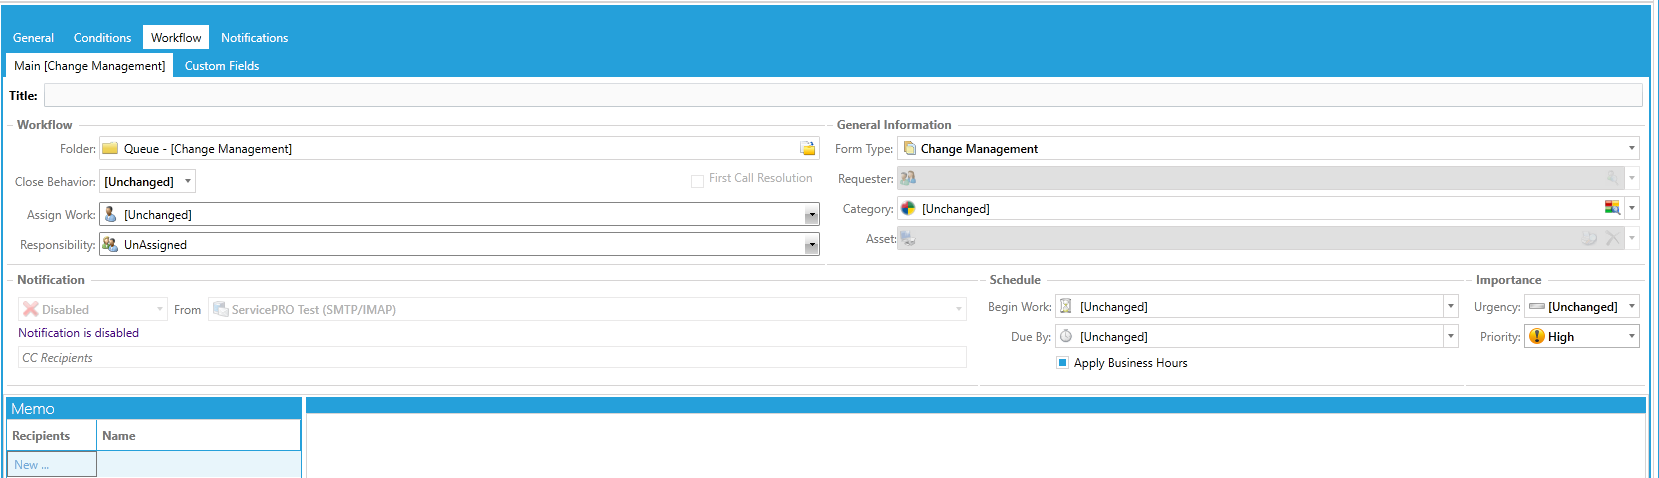
For our scenario, we use the Workflow tab to select the “Change Management” Form type, forward it to the Change Management queue and define the Priority of these requests as “High”.
Notifications Tab
The Notifications tab allows you to set up various types of notifications that are sent when this email rule runs. You can have multiple notifications for one rule.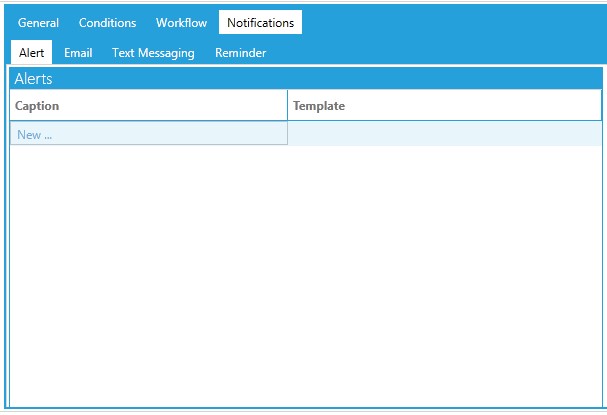
There are four types of notifications:
- Alert – Send a system alert to notify appropriate personnel for the request affected when this email rule runs.
- Email – Send an email to a user for the associated request when this email rule runs. This section has two tabs:
- New – Create a new email template
- Existing – Select a pre-existing email template
- Text Messaging – Send text message to email address configured in User Options
- Reminder – Schedule an automatic reminder for yourself, or other Support Reps.
For our scenario, we will use email notification. In the Email tab, click on the New link in the Caption column.
Email Tab
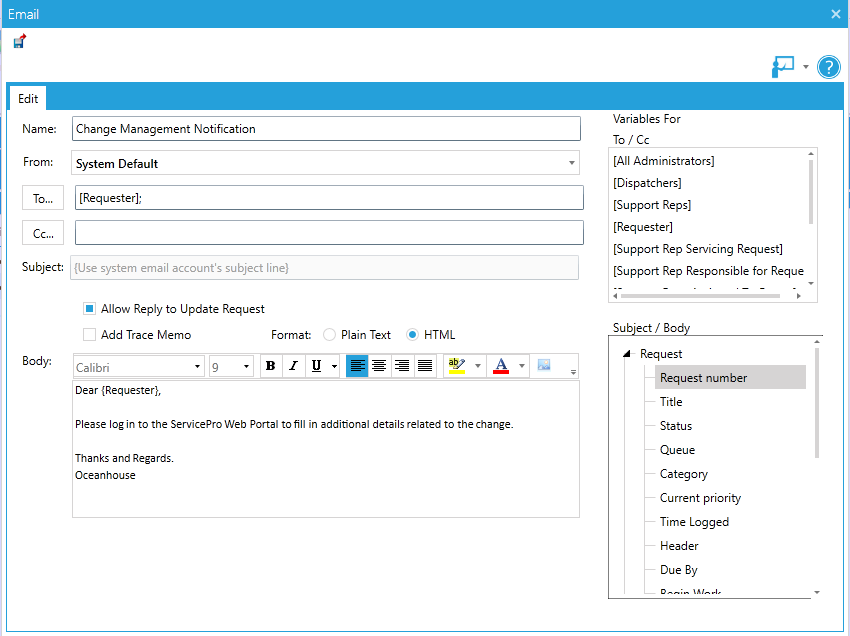
Using this tab, you can configure a new email notification.
- Name – Enter a relevant Email Template Name.
- From – Select the System Email Account this notification should be sent from.
- To – Click on the To button and select the recipient for the email notification. You can also select from a list of pre-selected options in the 'Variables For To/Cc' work area. This feature helps you select a group of people who will receive notifications without having to individually select each person. For example, you can send the email to “All Dispatchers.” In this section you will also find all User Lookup custom fields that have been placed in various form types.
- CC – Click on the CC button to select recipients who should receive a “carbon copy” of the notification. Again, you can also select from a list of pre-selected options in the 'Variables For' work area.
- Subject – Enter a subject for the email notification. You can also enter variables in your Subject field using the Subject/Body section in the 'Variables For Subject/Body' work area. For example, if you want the request number to show in the subject, you would select the “Request number” variable.
NOTE: Customized subject line option is unavailable if ‘Allow Reply to Update Request’ is enabled. ServicePRO will create a standard subject line which includes the Request Title and Number in order to recognize the request that needs to be updated with reply from sender.
- Trace Memo – Log a trace memo in the request when notification is sent.
- Allow Reply to Update Request – Select this option if you would like the recipient of the email to be able to update the request by replying to this email. All privileged users and the requester (end user) of the service request have the ability to update the request via. email.
- Format – Select whether you would like the email to be sent in plain or rich text format
- Body – Enter the email body for this notification. Variables can also be selected in the body that will be automatically populated to reference properties of the associated request.
When you have completed entering in the new email template information, click on the OK button. This email template will be added to the Email Notification list.
Email Template - Existing Tab
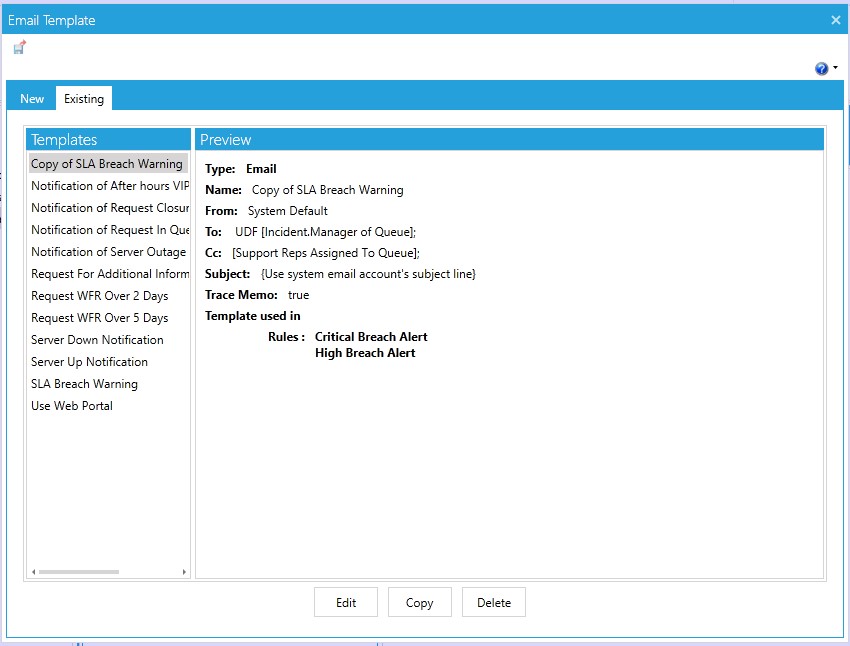
From the Email tab of Notifications, click on New. The window above opens. Select the Existing tab, which has email templates that already exist. Click on the related button to perform these tasks:
- Edit – Modify the highlighted template.
- Copy – Create a copy of an existing template. A new template will be created to which you can make changes.
- Delete – Delete the selected template.
Updating an Existing Rule – Toolbar Overview
When an existing email rule is highlighted, the window displays an Options tab as shown below.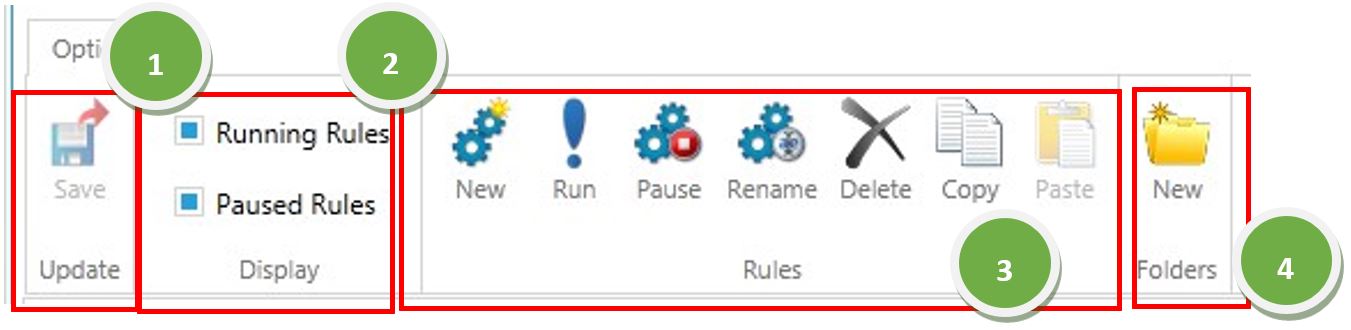
The Options toolbar includes four task groups:
- Update Task Group
• Save – Save or cancel changes that have been made. - Display Task Group
Select which rules you want to see:
• Running Rules – Rules which are currently active.
• Paused Rules – Rules which are currently not active. - Rules Task Group
• New – Create a new business rule.
• Run – Run the rule manually that is selected in the ServicePRO Rules tree view.
• Pause – Pause the rule that is selected in the ServicePRO Rules tree view.
• Rename – Change the name for the selected rule in the ServicePRO Rules tree view.
• Delete – Permanently delete the rule that is selected in the ServicePRO Rules tree view.
• Copy – Copy the selected rule.
• Paste – Paste copied rule in the selected location - Folders Task Group
• New – Add a new folder to help organize your business rules.