Manage Assets - Assets / Configuration
Return to Manage Infrastructure
What?
A centralized system for managing all your organization's physical assets. ServicePRO has the ability to automatically scan for all network assets. Assets can also be imported using the Users and Assets Import Utility, and can also be added manually into the system.
Why?
When it comes to Configuration and Asset Management, ServicePRO can be used to manage IT assets for all hardware and software, as well as any other physical assets in the organization. IT can easily locate and manage assets, including the inventory and asset allocation. IT can also audit software licenses to ensure they are compliant with important software licensing agreements.
- 1. Navigation
- 2. Asset Explorer Tab
- 3. Compliance and Documentation Tab
- 4. Auto Discovery Tab
- 5. Purchasing Tab
- 5.1 Toolbar Overview
- 5.2 Logging New Purchase Requests – ServicePRO Web
- 5.3 Logging New Purchase Requests – Privileged User
- 5.4 Purchasing Tasks Group
- 5.5 Approving or Declining a Request
- 5.6 Updating a Request
- 5.7 Place Order
- 5.8 Receive
- 5.9 Void Purchase Order
- 5.10 Purchase Requests
- 5.11 POs (Purchase Orders)
- 5.12 Administer Task Group
- 5.13 Data Analysis
Navigation
- Navigate to the backstage menu by clicking on the ServicePRO icon.
- From the Assets tab, click on the Asset Explorer option as highlighted below.
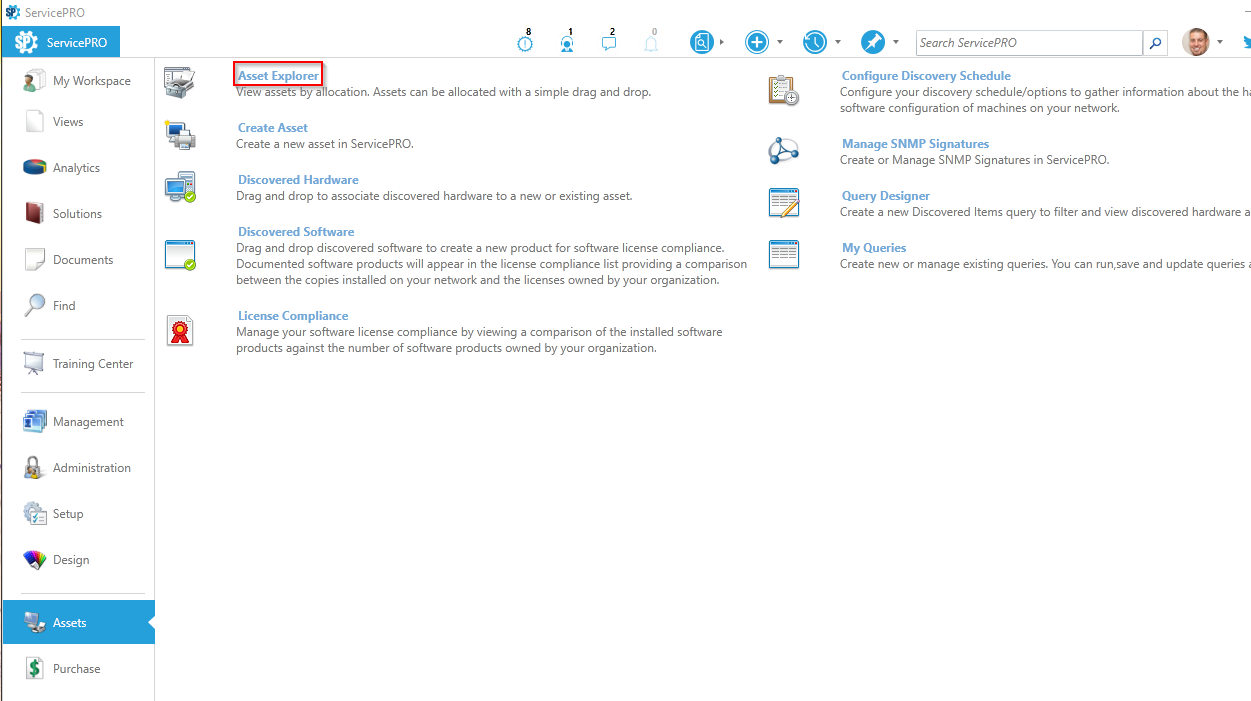 Asset Explorer Navigation
Asset Explorer Tab

Create Task Group
- Assets – Create a New Asset.
Manage Assets Task Group
- View Properties – View the properties of the item (asset) selected in the asset tree view.
- Allocate – Allocate (or re-allocate) the selected item (asset) to a company, organizational unit, user, another asset, or to inventory.
- De-Activate – De-activate an asset. This will not delete the asset; but will remove it from views and search results until you choose to delete or re-activate the asset.
View (Asset) Properties
Asset Properties allows you to view details related to an asset added in ServicePRO. Here you can view or edit asset details as needed using the option from the Ribbon Toolbar.Manage Asset
The following options are available when viewing the properties of an asset:- Update: Make revisions to asset properties
- Print: Print the asset details
- Output to Text File: Open the asset details in a text file
- Asset History: View all closed service requests associated with the asset.
Asset Details
In this pane you can view details pertaining to the selected asset. Some of the properties may not be entered because some of these fields are optional. The following fields are available:- Asset Name: Given name during asset creation. Note that if a PO # is appended to the asset name, this indicates that the asset was created by means of a Purchase Order. For more information please see Receiving Purchase Orders.
- Tag: Property identification as defined by your organization
- Serial Number: Product serial number
- Asset Type: Type of asset specified during creation. Custom asset types are available if created using Custom Form Designer.
- Acquisition Date: The date in which the asset was acquired by your organization
- Product: Click on the link here to view associated product properties
- Vendor: The specified vendor which this asset was purchased from
- Barcode: Product bar code
- Cost: Cost of asset
- Discovered Item: If the selected asset has been audited using ServicePRO’s Auto Discovery feature, a link to discovered information will be available here.
- Allocation History: View the current location of an asset. If this asset had been previously allocated to another user or asset, this history will also be listed here.
Find Assets Task Group
- Quick Find – Click on this icon to find a specific asset listed in the asset tree view. When you click on the Quick Find icon, the Search for field and controls (shown below) appear just below the toolbar.

- Enter a key word or two (or more) to help locate the asset.
- If more than one item contains the key word(s), click on the Find Next button to locate the next matching item.
- Filter – When you click on this icon, the Define Criteria work area (shown below) appears just below the toolbar. This will allow you to provide more specific criteria.

The Search By drop-down list includes the following parameters:
- Name
- Tag
- Serial Number
- Bar Code
- Product
- Vendor
- Cost
- Acquisition Date
- PO Number
- Allocated to Company
- Allocated to Organizational Unit
- Allocated to User
- Allocated to Asset
- Allocated Inventory
You can specify that the Match should contain, start with, end with, or equal the Value that is entered. When you click on the Find button, the asset tree view will display only those assets that meet the filtering specifications.
Data Analysis Task Group
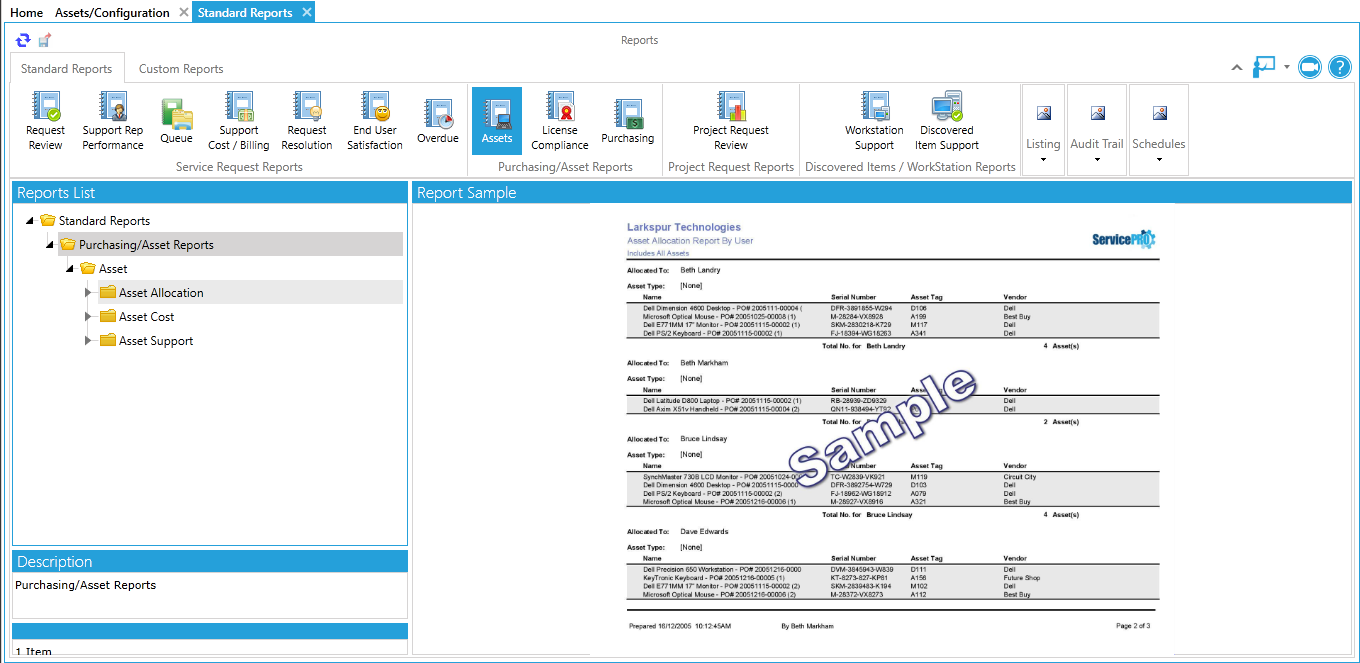
Under this Task Group is the Reports option, which allows you to view Standard Reports and Custom Reports.
Selecting this option from the Ribbon Toolbar opens the Standard Reports window. This is identical in function to the Reports icon in the Purchasing tab.
This window will allow the user to review Service Request Reports, Purchasing/Asset Reports, Project Request Reports, and Workstation Reports. It also offers Reports for Listing off various criteria, such as Users within a Company, and Audit Trail Reports, which cover ServicePRO Logins and ServicePRO Objects.
Additionally, the ability to create reports is offered in the Custom Reports tab.
For additional details, please view the section on Reports.
Compliance and Documentation Tab
In ServicePRO’s Assets/Configuration menu, the second tab features options to assist in discovering hardware, software, and available software licenses within your database.The Ribbon Toolbar features a task group with three options.

Discovered Hardware
When a network audit has been completed a discovery of an organization's workstations, the scanned data can be created into workstation assets stored in your database. In ServicePRO, a workstation is an asset that has been assigned the default type of "Workstation."
- From the Compliance and Documentation tab; click on the Discovered Hardware icon. The Discovered Hardware window opens as shown below.
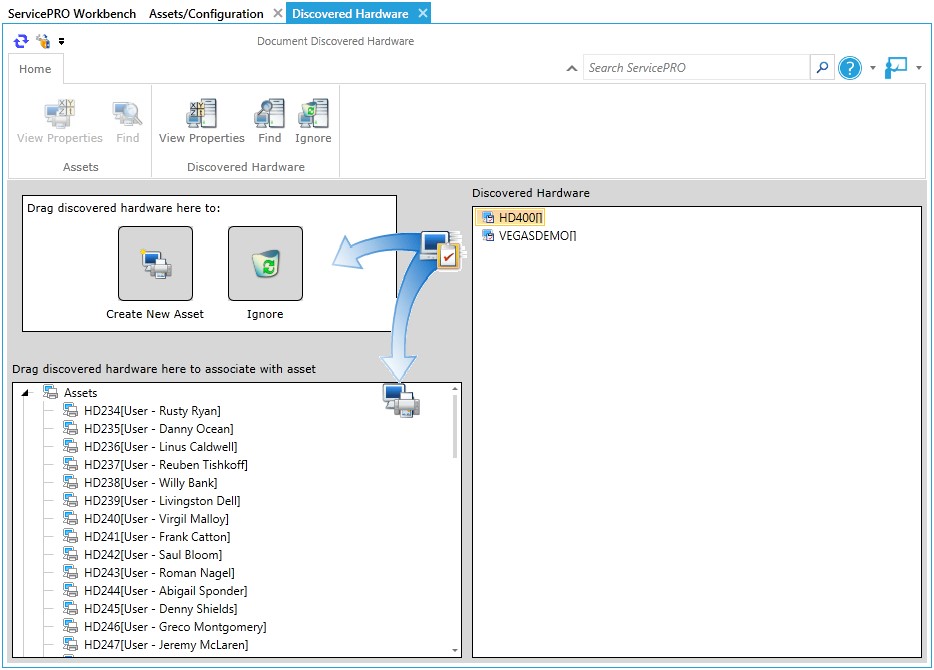
- The lower left pane shows the workstation assets currently stored in your ServicePRO database that were created from discovered hardware. The right pane shows a list of the workstations (according to the computer names that were scanned) discovered during the audit. If you do not want to associate specific workstations with assets, drag them to the Ignore icon in the top left pane. (If needed, you can return them to the Discovered Hardware list by expanding the Ignore node in the tree view and dragging them back to the Discovered Hardware list.
- To add a workstation to ServicePRO as an asset, drag it to the Create New Asset icon.
- A New Asset window, with the workstation asset type already selected, opens as shown below.
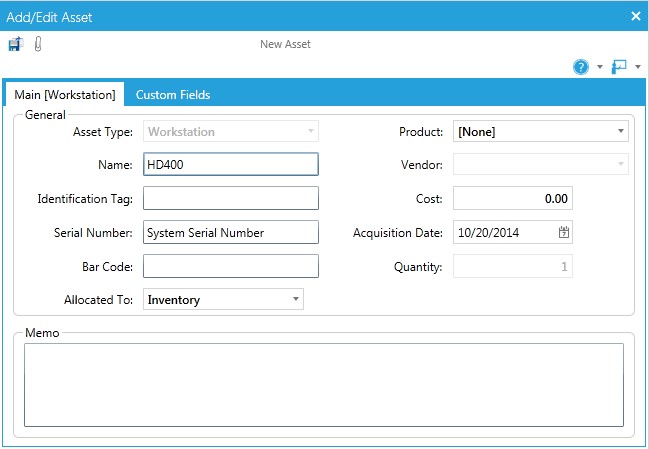
- The Name field is populated with the computer name.
- The Serial Number is populated with the information from the audit.
- The Allocated To field is set to “Inventory” by default, but you can change this if needed.
- The remaining fields are optional and can be modified as needed.
- Click on the Save icon in the Toolbar to save the workstation asset.
Workstations Already in the Database
If you are unsure about a particular asset, you can right-click the mouse on it to view its properties.
Removing a Hardware/Asset Association
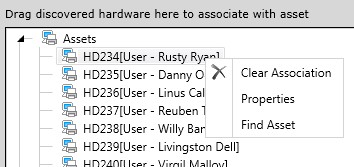
If you want to remove a discovered hardware/asset association, right-click the mouse on the asset in the asset tree view (shown below) and click on the Clear Association menu item.
Discovered Software
After you have audited your workstations, you can use the Discovered Software feature to check your license compliance. Before you can do this, you must associate the discovered software to software products in your ServicePRO database.
- From the Compliance and Documentation tab, click on the Discovered Software icon. The Document Discovered Software window shown in the figure below opens.
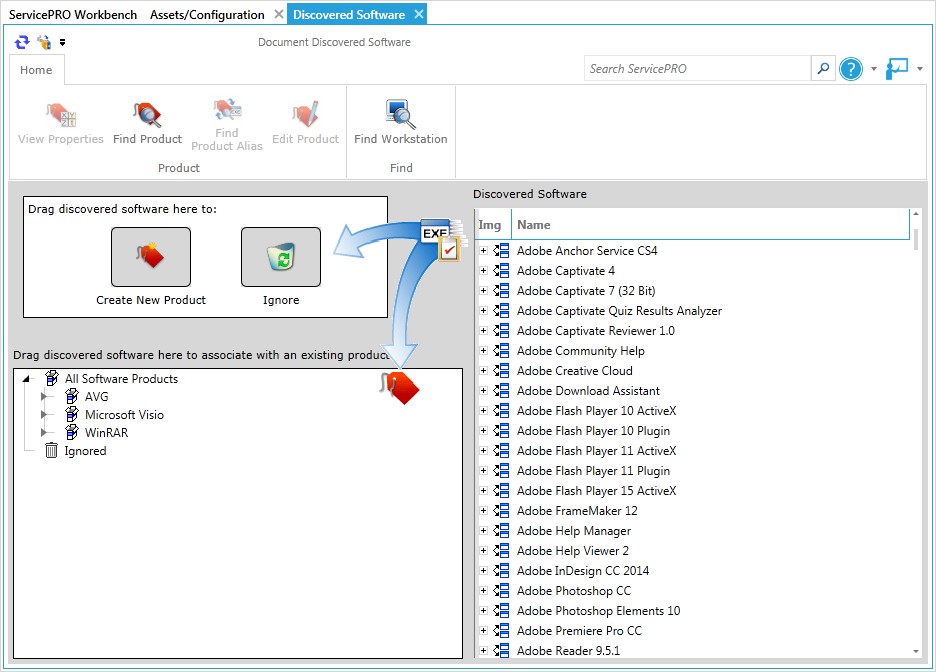
- The lower left pane shows the software products data currently stored in your ServicePRO database. The right pane lists the software discovered during the audit. The list includes all installed programs found under the Add or Remove Programs settings of an audited workstation.
- Because the discovered software is based on the installed programs found under the Add or Remove Programs setting of each audited workstation, the list can include programs (for example, updates, hot fixes) that you do not need to document. Drag the unwanted software aliases to the Ignore icon in the upper left pane. You can return them to the Discovered Software list by expanding the Ignore node in the tree view and dragging them back into the list.
- If a corresponding software product for the discovered software is not listed, drag the discovered software to the Create New Product icon in the upper left pane to create a new product.
- A New Product window opens with the software product type already selected.
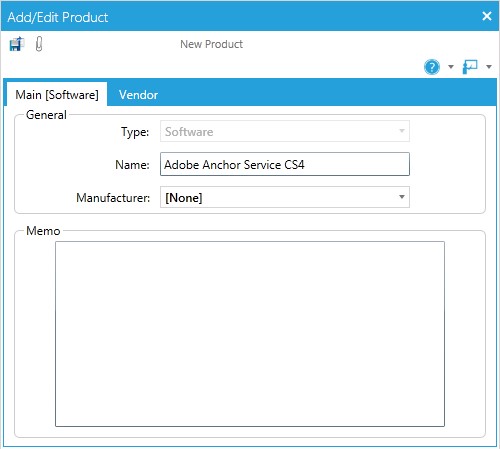
- If applicable, select a manufacturer for the product from the Manufacturer drop-down list.
- Click on the Save icon in the Toolbar to save the new product.
Software Already in the Database
If you already have software data stored in your database (for example, added from purchase orders), it will be listed in the lower left pane of the Document Discovered Software window. If the data corresponds to audited software, drag the audited software to the matching products. If you are unsure about a particular product, you can right-click the mouse on it to view its properties.
Removing a Software/Product Assignment
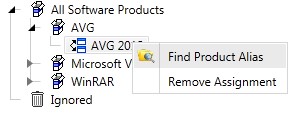
If you want to remove a discovered software/product assignment, right-click the mouse on the product in the product tree view (shown below) and click on the Remove Assignment menu item.
License Compliance
The License Compliance feature helps you compare the instances of installed software discovered by network audits with the corresponding software assets stored in your ServicePRO database.
Before you can view if you are compliant, you must:
- Add software assets to the ServicePRO Database. For example, if you have five Adobe Reader licenses, you would add them as assets.
- Document discovered software to associate it with the software products data currently stored in your ServicePRO Database.
When completed, you can see if you are compliant with your own software licenses.
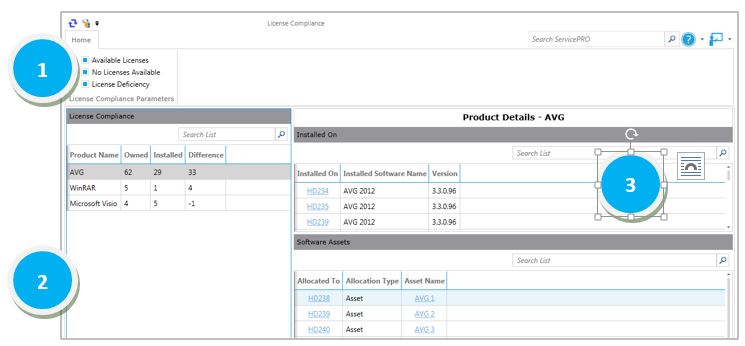
1. Ribbon Toolbar License Compliance Parameters - The toolbar helps you select which results you want to view based on the following parameters. By default, all three parameters are selected.
- Available Licenses – You own more licenses that you have installed. For example, you have purchased nine licenses for Norton Anti-virus, but you have installed only seven of those nine.
- No Licenses Available – The number of installed software instances is equal to the amount of licenses your company has added as assets.
- License Deficiency – You own fewer licenses than you have installed software instances. For example, you purchased five Microsoft® Office® licenses, but you installed 34 copies.
2. License Compliance Overview Pane
This work area provides you with an overview of the products you own, along with the number of copies you have installed.
- Owned – The quantity of a specific software product that has been added to ServicePRO as an asset.
- Installed – The number of instances of the software found by the audit.
- Difference – The number of product licenses owned minus the number of instances installed. If the value displayed in the Difference column is a negative number, it indicates that you are not compliant. One of two situations is likely:
- Your organization has installed more versions of the software than were added as assets.
- You have not added all licenses of that product as assets in ServicePRO.
If the value displayed in the Difference column is 0, it indicates that you have installed instances using all of the purchased licenses.
If the value displayed in the Difference column is greater than 0, it indicates the number of valid instances that can be installed before you need to purchase more licenses.
3. Product Details
View Product Details for a particular software selected in the License Compliance pane.
- Installed On – View which hardware assets (i.e. computers, laptops) the software is installed on. It will also specify the Installed Software Name and Version name/number of the software that is installed.
- Software Assets – View all available Assets for the selected software. This can include items still in inventory which have yet to be installed on a hardware asset. Each individual software asset can be designated a unique name for inventory purposes.
If items are listed in the Allocated To column, you can click on the item to view its properties. In the Asset Name column, you can click on the link to view its properties.
Selecting a Hardware Asset’s name will open the Discovered Items Properties window for that particular Asset. Selecting a Software Asset’s name will open the Asset Properties window for it.
Auto Discovery Tab
Using the Network Audit Engine, you can remotely collect detailed hardware and software information about the machines on the networks you manage. This information will then be automatically stored in the ServicePRO database.The Audit Service uses Windows Management Instrumentation (WMI), which is built into the Windows® operating system. So no additional software is needed on the machines to audit them.
The Ribbon Toolbar features one task group with four options:

Configure Discovery Schedule
To audit network machines, you first need to configure and schedule the Audit Service. When the scheduled time arrives, the Audit Service will start scanning the machines specified in the configuration.
The Audit Service uses the Audit service log-on account to connect to the network machines and gather the hardware and software details using WMI. The collected data can be viewed in the Discovered Hardware or Discovered Software windows.
- From the Auto Discovery tab, click on the Configure Discovery Schedule icon.
- Click on the New icon in the Discovery Schedule task group. The window shown below opens.
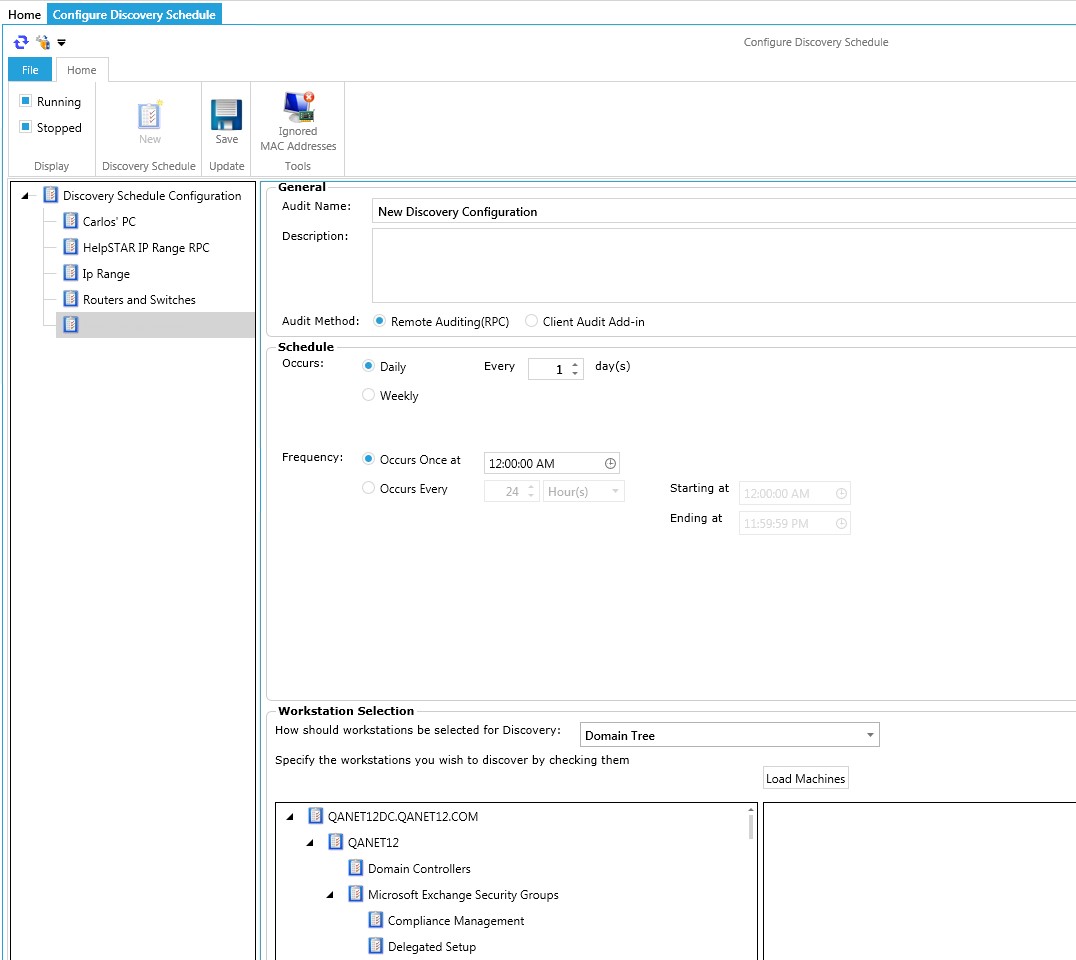 New Discovery Schedule Configuration (by Domain Tree)
 - In the General work area, give the audit a name and enter a brief description.
- In the Schedule work area, indicate how frequently the audit will run.
- In the Workstation Selection work area, choose how the workstations will be selected for discovery. The drop-down list contains the following choices:
• Domain Tree – Selected by default, this view displays the network machines in the domain you selected when configuring the service. You can click the checkbox(es) to select the domain, organizational unit, group, or specific machines in each collection.
• Machine Name or IP Address – The window refreshes and displays an entry field for specifying the machines you want to scan. You can enter workstation names, domain names, or IP addresses. Use semicolons to separate the entries.
• IP Range – The window refreshes and displays an entry field for specifying the IP Range of the machines you want to scan.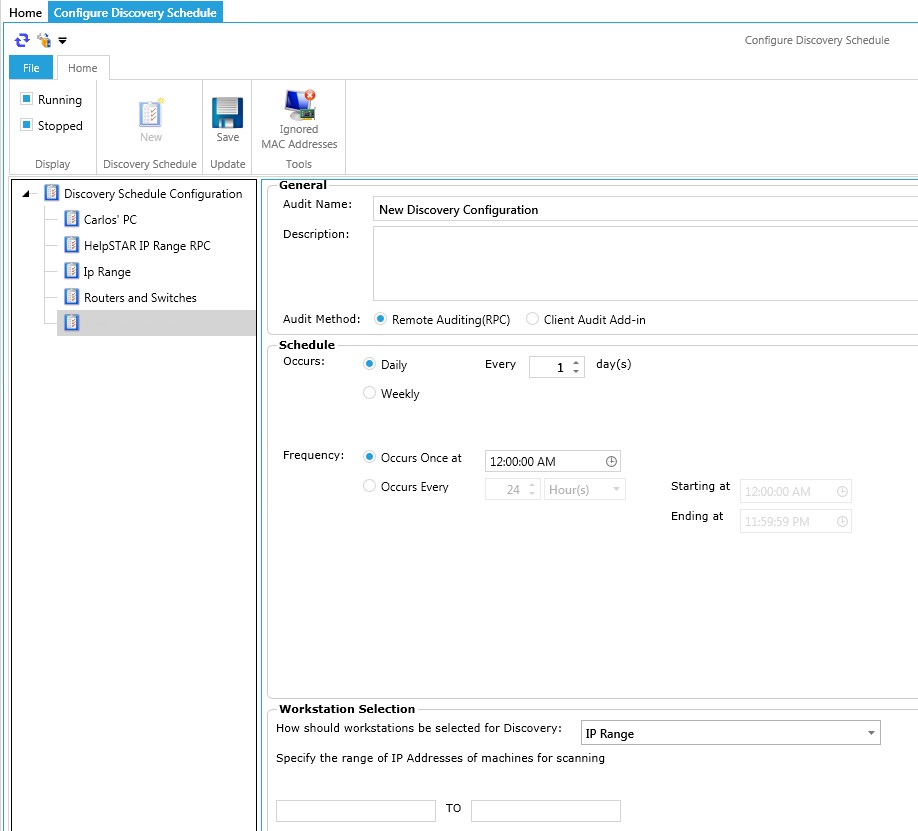 New Discovery Schedule Configuration (by IP Address)
 - Close the window. You will be prompted to save your settings. Repeat the process to schedule separate settings for different groups of machines.
- Your new discovery schedule configuration will be active by default (that is, the audit service will scan the workstations according to the schedule you have set). To stop a specific configuration schedule, select it and click the Stop button. To restart a paused schedule, click the Start button.
NOTE: In ServicePRO, a workstation is an asset that has been given the Workstation asset type. If you have added workstations to your database, you should associate them with the audited workstation data.
You can document the discovered software to associate it with the software products in your ServicePRO database. This will allow you to check your software License Compliance.
Configuring your Login Script to Perform the ServicePRO Audit
ServicePRO provides a means of auditing a machine using a login script. This is ideal for machines not on a trusted domain or those that are not constantly powered on.
In order to audit machines that are not in a trusted domain, they must be able to connect to the server hosting your ServicePRO network installation. The audit script must be configured so that the first part points to the executable file "HdtcAudit.exe" that will audit the workstation, and the second part points to the "Scan" folder where the audited data will be written to an XML file. In the following examples of login scripts, the mapped drive "T" hosts the ServicePRO network installation.
Start T:\HelpSTAR\Hlpstrcs\Scan\HdtcAudit.exe /Path:T:\HelpSTAR\Hlpstrcs\Scan
You must configure the Network Audit Service to scan the audited data in the XML file created by "HdtcAudit.exe". To do this you must edit a value in the file "AuditService.exe.config", which is located in the "AuditService" directory on the machine where you installed the Network Audit Service – e.g. C:\HelpSTAR\HLPSTRCS\Modules\AuditService. Open this file in Notepad and locate the following line:
<add key="hsFileScan" value="0"/>
Change the value to "1" to enable the file scan function. Now the Network Audit Service will scan the XML file once a day for new audited data. If you want the Network Audit Service to scan the XML file more frequently than once a day, open "AuditService.exe.config" in Notepad and locate the following line:
<add key="hsFileScanTimer" value="0"/>By default, the value "0" sets the scanning interval to once a day. You can replace this value with 1, 2, 3, etc. to set the interval to hours – i.e. 1, 2, 3, etc. hours.
Current Workstation
Click on this icon to run an audit on the workstation where you are currently logged in. This audit identifies and displays all hardware and software currently installed on your workstation.
From the Auto Discovery click on the Current Workstation icon. When the audit completes, the Discovered Items window appears, as shown below, displaying the audit results for your machine. These results include the following information:
- Summary – This page lists general information regarding your workstation such as computer name, processor speed, operating system, and IP Address.
- Device Driver – This page lists all devices connected to your system along with their information; similar to Window’s Device Manager.
- Disc Drives – This page displays the disk drives (local and network) accessible from your computer.
- Printers – This page displays all printer devices installed on your workstation.
- Communication Settings – This page displays information about your communication ports.
- Installed Software – This page displays all software installed on your workstation.
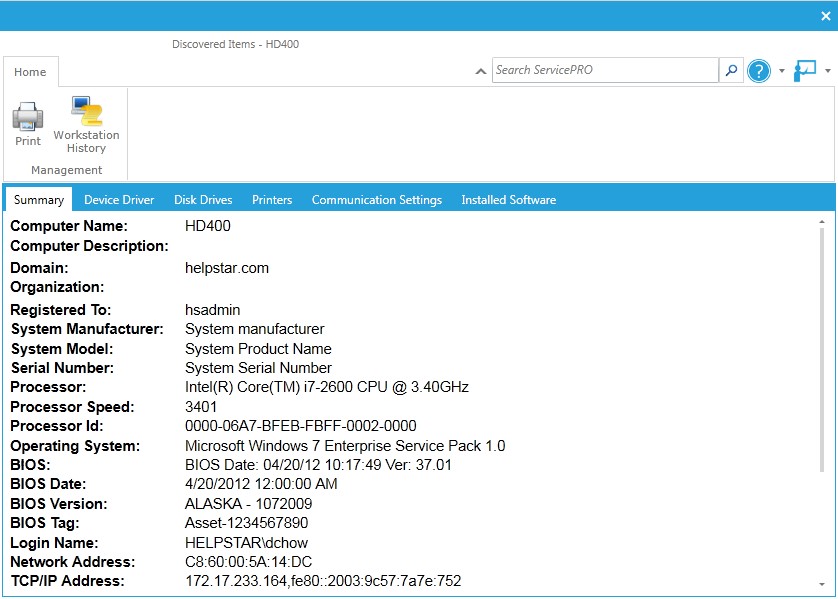 Doscovered Items Window
Current Workstation – Ribbon Toolbar
The Ribbon Toolbar features the following options under the Management Task Group:
- Print – When you select this button, you will be prompted to select which audited sections you would like to preview before printing (shown below): Once you select the preferred options, click the Preview button to see a preview of the file before it prints.
- Workstation History – You have the option to specify a workstation asset when logging a request via the “Item” field of a request. Selecting this option will list all requests where this workstation was specified in the asset field. This is beneficial in determining the amount of maintenance/support a workstation has required.
Query Designer
Select the Query Designer to open the Discovered Items Property window from the Auto Discovery Tab. Here you can create a specific Query for assets to be discovered.
- From the Assets/Configuration page, go to the Auto Discovery task group and click on the Query Designer icon. The Discovered Items Properties window opens as shown below. Use this window to create a custom query to filter and view information regarding items discovered in an audit.
- From the Request Field Selection tree view, click on the fields you would like your query to filter, as shown in the figure below.
- The Design and Preview work area contains two pages: Design Query and Preview Query Results.
- On the Design Query page, click on the desired field in the Criteria column to define criteria for the request field item. The Selection Criteria window opens as shown in the figure below.
- Enter the criteria for your query.
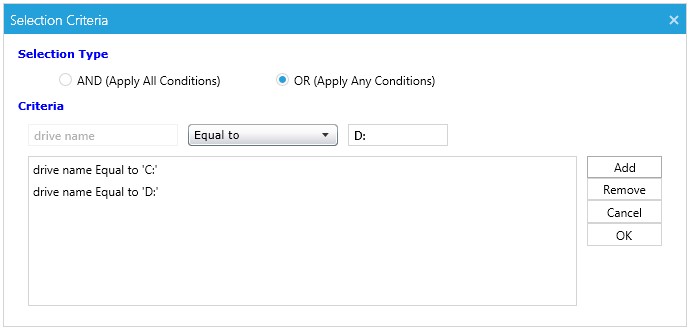
- In the Selection Type work area, click on the And or Or radio button to select the operator you want to use to combine your search strings. In the example in the figure above, the query will find all the Drives with the name “C:” OR “D:”
- Click on the OK button.
- Click on the Preview Query Results page to view all items matching your query.
Ribbon Toolbar Under Actions, you can then perform one of the functions listed below:
- Name – Set the name for the Query
- Refresh Results – Refresh the results of the current Query
- Save – Save the Query
- Export to PDF – Export the Query in PDF format
- Export to CSV – Export the Query in CSV format
Request Field Selection Pane - In this pane, select checkboxes for corresponding fields to be displayed in the Design pane. Each Field contains different Criteria.
Design and Preview Pane - This pane displays Queries for Discovered Item searching, based on fields checked off in the Request Field selection. It contains two tabs:
- Design Query Tab
- Preview Query Results Tab
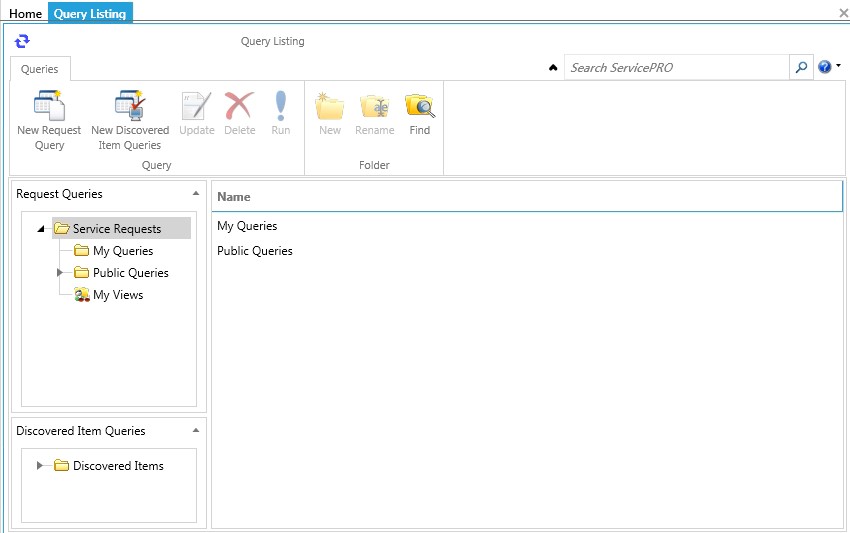
My Queries - From the Assets/Configuration page, go to the Auto Discovery task group and click on the My Queries icon to open the Query Listing window, as shown below. This window helps you create new, run, update, or delete an existing discovered item query.
Purchasing Tab
The Purchasing tab provides access to the features and functions needed to add, update, and view purchase requests and purchase orders. Purchase requests enable users to request products in the same manner that they request support. The following conditions apply:- Users with the “Submit” Role can enter purchase requests on behalf of other users.
- When a purchase request has been created, it must be approved by a user with the “Purchase Approval” Role before a purchase order can be generated.
- When products are received, they become assets in ServicePRO. These assets are allocated to users, Organizational Units, companies, or other assets for which they were ordered.
Toolbar Overview
The Purchasing tab, shown below, helps users with the “Purchaser” Role create and manage purchase requests through all states of the process – approval, placing an order, and receiving an order.

The Purchasing Ribbon Toolbar includes five task groups:
1. New Task Group
- Purchase Request – Create a new purchase request.
2. Purchasing Tasks Group
- In Dispatch – Go to the In Dispatch view to find recently submitted purchase requests.
- Approve – Approve or partially approve items requested in a purchase request.
- Place Order – Place an order for items approved in a purchase request.
- Receive – Specify an item as being received in ServicePRO.
- Void PO – Void a purchase order.
3. View Task Group
- Purchase Requests – View purchase requests at different stages of the purchasing process. You can view purchase requests that are: In Dispatch, awaiting approval, approved, declined, ordered, and received.
- POs – View opened, closed, or voided purchase orders. Also, use the search feature to locate a specific purchase order.
4. Administer Task Group
- Products – Add new products or manage existing products. Use the Manage Existing feature to edit or de-activate products no longer used by your company.
- Vendors – Add new vendors or manage existing vendors. Use the Manage Existing feature to edit or de-activate vendors no longer used by your company.
- Assign Product/Vendor – Use this option to associate a specific product to a vendor.
- Purchase Order Options – Set default values for your company’s shipping or billing address, mailing method, and terms and conditions.
5. Data Analysis Task Group
- Reports – View reports related to purchasing.
Logging New Purchase Requests – ServicePRO Web
End Users may log Purchase Requests from ServicePRO Web or the legacy End User Web Portal.- From the Home page, click on the +New Request button.
- On the Title tab, specify a Request title and click Next to continue.
- On the Main Properties tab, select a Purchase Request as the Service Type. Note: The default Purchase Request type is called "[Generic Purchase Request]". You can create custom purchase request types in ServicePRO using the Custom Object Designer and have them available in ServicePRO Web. Note: A purchase request type is noted by the icon of a piece of paper with a dollar sign in the middle. Fill out any other fields as required.
- On the Details tab, you can create a memo.
- On the Purchase Items tab, click on +Add Item to add product information and click on Save to add it to the Purchase Request. If you need to make any changes, click on the Edit Product or Delete Product button to the right of the line item. When all items are added, click on Next to continue. The Purchase Items tab appears as shown below.
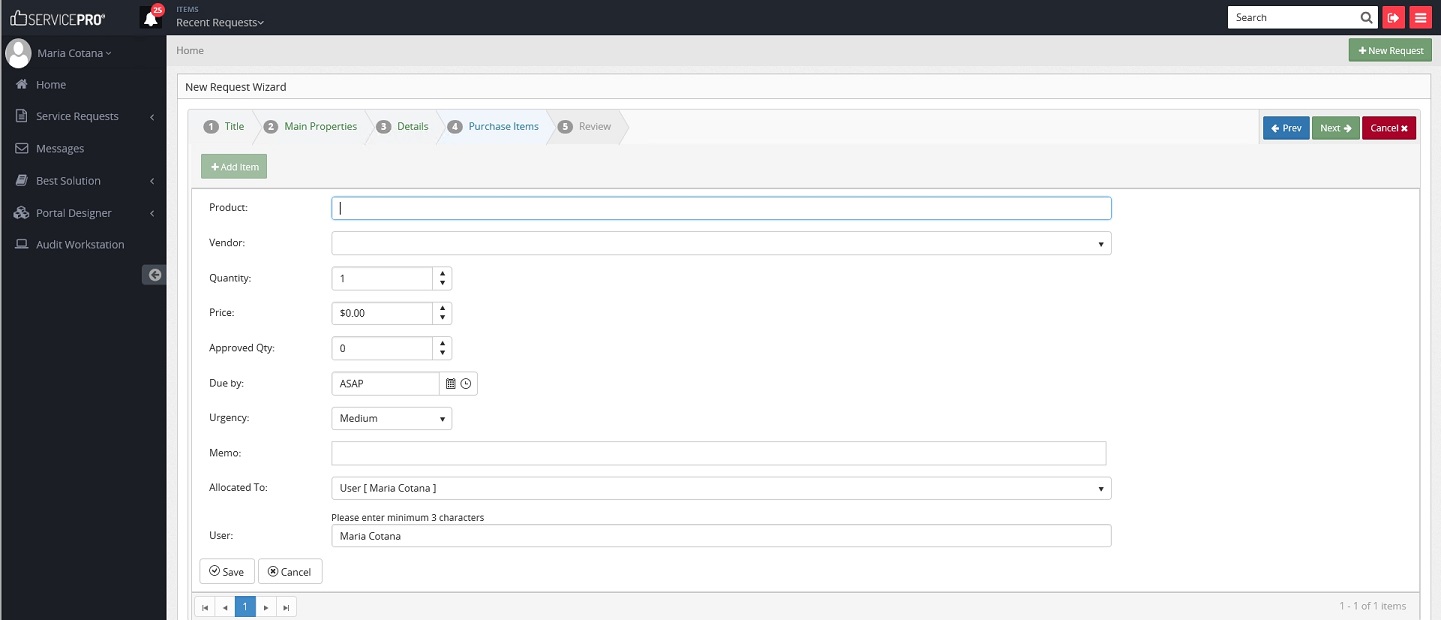 Purchase Items - ServicePRO Web
 - If you have specified a custom purchase request type, a Custom Fields tab will be next to allow you to gather more information.
- On the Review tab, confirm all the information is correct and click on the Submit button to create the purchase request.
- Log into ServicePRO Web as a Support Rep
- On the left panel, expand Portal Designer and select End User
- Go to the Catalog tab
- Beside Enable End User Purchase Request, set this to Yes. If you want end users to also use the Generic Purchase Request, instead of a custom Purchase Request type then select Yes to Generic Purchase Request under Allowed Service Type Selection.
Purchase Request Status
You will be notified via an alert when your purchase request is approved, partially approved, declined, or returned to you. You can check the approval status of your purchase requests with the My Requests feature on the Service Requests page.
Logging New Purchase Requests – Privileged User
Users with the ”Submit” Role can submit product purchase requests on behalf of other users.- From the Purchasing tab, click on the Purchase Request option.
- If applicable, select the purchase request type using the Request Type drop-down list. Request types can be created via the Custom Object Designer feature.
- To submit a purchase request on behalf of another user, click on the Requester drop-down list, and find or add a user.
- Enter a name for the request in the Title field.
- In the Importance work area, enter the User Urgency.
- In the Scheduling work area, enter the Due By date (if applicable).
- In the Current Location work area, enter where you want the request to be moved to by selecting a specific queue or Support Rep from the Move To drop-down list.
- In the Memo work area, enter Time Worked and a description of the requested purchase in the Memo field.
- Select requested purchase items from the Line Items panel. Click on the first line to select a product and the quantity desired.
NOTE: The products must already have been added to the system to be listed in this panel for selection.
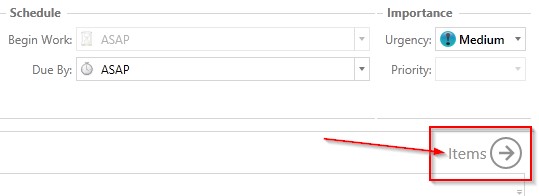 Accessing the Line Items pane
 - If you want to add another product, click on the line labeled Click here to add new item and enter new product details. (This feature is only available for privileged users. End users cannot add a new product.)
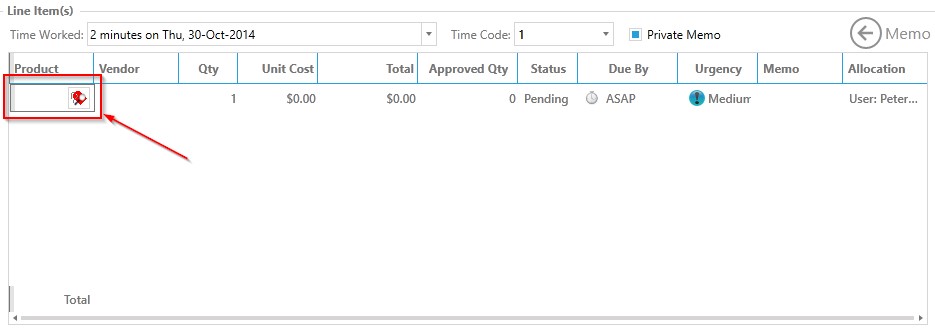 Adding Products to Line Items
 - If you have the “Purchase Approval” Role, you can also provide additional data in the panel fields, such as Approved Qty and Urgency.
- Click on the Save icon in the Toolbar.
Purchase Request Status
As a privileged user, you will be notified by an alert when purchase requests that you have created are approved, partially approved, declined, or returned to you. You can also check the approval status of all purchase requests in the system by going to the Purchasing tab and clicking on the Purchase Requests icon in the View task group.
Purchasing Tasks Group
Use this task group to access features that help you perform common tasks such as approving a purchase order, placing an order, receiving an order, and voiding a purchase order.
When a purchase request has been created, it must be approved by a user with the “Purchase Approval” Role. Before it can be approved, the request must be assigned to a user or queue. Privileged users will receive an alert when a purchase request has been forwarded to their assigned queues or to their In Service folder. Purchase requests In Dispatch are not eligible for approval.
1. In Dispatch
From the Purchasing tab, click on the In Dispatch icon to view a list of requests currently In Dispatch. The list shows both service requests and purchase requests. This option helps you route requests In Dispatch to the appropriate queue or Support Rep.
2. Approve
From the Purchasing tab, click on the Approve icon to open the Purchase Request Approval window as shown in the figure below. Use this window to approve or decline the entire request, and to update the request before approving.
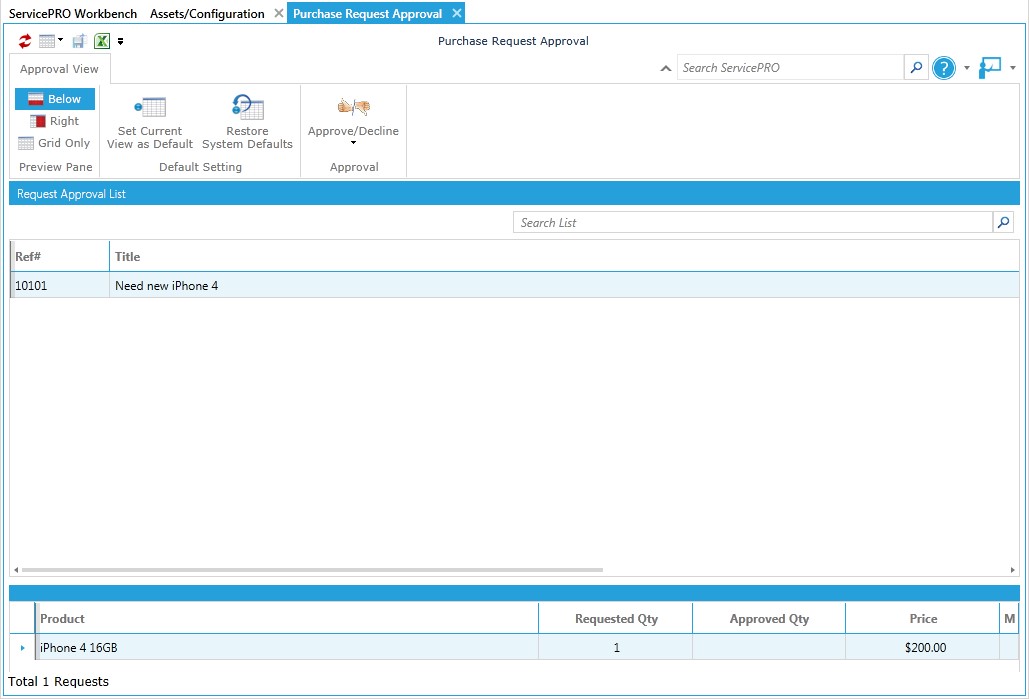
Approving or Declining a Request
- From the Purchase Request Approval window, highlight the item in the Request Approval List that you want to approve or decline. Click on the Approve/Decline icon in the Approval View toolbar. A drop-down menu appears and presents you with three items to choose from:
• Approve All Line Items – To approve the purchase in full, click on this menu item.
• Partially Approve – To partially approve the purchase, click on this menu item. - The Update Purchase Request window opens with the cursor in the Approved Qty cell in the Line Items panel.
- If the requested quantity is greater than “1,” you can reduce that amount by entering a lower number. You can also change products.
- If the total approved quantity is less than the requested quantity, the request will be considered partially approved.
- Add a description of your action in the Memo field.
- Click on the Save icon in the Toolbar to save your changes.
• Decline All – To decline the purchase in full, click on this menu item. - Close the Purchase Request Approval window when you have completed these steps.
Updating a Request
- From the Purchase Request Approval window, right-click on a request and select the Update Request menu item. The Update Purchase Request window opens to help you make your changes.
- To change product information (including the approved quantity); double-click an item in the Product column of the Line Item(s) panel. You can also click on the More… button for the corresponding item.
- To change allocation, click the line item’s More… button and change the value in the Allocated To drop-down list in the Requested Item work area.
- Click Save in the Toolbar.
Place Order
When the purchase request has been approved, a user with the “Purchaser” Role is required to place purchase orders.
Generating Purchase Orders from Purchase Requests
- From the Purchasing tab, click on the Place Order icon. The Place Order window will open if purchase requests have been approved.
- When multiple vendors sell the same product, the vendor associated with the lowest cost will be shown in the Approved Items panel. The bottom pane of the window provides a purchase order preview. Approved Items will be grouped together under the associated Parent Purchase Request.
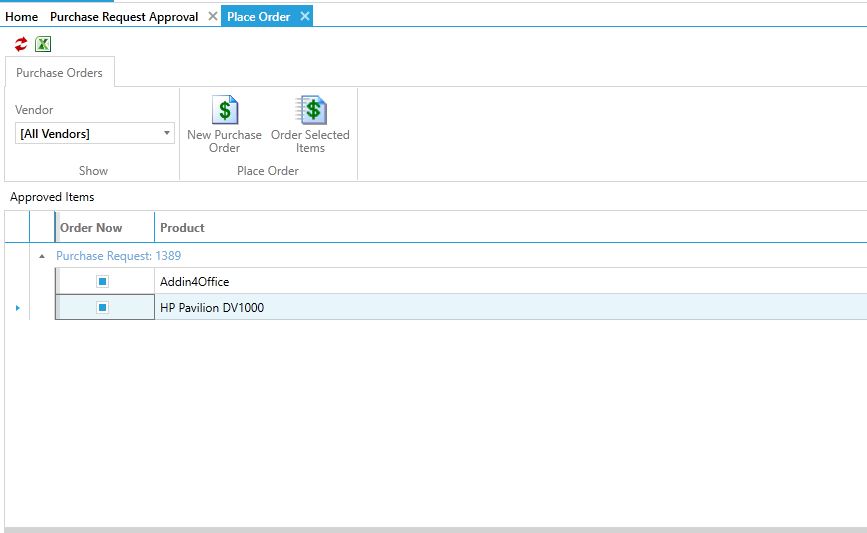 Placing Orders - Viewing Approved Items
 - To preview or update Approved Item requests properties, right-click on the item, either select ‘View Request Details’ or ‘Update Request’.
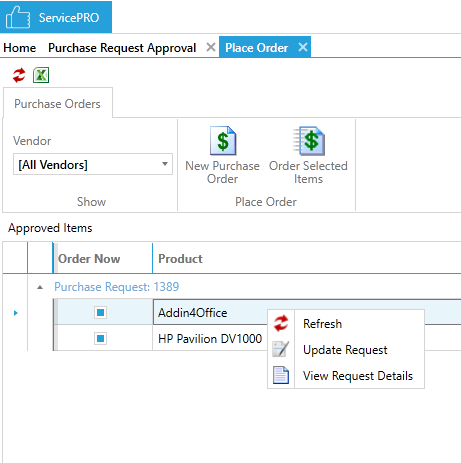 Placing Orders - Item Request
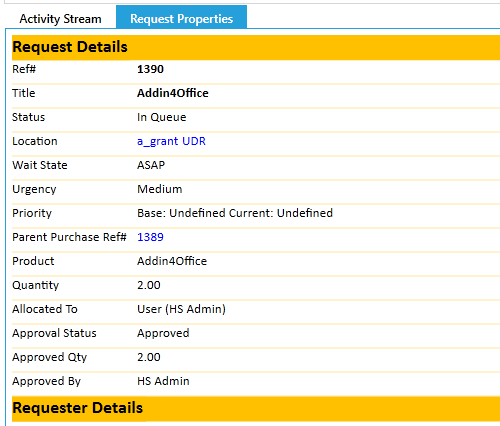 Placing Orders - Item Request Properties
 - Highlight an item then click on the Place Order button. The New Purchase Order window opens as shown below.
- If applicable, select the purchase order type from the PO Type field.
- Purchase order numbers (PO#) are automatically generated in sequence based on the date. If needed, you can change this number.
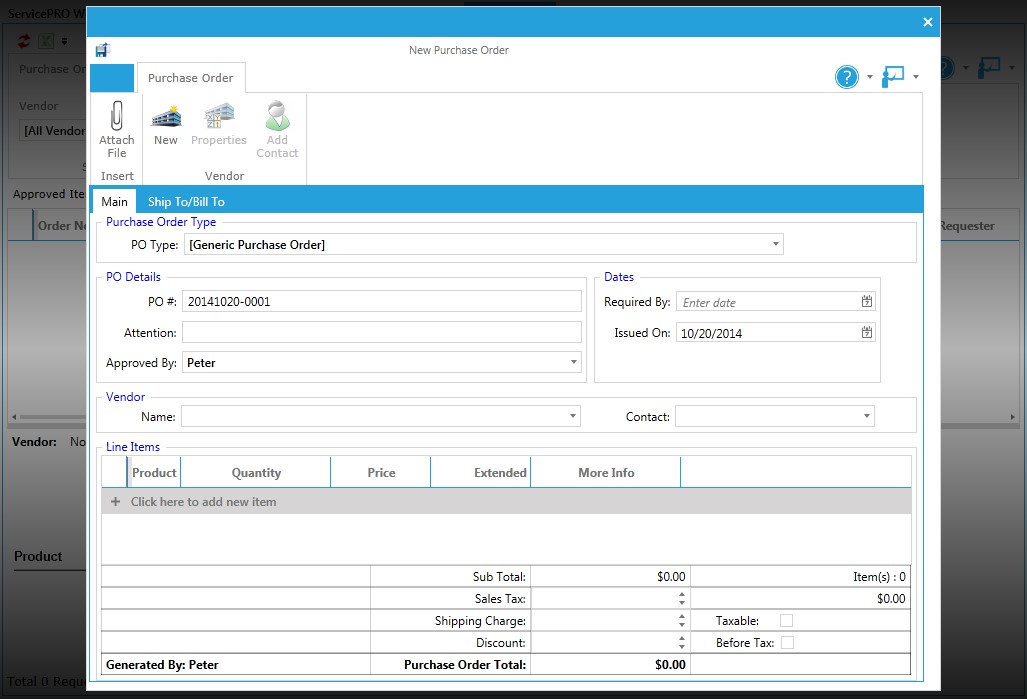 Placing a Purchase Order
 - Modify the following order items as needed:
• To add new items from the same vendor, right-click on the item under the Product column then click New Line Item.
• To edit the price of an item, double-click a line item and edit the amount.
• To change allocation or part number, click on the More Info… cell for the line item.
• If applicable, use the lower half of the window to enter tax, shipping charge, and discount information.
• If applicable, enter billing and shipping information on the Ship To/Bill To page. Shipping addresses are
automatically entered if they have been configured in System Options. - Click on the Save icon in the Toolbar.
Generating Purchase Orders Manually
- From the Purchasing tab, go to the Purchasing Tasks group and click on the Place Order icon.
- Click on the New Purchase Order icon. The New Purchase Order window will appear.
- Purchase order numbers (PO#) are automatically generated in sequence based on the date. If needed, you can change this number.
- By default, your name appears in the Approved by field as the purchase authorizer, but you can select any other privileged user in your company.
- From the Vendor Name drop-down list, select a vendor for the products you want to order.
- To add a product, click the drop-down list in the Product cell of the Line Items panel. Select the products you want to add to the PO. If applicable, you can also add a new product or assign an existing product to the vendor you have selected.
- The default value entered in the Quantity cell is “1.” You can change this number as needed.
- The item’s Price is entered automatically, but can be manually edited if needed.
- By default, the product is allocated to “Inventory.” Click on the More Info … cell for the item to change allocation information before you generate the PO. You can also change allocation after the purchase is received.
- Click on the Save icon in the Toolbar.
Receive
When an order has been received, record its information using the Receive Order feature. The received items become assets in ServicePRO, and by default are allocated to the requester of the initiating purchase request. The “Asset Administrator” Role is required to receive purchase orders.
- From the Purchasing tab, click on the Receive icon. The Receive window opens as shown below.
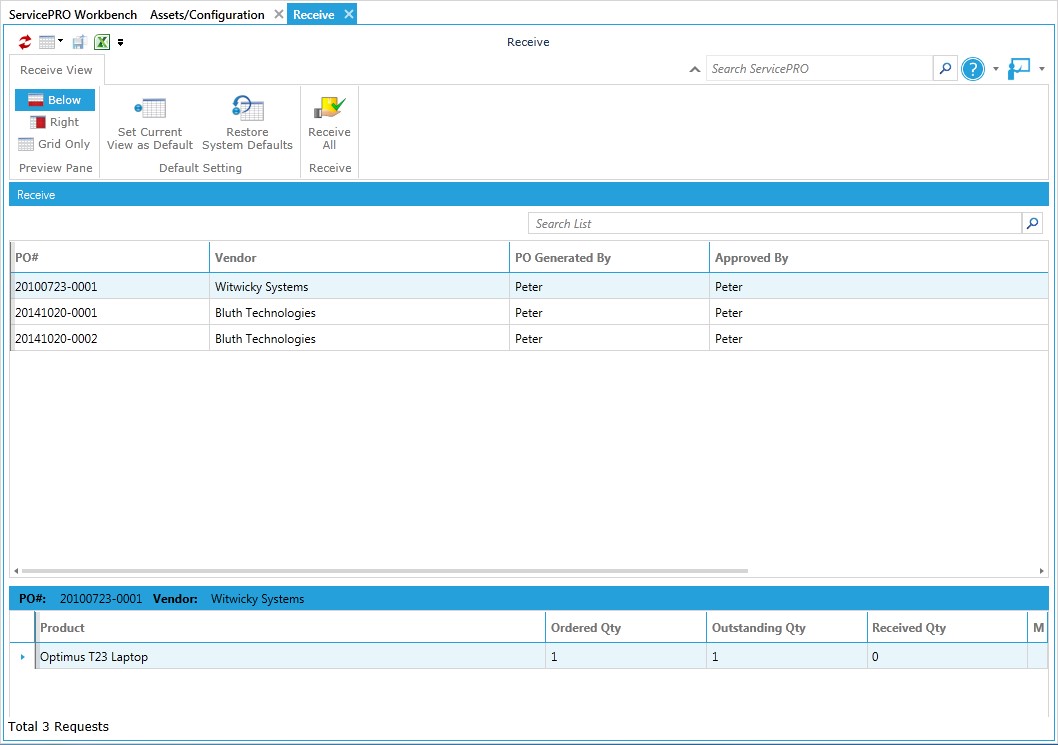 Receiving a Purchase Order
 - All purchase orders waiting to be received are listed in the Receive panel. To receive the items in a purchase order, highlight the item under the PO# column.
- Double-click the Received Qty column to enter the number of items received. Repeat this process for each product you are receiving.
- When all products in the PO have been received, the system closes the PO. A received product becomes an asset allocated to the requester for whom it was ordered.
- After the PO has been received the status of the Purchase Request is set to Closed.
Void Purchase Order
Use this feature to void an open purchase order.
- From the Purchasing tab, click on the Void PO icon. The window shown below appears.
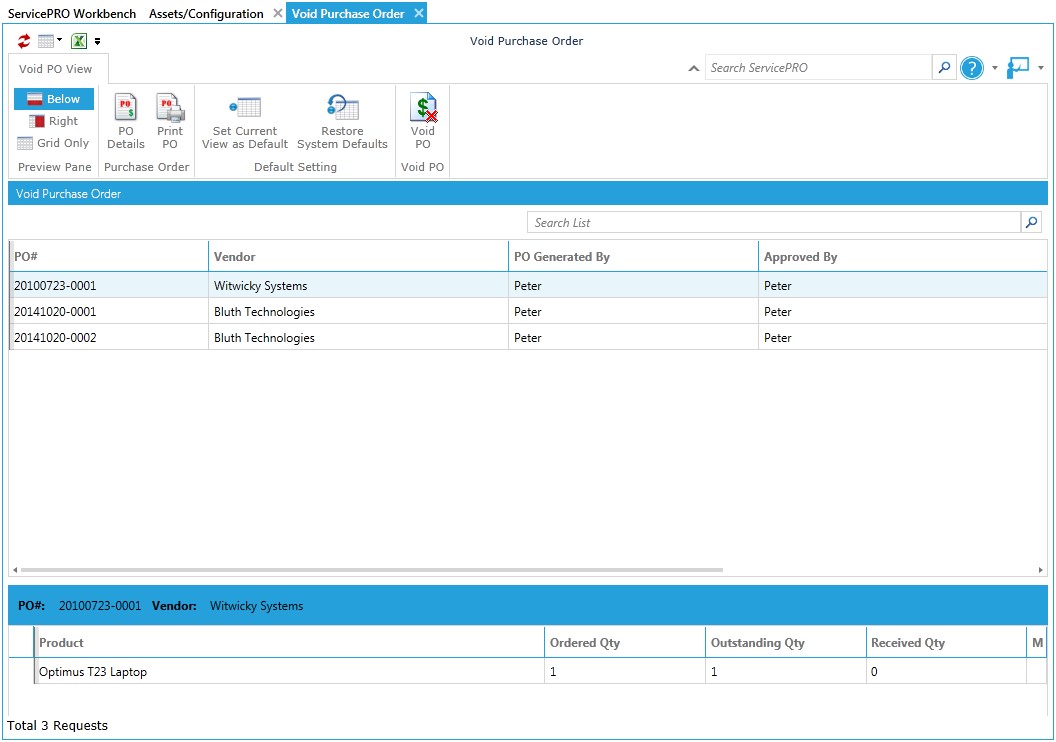 Void Purchase Order Window
 - Open purchase orders are listed in the Void Purchase Order panel.
- In the PO# column, highlight the purchase order you want to void, then click on the Void PO icon in the Void PO View toolbar.
- A confirmation message will appear. Click Yes to confirm that you want to void the selected purchase order.
- To view voided purchase orders, from the Purchasing tab, click the on the PO icon in the View task group.
- You can re-issue a voided PO by highlighting the PO you want to re-issue, and clicking on the Reorder Items button.
- Update the PO and click on the Save icon in the Toolbar.
Purchase Requests
From the Purchasing tab, go to the View task group and click on the Purchase Requests icon to display a menu of purchase requests grouped by the following status:
- In Dispatch – Purchase requests that have yet to be assigned to a queue.
- Awaiting Approval – Purchase requests that have yet to be approved.
- Approved – Purchase requests that have been approved.
- Declined – Purchase requests that have been declined.
- Ordered – Purchase requests that have been ordered.
- Received – Purchase requests that have been received.
Click on any of the menu items to open a window that displays the current list of purchase requests in the related state.
POs (Purchase Orders)
Use this feature to display a menu of purchase orders that are Opened, Closed, or Voided. You can also use the Find menu item to locate purchase orders by entering in relevant search criteria.Opened, Closed, Voided Purchase Orders
These options share a similar interface. The Ribbon Toolbar presents you with the following options:
- Preview Pane - View the Preview Pane one on top of another (Below), side by side (Right), or show the Grid Only.
- Purchase Order
- PO Details – View Purchase Order Properties.
- Print PO – Print the PO selected in the Purchase Order listing.
- Default Settings
- Set Current View as Default – Save the current Search settings as your default.
- Restore System Defaults – Return search setting defaults to the system default.
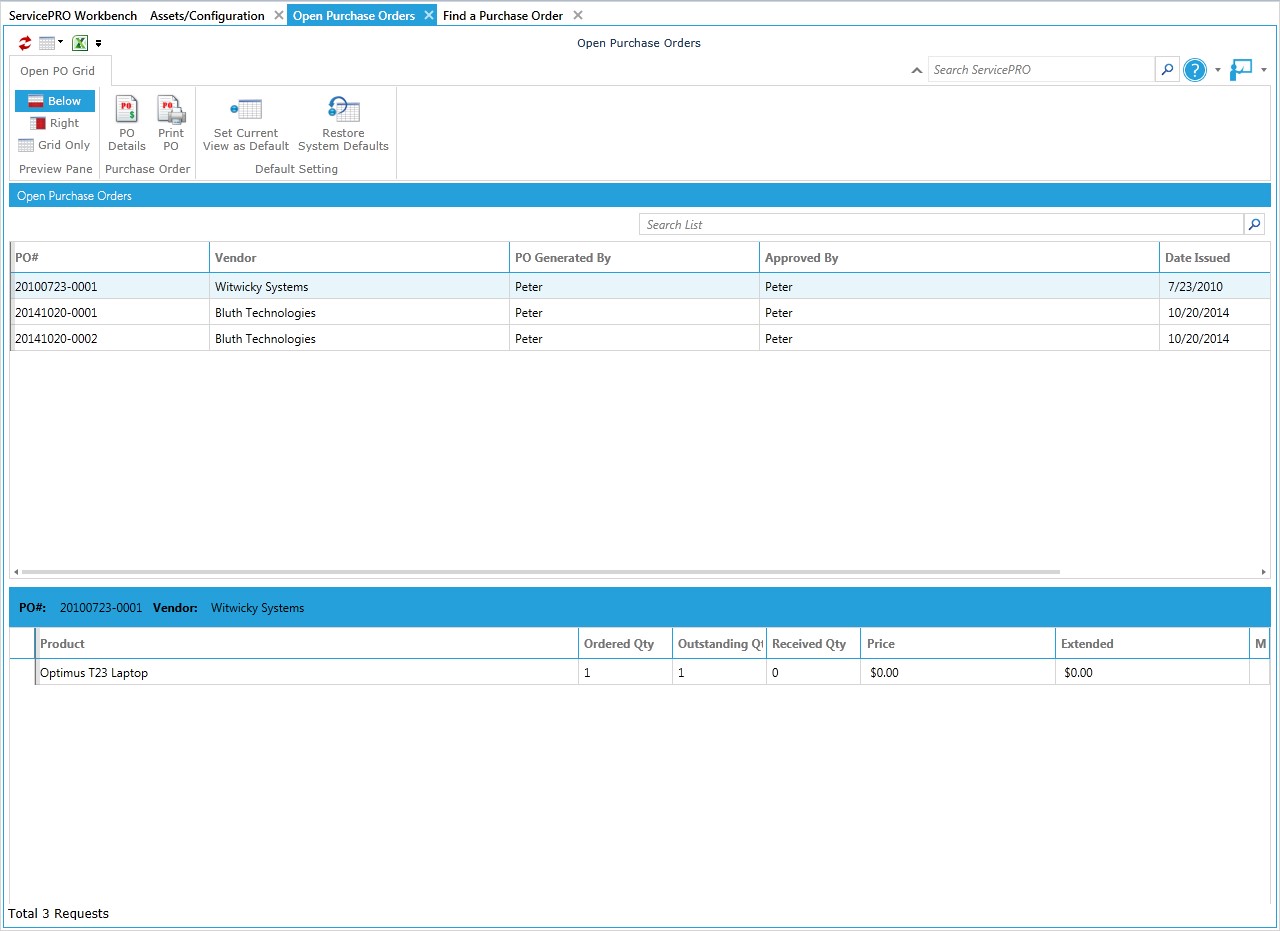 Open Purchase Orders Window
Find Purchase Orders
- From the Purchasing tab, go to the View task group and click on the POs icon in the View task group.
- From the menu provided, select the Find menu item.
- To shorten the list of orders displayed, select a filter parameter option from the Search field, as shown in the figure below. Certain parameters, such as “PO Number,” activate the Match field. Use these qualifiers with the Value field to search for a specific item. For example, you could search for “PO Number Starts with 20130920.”
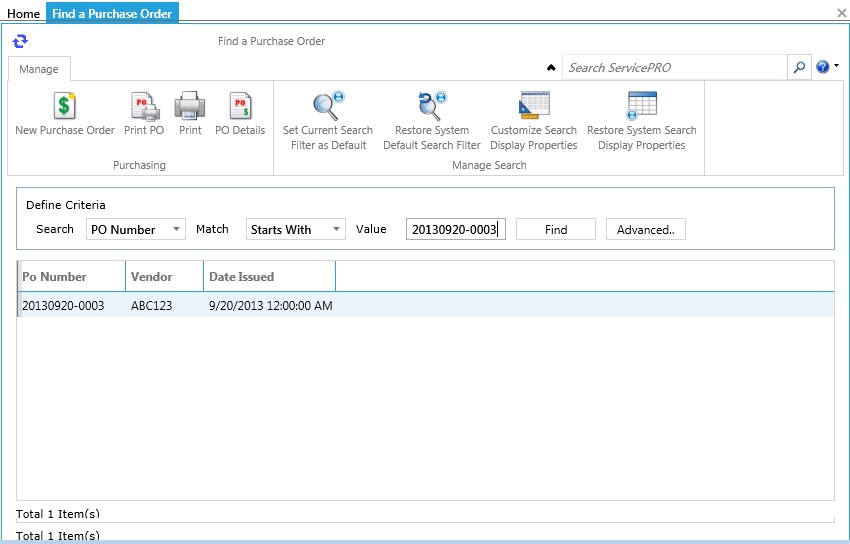 Find Purchase Order Window
The following options are available in the Find a Purchase Order toolbar:
- New Purchase Order: Create a New Purchase Order.
- Print PO: Print the PO selected in the Purchase Order Listing/ Search Result Listing.
- Print: Print the Purchase Order Listing/ Search Result Listing.
- PO Details: Open a Purchase Order in details mode.
Administer Task Group
Clicking on the icons in this task group opens windows that help you perform administrative purchase request tasks such as adding and managing products and vendors, or changing purchase order options.For more details on Products and Vendors, please view respective Learning Series document for each.

Assign Product/Vendor
In this window, drag a product from the right Product pane to the left Vendor pane (or vice-versa) to assign the product or vendor.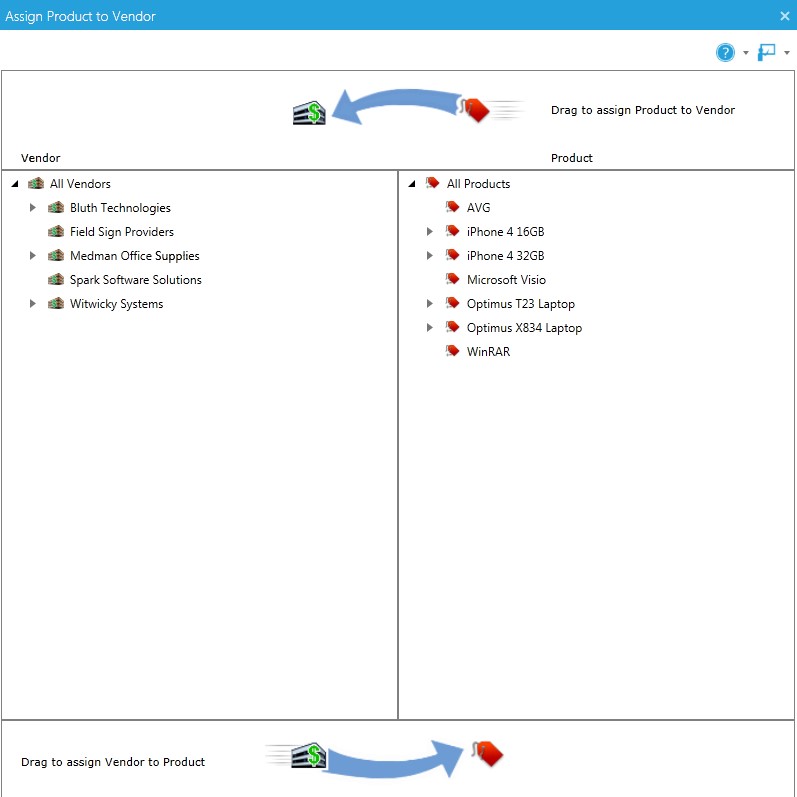

Purchase Order Options
The Purchase Order Options feature helps you enter default values for billing/shipping addresses, mailing instructions, and terms and conditions. When placing a purchase order, similar fields in the New Purchase Order window’s Ship To / Bill To page display the information entered in the Configure Purchase Order Options window. These fields can be edited as required.
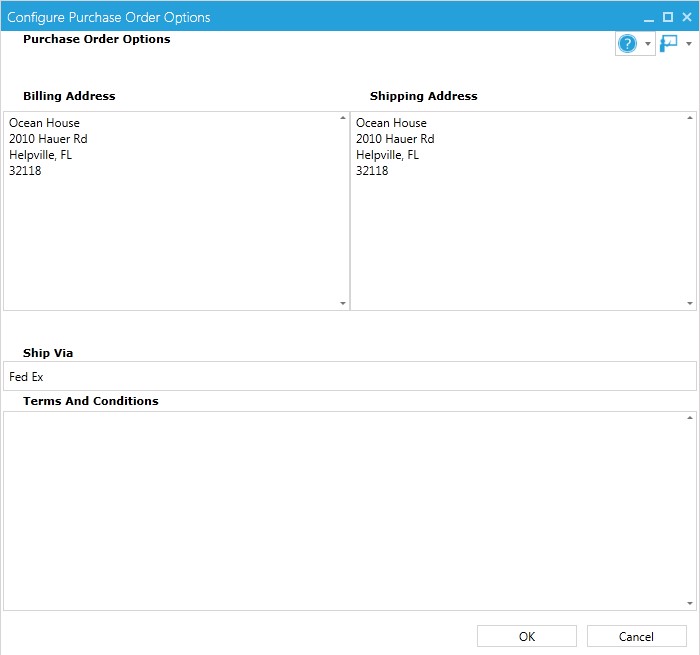
Data Analysis
For more information on Data Analysis, please view this page.Reports
Selecting this option from the Ribbon Toolbar opens the Standard Reports window. This is identical in function to the Reports icon in the Asset Explorer tab.
For additional details on Reports, please view the Learning Series documentation on Reports.
