Chat [OBSOLETE]
Return to Collaboration and Communication
Chat [OBSOLETE]
The Chat option allows you to communicate in real time with other support reps all within the ServicePRO interface. When launched from a service request, the entire chat transcript will be attached to the request and be viewable by any privileged users who looks at the request in the future. Alternatively, you can also initiate a Chat session from the ServicePRO Workbench, which will not be attached to the Service Request, but will still be available in the Messages module in ServicePRO.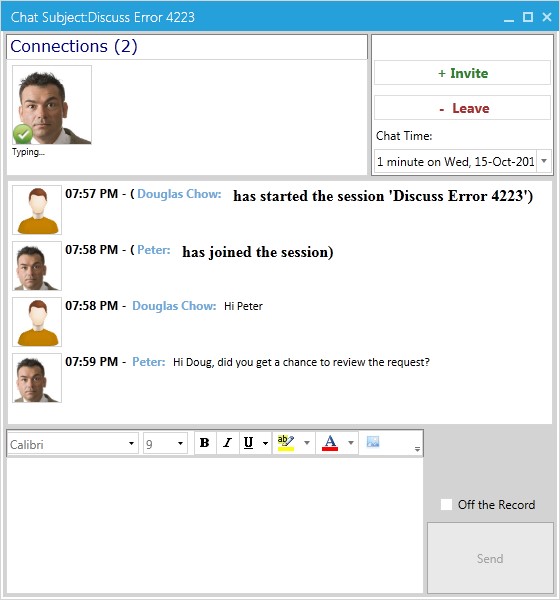
Initiating a Chat from a Service Request
To initiate a chat session, click on the Social button (located on the ribbon of a Service Request or of the Workspace) and click on Chat from the pop-up menu.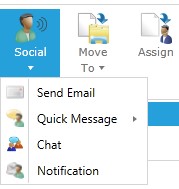
Initiating a Chat from the Workbench
Chat can also be initiated from the ServicePRO Workbench by selecting the Chat icon.
Setting Availability Status
To change your Availability, select the status from the bottom right corner of the Chat tile on the Workbench.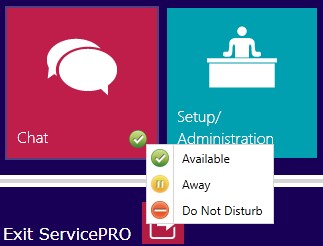
Inviting Attendees
The Invite window appears when initiating a chat session or when the Invite button is clicked within the chat window.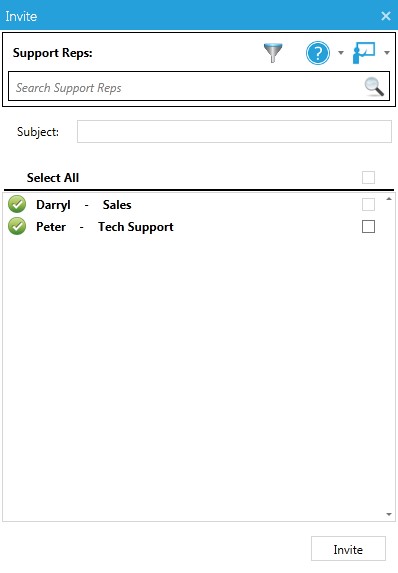
Accepting a Chat Invitation
When you have been invited to a chat session, you will receive a pop-up within the ServicePRO window. Clicking the Accept button will allow you to join the session.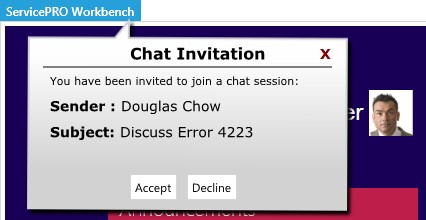
Chat Session
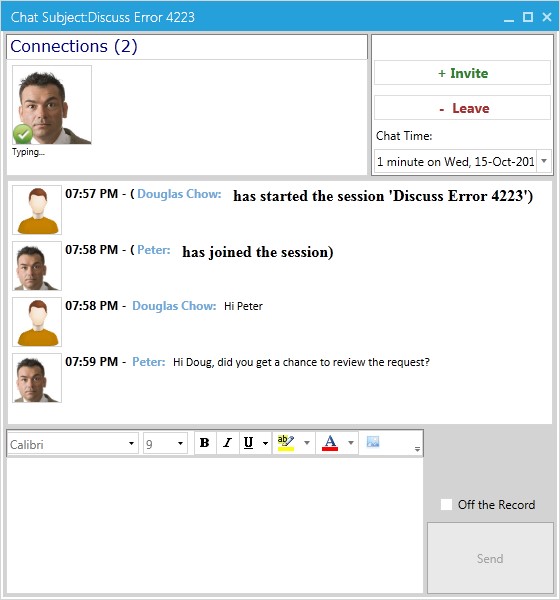
The Chat session window consists of 4 areas:- Connections
- Options
- Dialog Box
- Text Entry
 Chat Session
Connections This area displays the avatars of anyone attending the chat session, along with an icon indicating their availability status. Options
The options pane provides attendees with three options:
- Invite – This will bring up the invite window, allowing you to invite other support reps to the session.
- Leave – This logs the user out of the chat session and closes their chat window. Note if the chat session originator leaves the chat session, the entire session will end for all invited users.
- Chat Time – This fields tracks the amount of time spent within this chat session. This time may be paused or manually entered if needed.
Dialog Box
The Dialog box shows the complete list of everything done within the chat. This includes indications when support reps joined the session, left the session, as well as any messages exchanged.
Text Entry
The Text Entry area allows the support rep to enter in text they wish to be displayed in the Dialog box. If a support rep wants to exchange a dialogue with a specific invitee and does not want that dialogue to be part of the chat transcript or shown to other invitees in the dialog box, they may click the Off the Record check box prior to clicking the Send button. This will add the message to the Dialog Box but it will not be included within the transcript that will be saved to the request.
Note that the User must select another Chat participant when selecting Off the Record. This will notify that user Off the Record is being selected for the conversation. Select the User in the upper left window list.

Ending a Chat Session
To end a chat session, the initiator of the chat session can either close the chat window or click on the Leave button from within the Options pane.
Once the session has ended, the request from which the chat session was initiated will be updated with the length of the session, as well a transcript of the chat session. The transcript is will be available in the Activity Stream.
