Audit by Login Script
Audit By Login Script
Machines that are not in a trusted domain can be audited from a login script. Note that this topic refers to auditing with WMI technology, which will scan for hardware configuration and installed software.
In order to audit machines that are not in a trusted domain, they must be able to connect to the workstation hosting your ServicePRO network installation. The audit script must be configured so that the first part points to the executable file "HdtcAudit.exe" that will audit the workstation, and the second part points to the "Scan" folder where the audited data will be written to an dat file. In the following examples of login scripts, the mapped drive "T" hosts the ServicePRO network installation.
- ServicePRO for SQL: Start T:\HS2008\Hlpstrcs\Scan\ DiscoveryAgent \HdtcAudit.exe /Path:T:\HelpSTAR\ Hlpstrcs\Scan
You must configure the Network Audit Service to scan the audited data in the dat file created by "HdtcAudit.exe". To do this you must edit a value in the file " ServicePRO.Discovery.Service.exe.config", which is located in the "AuditService" directory on the machine where you Installed the Network Audit Service – e.g. C:\HelpSTAR\HLPSTRCS\Modules\AuditService. Open this file in Notepad and locate the following line:
add key="hsFileScan" value="0"/
Change the value to "1" to enable the file scan function. Now the Network Audit Service will scan the XML file once a day for new audited data.
If you want the Network Audit Service to scan the XML file more frequently than once a day, open "AuditService.exe.config" in Notepad and locate the following line:
add key="hsFileScanTimer" value="0"/
By default, the value "0" sets the scanning interval to once a day. You can replace this value with 1, 2, 3, etc. to set the interval to hours – i.e. 1, 2, 3, etc. hours.
Auditing a Standalone Computer
You can also use the HdtcAudit.exe file (described above) to audit a standalone machine. Copy this file to a portable device like a floppy disk or USB drive and insert it in the standalone computer. From this machine, locate the file and double-click on it to start the audit. Then wait a few minutes for the audit to finish (it runs in the background).
When the audit is done it will add an XML file to the same folder where HdtcAudit.exe is located. This file will be named after the audited computer – e.g. machinename.xml. Copy this file to the \Scan folder in your HelpSTAR network installation. The audited data will be imported into HelpSTAR the next time the Network Audit Service runs.
Steps to creating a Group Policy
- Start the Administrative Tool:

- Right click on the SoftwareUnit OU
- From the quick menu choose: Properties
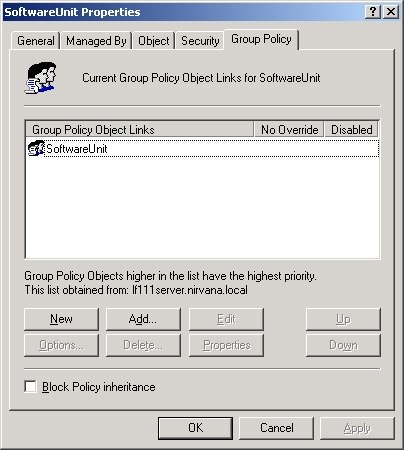
- Select the tab: Group Policy
- Click the New button to create a new Group Policy for the SoftwareUnit OU, name the new Group Policy object SoftwareUnit.
Steps to Editing the Group Policy and adding a Logon Script
- Click on the SoftwareUnit Group Policy to make it selected.
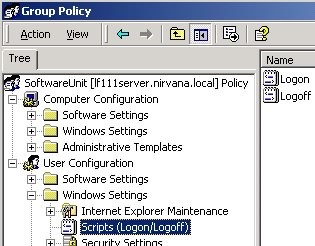
- Click the Edit button to edit it. This will bring up the Group Policy administrative tool, with the new SoftwareUnit group policy ready to be edited.
- Navigate to:
- Right click on the Logon script (on the right side) choose: Properties. This brings up the "Logon Properties" dialog (not shown here).
- Click the "Add..." button. This brings up the "Add a Script" dialog (not shown here).
- Click the Browse button. This brings up the "Browse" dialog (see below):
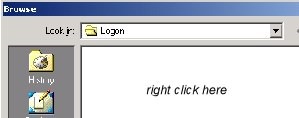
- Right click in the Browse dialog's white area to get the quick menu, choose New | Text Document, name the document script.bat
- Still in the Browse dialog, Right click the script.bat file that you just created and choose Edit from the quick menu.
- Add the following line to the file:
- Save the file and exit back to the Browse dialog.
- Make sure the new script.bat file is selected and click OK, this will take you back to the "Add a Script" dialog.
- In the "Add a Script" dialog, script.bat should be the only file listed, click OK to exit. This will take you back to the "Group Policy" administrative tool. Close this window, which should return you to the "Active Directory Users and Computers" administrative tool.
//User Configuration|Windows Settings|Scripts (Logon/Logoff)//
T:\HelpSTAR\HLPSTRCS\Scan\HdtcAudit.exe
/Path:T:\HelpSTAR\ HLPSTRCS\Scan//
Where T: is the mapped drive to the HelpSTAR network install.