Service Requests Import Utility
Return to Utilities
Overview
This page outlines instructions for using the Service Requests Import Utility. With it, request importing can be performed by importing data from CSV files.
What is the Service Requests Import Utility?
The Service Requests Import Utility is an open source utility developed using the ServicePRO SDK to import Service Requests and memos into the ServicePRO database from a comma-separated values (CSV) file.
Data for tickets can be exported from other Help Desk systems into CSV file, and then added into ServicePRO Database in bulk using this import utility thus allowing a quick and streamlined way to import service request data without needing to recreate each ticket manually from the ServicePRO application.
Prerequisites, Scope and Limitations
- The input data for importing Service Requests must come in CSV format (comma-separated values), with the following criteria:
- Only the very first row should contain Column/Field Names.
- All other rows should contain the data values for the fields.
- One CSV file should be available for Service Requests
- One CSV file should be available for Memos, linked using a Logical Request ID, supplied by both CSV files.
- The following Request Properties are required fields for creating Service Requests and should be present in the CSV file:
- Request Title
- Requester Name
- Priority
- Requester Names in the CSV file need to already be present in ServicePRO before importing data.
- It is possible to have multiple memos imported per ticket.
- The User needs to provide a folder id in which all the requests will be imported to.
- The User needs to select the request type (UDF or Generic) and map it appropriately.
- It is not possible to import the following Base Service Request fields:
- TimeStateChanged – This field is updated automatically whenever the request data is inserted or updated
- Status – Status in ServicePRO may not match with the Status coming from another application
- It is not possible to import the following Custom Fields:
- Reference Fields
- DB Lookup Fields (LookupBox)
- Function Fields
- Masked Entry
- Only the following Custom Fields Data can be imported (no validation will be applied):
- Text
- HyperLink
- Numeric
- Date (In ISO format, e.g. 2015-07-10 09:00:00)
- CheckBox
- DropDown
- RadioButton
The user should also ensure that valid data is entered into fields in the CSV file.
- Requester Name and Memo Author Name are mapped to the table tbluser.name
- The following keys need to be updated with the correct values in the configuration file as a prerequisite:
- ServiceURL (i.e. http://localhost/HelpSTAR.Server/) - This needs to be updated to the Client’s ServicePRO WCF Service URL
- Username and Userpassword - These needs to be updated to a ServicePRO User with Administrative credentials in the client’s ServicePRO Database
Field Mapping with CSV data
CSV files require specific fields to be available in order for them to be properly mapped during the import process, column names also may not contain spaces. The required fields are as follows:
- Required fields mapping: RequestID [Logical Request ID for Mapping to Memos in Memo CSV File, must be numeric], Title, Requester, Priority code
- TimeLogged: this is an optional date-time field. If the user does not map it, then it will use current date time to log a ticket. Otherwise it will use the mapped field.
- UDF fields mapping: Only basic fields (ie. numeric, text, datetime) without validation The Memo CSV file is optional – If you do not import memos, then the imported request will have only one default memo.
The Memo CSV file features the following fields, required for mapping:
- RequestID (A logical Request ID for mapping memos to Requests in the Requests .CSV)
- Author
- Type
- Memotime
- Text Memo
For the Service Requests imported using the Service Requests Import Utility, the Category will be set to [none] by default. As a result, when a user tries to save these imported requests in ServicePRO, the user will be prompted to select a Category for them.
Accessing the ServicePRO Import Utility
The Service Request Import Utility is supplied as an open source code Visual Studio project, as part of the ServicePRO SDK.
Technical Prerequisites
Technical Prerequisites to build and run the Open source Service Requests Import utility are as follows:
- ServicePRO 14.0.72.6 version or Later
- ServicePRO SDK 14.0.72.6 version or Later
- Microsoft Visual Studio 2013
- .NET framework 4.6
Configuring, Building and Running the Utility
- Extract the provided ZIP file containing the ServicePRO SDK into a local directory.
- Using Visual Studio 2013, browse to the extracted files location and open the project file ImportRequests.csproj.
- Correct and/or add the references in the project for the following ServicePRO SDK related DLL files:
• HelpSTAR.PCL.Common.dll
• HelpSTAR.PCL.ObjectDesigner.dll
• HelpSTAR.Transport.Hybrid.dll
• ICSharpCode.SharpZipLib.dll
• ServicePRO.Sdk.Windows.dll
- In the App.Config file (in the case of the Compiled Utility – ImportRequests.exe.config file), the values for the following keys need to be updated with appropriate values:
- ServiceURL Key – Update with your ServicePRO service url. This URL can be found in the web.config of your ServicePRO installation, typically found under:
C:\HelpSTAR\HSSITES\HSSupportNET\web\
- Username & Userpassword keys – Update with the user login name and password for an Administrative user in ServicePRO. The utility will use these credentials to login as that user:
<add key="serviceURL" value="http://localhost/HelpSTAR.Server/"/>
<add key="Username" value="adminUser"/>
<add key="Userpassword" value="helpstar"/>
- After correct url and login information has been provided, build and run the utility.
User Interface Overview
This section will outline the User Interface for the Import Utility.
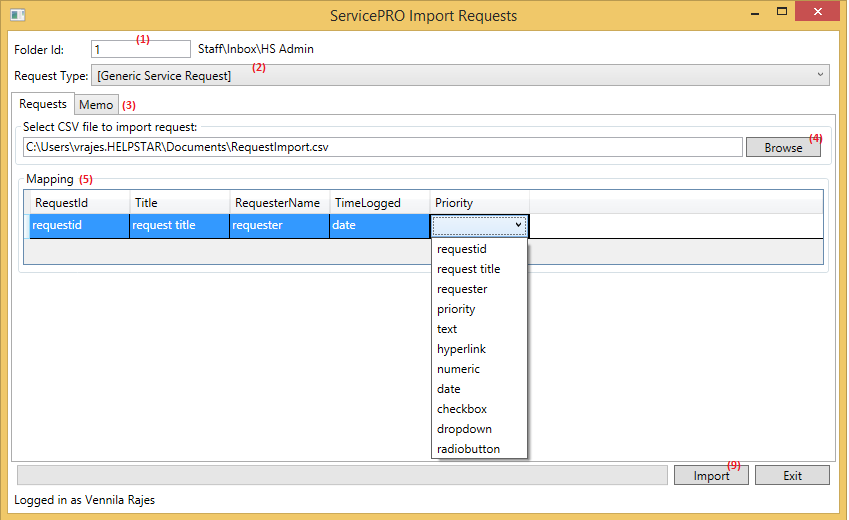
With the Requests Tab selected:
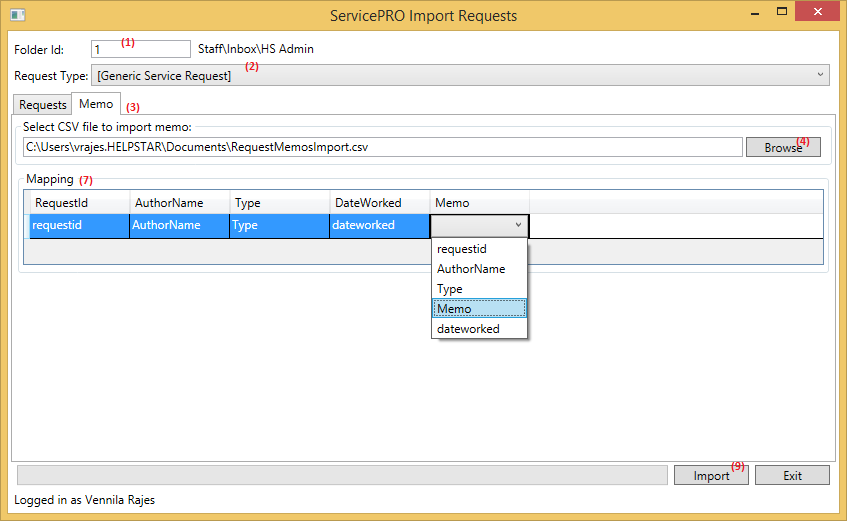
With the Memo Tab selected:
The following are the main parts of the open source Service Requests Import utility User Interface (Please reference the above images):
- Folder Id input – This is the ID of the Queue folder to where the request will be moved to after creation. To find the id run the following sql statement on your ServicePRO HS2000CS database:
select * from tblqueue where QueueType in (2,8)
- Service request type selection – This will depend on your ServicePRO database. Selecting a custom request type will also alow you to map values to custom fields on the request.
- Requests and Memo CSV import selection – You may import request data only OR request PLUS memo data, although memo data is not mandatory. If a Memo CSV is not selected, a default memo will be entered for newly created requests.
- Browse – Browse and select a comma separated values (CSV) file that contains the data to import here. Please note that the data file needs to include a header row containing Column/Field names to facilitate field mapping in Step 5 (Request field mapping) and Step 6 (Memo field mapping).
- Mapping (Requests) – Once a valid CSV file is selected for Requests, the field headers in Mapping Grid should be mapped to the corresponding columns in the CSV file.
Details on field mapping are provided in the Section ‘Fields Mappings for CSV file Data’ - Mapping (Memo) [Optional] – Once a valid CSV file is selected for Memos, the field headers in Mapping Grid should be mapped to the corresponding columns in the CSV file.
Details on field mapping are provided in the Section ‘Fields Mappings for CSV file Data’. - Import – Import the data and create new requests. If you have not specified a memo CSV, the utility will prompt if you want to import with the default memo. Click Yes to continue.
After the import is completed, a success prompt will be displayed.