Active Directory Synchronization
- 1. Overview
- 2. Import Settings Tab
- 3. Authentication Tab
- 4. Field Mapping Tab
- 5. Schedule/Import Now Tab
- 6. Saving Settings and Running the Import
- 7. Public Cloud Clients
- 8. Enter Active Directory Path Manually
- 9. Microsoft Entra ID Settings tab for Authentication
- 10. Login Screens ServicePRO Vs. ServicePRO Web
- 11. Appendix
- 12. Tips and Best Practices
Overview
ServicePRO Active Directory Synchronization and Import Utility allow you to quickly import users from a list, or directly from Active Directory.
ServicePRO can be configured to import users and their attributes from Active Directory. You can also schedule the update of user information from Active Directory on a regular basis.
Always take the following precautions when importing data:
- If you already have existing users in ServicePRO it is optimal if their user names are identical to the user names being imported from ADS, otherwise they could be created as new users, thus creating duplication.
- If there are discrepancies between existing ADS and ServicePRO user names, you can remove the user name mapping and use the email addresses as a key field mapping.
You must also select a default ServicePRO Organizational Unit for new users. New users will be placed in the default Organizational Unit unless their AD OU has been mapped to a specific ServicePRO OU with 'Select OU'.
- On the Configuration tab, click on the Active Directory Sync option to configure import parameters.
- Each tabbed window is discussed below.
Limitation: When MFA is enabled in Microsoft Entra ID [Previously called, Azure Active Directory] for the ServicePRO user, then
- The user cannot login to ServicePRO or ServicePRO Web application using the Domain authentication.
- The user can login using ServicePRO Authentication, from both ServicePRO & ServicePRO Web.
- The user can login using AD Pass through Authentication from ServicePRO Web.
- If ServicePRO is hosted on-premise, the user can login using AD Pass through Authentication from ServicePRO, through both Desktop Client and in-browser [MS Edge in IE Mode]
- If ServicePRO is hosted on cloud, the user can login using AD Pass through Authentication from ServicePRO, only through Desktop Client.
Import Settings Tab
- In the Domain Type work area, click on the radio button that defines the domain from which you want to import users (Trusted Domains or Forest). You can select a single Active Directory domain or multiple domains.
Import Settings - From the Import Users from the following Active Directory Groups/Units work area, select the source of the users you want to import. The default value is "All Users In Your Current Domain." To change this setting, click Edit. You may choose users to import based upon their Organization Unit or group.
- Click the cells in the Select Organizational Unit and/or Select Team columns to specify the ServicePRO Organizational Units and/or Teams with which the users will be associated, as shown below.
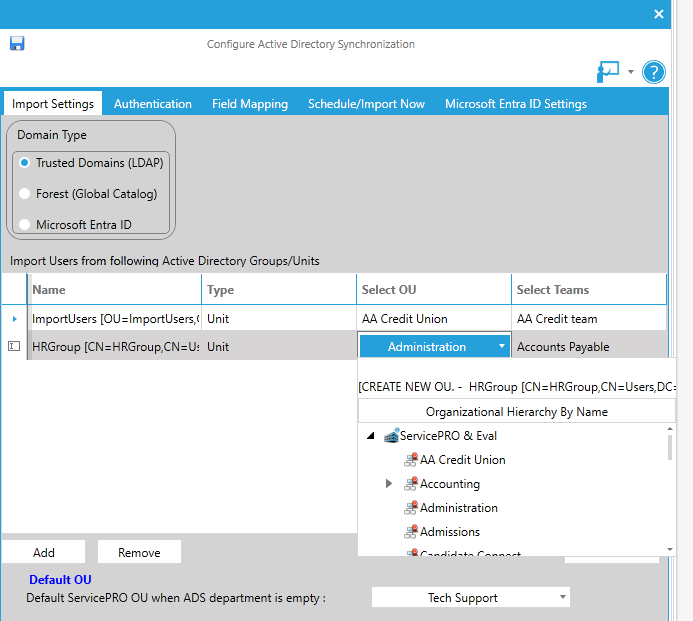 Selecting Organizational Units
Microsoft Entra ID Domain Type - Applicable only to ServicePRO Cloud Clients
If you are a ServicePRO Cloud Client (hosted on Azure), and if you would like to import users from your Microsoft Entra ID and if your ServicePRO is hosted on Azure PaaS, please choose the “Microsoft Entra ID” Domain Type option under “Import Settings” tab.- When the Microsoft Entra ID Option is selected for Domain Type in the Import Settings tab, it will display the “Microsoft Entra ID Settings” section, inorder to input the Client ID, Tenant ID and Client Secret values for connecting to Microsoft Entra ID.
- To fill the Client ID, Tenant ID and Client Secret fields under “Microsoft Entra ID Settings” section under “Import Settings” tab, the user should use the App registration settings of ‘Starwatch Outlook’ or ‘Startwatch Azure AD’ App that was configured in their Microsoft Entra ID (from https://portal.azure.com ), as part of the pre-requisites setup, as outlined in the Setup Guide Document ServicePRO-AzureADSync-WebJob-Setup-Guide.pdf, that will be provided to you by ServicePRO Technical Support, when you migrate from your ServicePRO from On-Premise to Azure Cloud.
Microsoft Entra ID- Import Settings
After the values are entered, clicking on ‘Verify’ button displays the below pop up on successful verification.
If the verification is not successful because of the permissions, the below validation message appears, it informs that the app registrations in Microsoft Entra ID either does not have the following permissions set or does not have the admin consent granted: Domain.Read.All, Group. Read.All, User.Read.All. If you receive this message, please make sure to go back to your Azure Portal and select the App Registration and take care of granting the necessary permissions / admin consent as needed.
Authentication Tab
Authentication for ServicePRO and ServicePRO Web is changed under Authentication tab.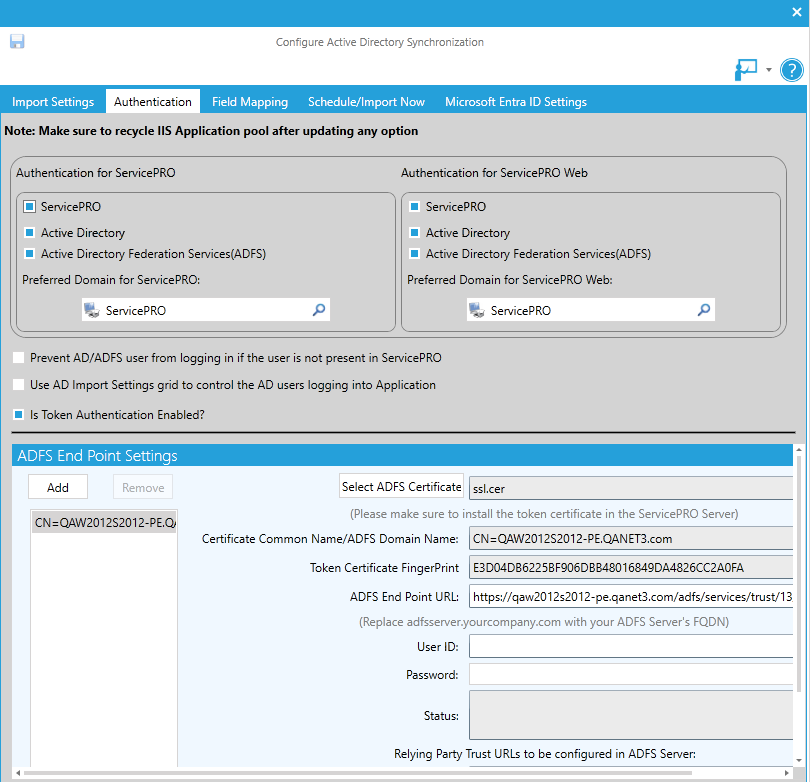
ADFS Authentication now can be configured to use in ServicePRO. Active Directory Federation Service (ADFS) is a software component provided by Microsoft that allows for login using active directory credentials.
From Microsoft’s Developer Network page on AD FS:
ADFS is a standards-based service that allows the secure sharing of identity information between trusted business partners (known as a federation) across an extranet. When a user needs to access a Web application from one of its federation partners, the user's own organization is responsible for authenticating the user and providing identity information in the form of "claims" to the partner that hosts the Web application. The hosting partner uses its trust policy to map the incoming claims to claims that are understood by its Web application, which uses the claims to make authorization decisions.
Authentication Check boxes
There are three options available to enable either ServicePRO, Active Directory of Active Directory Federation Services (ADFS)' for authentication in ServicePRO and ServicePRO Web.
Preferred domain list selection for ServicePRO and ServicePRO Web
Option allows to choose Preferred domain list for ServicePRO and ServicePRO Web.
- ServicePRO:
Domain Name caching. - If there is cached domain from previous application run, that will be set as default domain.
- If there is no cached domain, then it will use the “Preferred domain for ServicePRO” set in the Active Directory Configuration as the default domain.
- ServicePRO Web:
Domain Name caching. - If there is cached domain from previous application run, that will be set as default domain.
- If there is no cached domain, then it will use the “Preferred Domain for ServicePRO Web” set in the Active Directory Configuration as the default domain.
Check-boxes that control user creation during login authentication
There are two options to control user creation during login Authentication.
1. Prevent AD/ADFS user from logging in if the user is not present in ServicePRO
Option 1 will prevent AD Users from logging in if the user is not present in ServicePRO’s database, and will prevent users from being created automatically at login. This option will be disabled by default, and must be manually enabled by the system administrator if they opt for this behavior.
- When user not present while authenticating using ADFS
If the checkbox option labelled ‘Prevent AD/ADFS user from logging in if the user is not present in ServicePRO' is not checked, new users will be generated if the authenticated user is not already present in ServicePRO. The following steps outline user creation: - Settings configured in AD Field Mapping settings will be applied.
NOTE: The administrator needs to set up claims in the ADFS Server for all the Active Directory fields that are mapped in the Active Directory Field Mapping Settings. Please refer to Appendix sections 8.2 and 8.3.
- If not all claims are set as per AD Field mapping settings, the user will be created with the minimal data available based on the claims present. Details on minimum requirements for claims for authentication have been provided in Appendix Section 8.3.
As ADFS claims cannot be set for the ADS department, the generated user will always be assigned to the ‘Default Department’ set in the ‘Import Settings’ tab.
2. Use AD Import Settings grid to control the AD users logging into Application
Option 2 will use AD Import Settings set up in the Active Directory Groups/Units grid, at the bottom of the Import Settings tab to control the AD users logging into the application.
- If the user already exists in ServicePRO, then authentication will occur.
- If the user does not exist in ServicePRO, and if the user is successfully authenticated by AD, the following will occur:
- If the user does not belong to any of the Domains, Organizational Units or Groups selected in the AD Import configuration settings, then the user will not be created in ServicePRO; this user will not be allowed to login to the application.
- If the user belongs to any of the Domains, Organizational Units or Groups selected in the AD Import configuration settings, then the user will be created in ServicePRO and hence the user will be allowed to login to the application.
ADFS Endpoint Settings
- When the client chooses Active Directory Federation Services (ADFS) from the Authentication settings, they will need to set up ADFS Endpoints with names for each of the Endpoints. These Endpoints will provide access to the federation server functionality of Active Directory Federation Services, such as token issuance, and the publishing of federation metadata.
- For more details on ADFS Endpoints, please consult the Microsoft Server documentation on this subject.
https://technet.microsoft.com/en-us/library/adfs2-help-endpoints(v=ws.10).aspx
- If the administrator has selected ‘ADFS’, but has not added at least one ADFS Endpoint setting, then the user will not be allowed to save authentication settings. ServicePRO facilitates the client to set up multiple ADFS Endpoints.
- Saving ADFS Endpoints is disallowed until each of the Endpoints are validated successfully.
- During login, if ADFS authentication is enabled, the name of these configured Endpoints will be listed in the login dialog. Based on the selected Endpoint/domain name, authentication will be performed using the specific Endpoint.
ADFS Endpoint Settings – Adding & Validation
This section outlines the setting up of the ADFS Endpoints in detail.
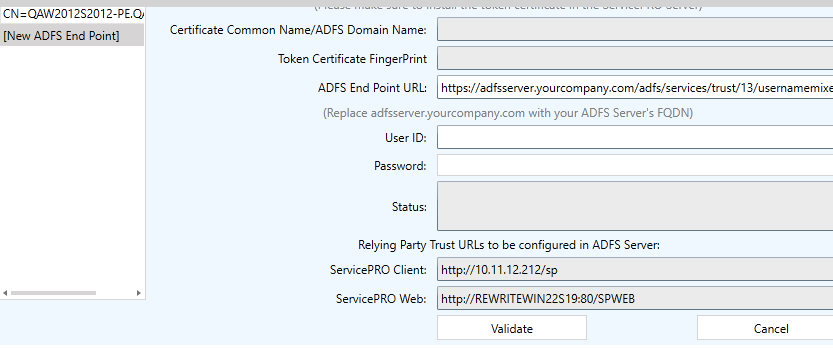
When a new ADFS Endpoint is added, the left panel will contain a placeholder item with the label, ‘New ADFS Endpoint’. This placeholder name will be updated and replaced with the contents of the ‘Certificate Common Name/ADFS Domain Name’ field when a certificate is selected, and Endpoint Settings have been validated.

The following field data should be entered by the user:
- Select ADFS Certificate – When this option is selected, the user will be prompted with a file selection dialog to select the ADFS token certificate. When the certificate file is chosen by the user, the application parses the certificate file to retrieve the following information:
- Certificate Common Name (Issuer Name)/ADFS domain name
- Token Certificate Fingerprint
The 2 display fields in ADFS Endpoint settings will be populated with information retrieved from the certificate.
- ADFS Endpoint URL – Field to enter the ADFS Endpoint URL that will be used for user authentication. This field will be populated with a URL with masked information (one shown below). The user will need to change the highlighted part of this URL to specify their company’s ADFS server name with domain name (FQDN – Fully Qualified Domain Name); once resolved correctly, it will be reachable from the application:
https://adfsServer.yourcompany.com/adfs/services/trust/13/UsernameMixed
- User ID, Password – The administrator setting up ADFS Endpoint settings should enter a valid AD user and password in these fields. This is to validate the ADFS Endpoint settings being configured.
For more details, please refer to the ADFS Server setup guide for the settings required in AD FS server for the relying party trust.
- “Relying Party Trust URLs to be configured in the ADFS Server” Display Only field – Users will be able to copy the URLs from these fields to use in setting up relying party trust in the ADFS server.
- ServicePRO Service URL – Displays the ServicePRO Service URL
- ServicePRO Web URL – Displays the ServicePRO Web URL
After filling in the fields listed above, the user should click on ‘Validate’ button in order to validate the settings before saving. The following actions will be performed when the user clicks on the ‘Validate’ button at the end of the ‘ADFS Endpoint Settings’ section:
- Validate and ensure that fields in this section are not empty.
- Make the required call to ADFS by passing the following parameters: Endpoint URL, Token Certificate Finger Print, User ID and Password.
If validation fails:
- It may potentially be due to one of the exceptions listed in Appendix Section 8.1. Section 8.1 provides details on the possible exceptions as well as how to resolve them. When validation fails, details of the failure will be listed in the ‘Status’ box.
If validation is successful:
- The current ADFS Endpoint will be marked as ‘Validated’. This information will not be saved until the user clicks on the ‘Save’ menu option.

Cancel
The ‘Cancel’ button in Add/Edit of ADFS Endpoint settings will be visible only when there are multiple ADFS Endpoint settings. When there is only one Endpoint setting, the ‘Cancel’ button will not be visible, and only ‘Validate’ will be present.
Remove
The ‘Remove’ Endpoint button will be available only under certain circumstances:
- If ADFS authentication is checked off for either SP or ServicePRO Web:
- The Remove option will be disabled when there is only one Endpoint exists.
- The Remove option will be enabled if there are multiple Endpoints.

- When either of the ADFS authentication options is unchecked, the user will be asked if they would like to remove the configured ADFS Endpoint Settings. The following actions will result:
- If the user says YES to remove ADFS Endpoint settings:
- ADFS Endpoint items and settings will be removed. Users will be required to create new Endpoint entries and search for an appropriate ADFS certificate.
- If the user says NO to the removal of ADFS Endpoint settings:
- The Remove option will be enabled, regardless of one or more existing Endpoints.
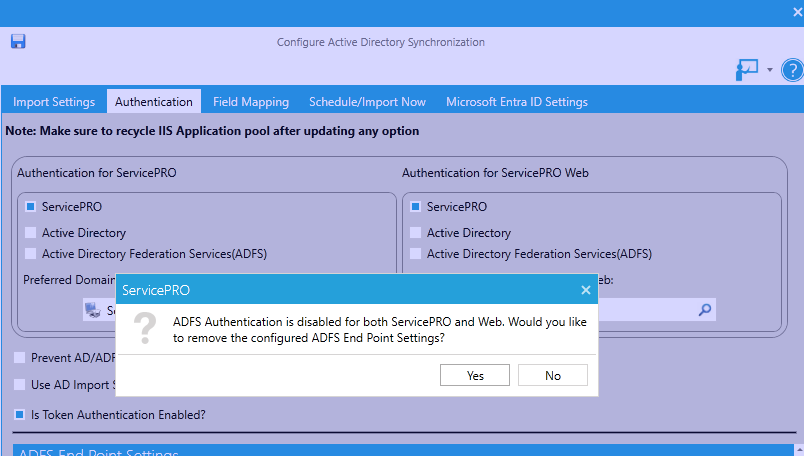
If the User has saved settings with ADFS authentication unchecked for both ServicePRO and ServicePRO Web, and if they have retained the Endpoint settings that were configured previously:
When the user launches the AD Sync Settings window:
- ADFS Endpoint settings will not be visible in the UI, though they are still in the Database (because both the ADFS authentication options are unchecked)
- If the user now enables ADFS authentication for ServicePRO or ServicePRO Web, the UI will show the previously configured ADFS Endpoint settings.
Field Mapping Tab
By default, only user names are imported.
- To import additional user data such as Telephone Number, Email Address, and Office highlight a field name in the Active Directory Field column then click on the Add button as shown below.
- In the 'Field Mapping' view, if the application cannot connect to "AD", such as when the Web server is not connected to the AD domain (public cloud as well as on-premise but application cannot access AD), ServicePRO will display the predefined list of Active Directory fields in the drop down for selecting Active Directory fields.
- In the ‘Field Mapping’ pop-up, drop-down fields will fetch all relevant ServicePRO fields, irrespective of whether the application can connect to AD or not.
- In the ‘Field Mapping’ pop-up view, in the Active Directory drop-down field, the existing behavior will continue to work if the application can connect to AD. If the application cannot connect to AD, it will show the pre-defined list of Active Directory fields in the drop-down for setting up the mapping.
- To select a key field or primary key in which ServicePRO should import user data, click on the checkbox in the Use as Unique Identifier? column next to the desired field. ServicePRO uses the unique identifier to prevent creating duplicate users and to import data in relation to this key (such as name).
NOTE: If Custom field is selected as the unique identifier, please make sure the field is indexed to improve performance.
- Select a default ServicePRO Organizational Unit for new users from the Default Organizational Unit. New users will be associated with the default Organizational Unit unless a destination ServicePRO Organizational Unit has been chosen for their AD OU.
Schedule/Import Now Tab
- To run an Active Directory import immediately, click the Import Now button.
- Select Enable in the Import Schedule settings if the Active Directory import should run automatically at the specified scheduled times.
- Specify if the import should daily or weekly.
- Enter the import frequency.
- When an Active Directory Import runs, a log file may be created to list new users and updated users as well as any errors by click on the corresponding checkbox.
- To clear the Active Directory log file of older entries, enter a value in the Clear log every field.
Saving Settings and Running the Import
Click OK when you have finished configuring the import parameters.At the scheduled time, ServicePRO will scan the Active Directory and import new and updated user information. Imported users are added as end users with their ServicePRO logins enabled. If the users’ email addresses are included in the import, email will also be enabled.
Public Cloud Clients
AD Configuration functionality is available for ServicePRO Public Cloud clients.
Public Cloud Clients will be able to access the following AD Configuration functions:
- Users will only be able to select “ServicePRO Only” for ServicePRO and ServicePRO Web Authentication.
- “ServicePRO and AD” and “AD Only” settings will not be selectable.
- Import Settings Tab – Selecting 'Add' opens the “Active Directory Organizational Units/Containers/Groups to Import” view. Here, users will be allowed to add active directory groups or units to Import, but the only option available will be to 'Enter Active Directory Path manually'.
- To add items to import, Administrators will need to manually enter in the “AD OU/Container/Group path” field
- Field Mapping Tab – “Add” operations are not available from this UI; new field mappings will need to be set up directly from the database by running SQL Scripts
- Schedule/Import Now Tab – “Import Now” options will be disabled, as the ServicePRO Application hosted in Public Cloud cannot access Active Directories for performing user synchronization.
Enter Active Directory Path Manually
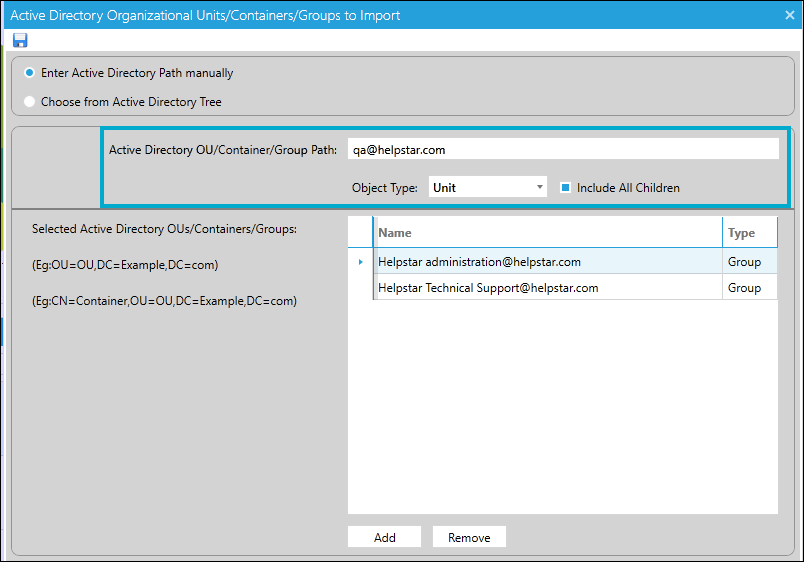
When trying to add Active Directory (AD) Units/Containers/Groups to import, the ‘Enter Active Directory Path manually’ option will be loaded by default, while listing all the node paths that were previously selected.
This will allow the administrator user to enter the AD Unit/Container/Group path manually, while choosing an object type and including all appropriate children flags. A sample valid path will be provided in the dialog itself.
When the client’s environment has a large AD domain structure with great number of OUs and Distribution Groups, this will allow them to easily enter the required configuration. If the administrator user wishes to perform the selection through the AD tree, the user can switch to the option ‘Choose from Active Directory tree’.
Note:-The screenshot below shows the AD path entered manually when the domain type selected is 'Microsoft Entra ID'.
The first two entries in the screenshot displayed under 'Selected Active Directory OUs/Containers/Groups' are migrated from On-Premise AD and there is no email address for the same in Entra ID. In this case we have to choose the object type as "Group" and enter the group name suffixing '@domain.com' .
Example:-'Helpstar Administration@helpstar.com'
'Helpstar Technical Support@helpstar.com'
When the group named QA is created in Microsoft Entra ID with the email address 'qa@helpstar.com' then enter the email address for that group and add the same by selecting the object type as 'Unit'.
Microsoft Entra ID Settings tab for Authentication
To configure Microsoft Entra ID Authentication for ServicePRO -1. Complete the pre-requisite setup as per the instructions detailed in the following document - Azure AD Authentication Setup for ServicePRO.pdf (supplied by HDT support team)
2. In the Configure Active Directory Synchronization screen, navigate to the “Microsoft Entra ID Settings” tab.
- Enable the ‘Microsoft Entra ID Enabled?’ checkbox, for enabling Microsoft Entra ID authentication for ServicePRO and ServicePRO Web.
- Enter the value for all the remaining fields based on the ServicePRO app registration and ServicePRO web app registration setup done in your Microsoft Entra ID by following through the instructions given in the Setup guide document that was supplied by HDT support team (Azure AD Authentication Setup for ServicePRO.pdf)
Login Screens ServicePRO Vs. ServicePRO Web
ServicePRO ‘Login’ Screen
- If ‘Active Directory’ authentication has been enabled for ServicePRO, domain name(s) will be listed after 'ServicePRO' in the drop-down list.
- Users will be logged in automatically through Active Directory Pass-through without prompting to enter credentials.
- if ‘Active Directory Federation Services (ADFS)’ authentication has been enabled for ServicePRO, the configured ADFS Endpoint(s) or domain name(s) will be listed first in the drop-down list.
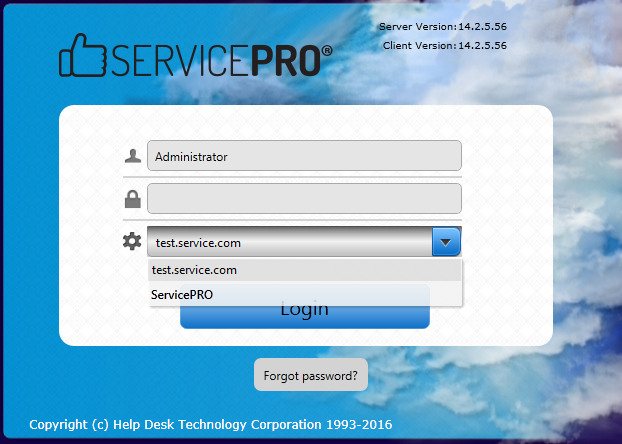
- When ADFS Endpoint is selected from the domains drop down:
- The User Name can be entered in one of the following ways:
- Email Address
- Domain\AD User Name [i.e. Domain\SAM Account Name]
- AD User Name [i.e. SAM Account Name]
- AD Passwords should be entered in the password field.
- User-entered credentials will be authenticated using the selected ADFS Endpoint/ Domain. When the user does not belong to the Primary domain, but belongs to the Trusted domain, then the user name must be entered either using email address and Domain\AD User Name.
- If the authentication fails, the reason for failure will be logged in a log file and the user will be shown a generic login failed message stating that the ‘User Name or Password is incorrect’ (Similar to OneLogin Single Sign-On).
- If the authenticated ADFS user is already present in ServicePRO, the user will be logged in immediately.
ServicePRO Web ‘Login’ Screen
- If ‘Active Directory’ authentication has been enabled for ServicePRO, domain name(s) will be listed after 'ServicePRO' in the drop-down list.
- To enable Active Directory Pass-through Authentication in ServicePRO Web, please refer to Active Directory Documentation.
- If ‘Active Directory Federation Services (ADFS)’ authentication has been enabled for ServicePRO Web, Configured ADFS Endpoint(s) / domain name(s) will be listed first in the drop-down.
Image title - When the ADFS Endpoint is selected in the domain drop down:
- User Names can be entered in one of the following ways:
- Via Email Address
- Domain\AD User Name (i.e. Domain\SAM Account Name)
- AD User Name (i.e. SAM Account Name)
- AD Password should be entered into the password field.
- User entered credentials will be authenticated using the selected ADFS Endpoint/Domain. When the user belongs to the Trusted domain, and does not belong to the Primary domain, the user name must be entered either using option A or B.
- If the authentication fails, the reason for failure will be logged in a log file, and the user will be shown a generic login failed message stating that ‘User Name or Password is incorrect’.
- If the user is already present in ServicePRO, the user will be logged in immediately.
Appendix
Table of Possible ADFS Authentication Exceptions
| SI.NO. | Exception Details | Possible reason for Exception | Solution |
|---|---|---|---|
| 1. | ServerTooBusyException | Turned off the server / ADFS was not running | Log in to the ADFS server and check the relying party URL’s are able to “update from federation metadata”. |
| 2. | System.ServiceModel.FaultException | When the Relay Party is disabled / when relay party is missing in the ADFS. | Test MetaData URLs. |
| 3. | TimeOutException | Increase the Factory Timeout interval of OpenTimeout property if this happens. Default is one minute. (Used when opening channels when no explicit timeout value is specified) | |
| 4. | SecurityTokenException | When the thumbprint has Unicode characters or certificate is not in the certificate store. | 1. Please check if the clock set correctly (i.e. so that the UTC time is correct [ignore local time, it is largely irrelevant]) - this certainly matters for WCF. 2. Is the certificate still valid? 3. Are you using the correct name from the certificate? 4. Is there a certificate trust chain issue? |
| 5. | SecurityNegogationException | When there is some issue with the certificate | Check the certificate is installed in the trusted root store and also check if there is a certificate in the ADFS configuration window (AD FS -> Service -> Certificates) ensure you have a valid certificate that is used for singing the token. |
| 6. | The request scope is not valid or is unsupported. | Relying Party URLs are not configured in ADFS | Check the certificate is installed in the trusted root store and Relying Party Trust URLs are configured in ADFS Server |
Pre-defined list of Active Directory fields
The following is a list of pre-defined Active Directory fields that will be shown in drop-down when the application cannot connect to AD. Only the first 6 fields have matching ADFS claims:Fields with Matching ADFS Claims
| Field | Matching ADFS Claim |
|---|---|
| emailaddress | |
| Name | name |
| givenName | givenName |
| telephoneNumber | homephone |
| pager | otherphone |
| mobile | mobilephone |
| Field |
|---|
| FacsimiletelephoneNumber |
| samAccountName |
| displayName |
| department |
| userPrincipalName |
| StreetAddress |
| NetworkAddress |
| UserWorkstations |
| employeeID |
Minimum Claims to be configured for successful ADFS SSO authentication
The following are the minimum claims needed to be configured for successful ADFS SSO authentication:- LDAP Attribute -> Outgoing Claim
- SAM-Account-Name -> Name
- User-Principal-Name -> Email Address
- Display-Name -> Given Name
Tips and Best Practices
- ServicePRO does not synchronize its passwords with passwords associated with Active Directory credentials with ServicePRO and AD authentication. ServicePRO maintains a separate set of passwords. ServicePRO uses pass-through authentication to determine that a user is logged into a workstation using their Active Directory credentials and will log the user in automatically.
- It is important to select at least one field as a key field when importing users via Active Directory synchronization.
- When selecting a unique identifier, select a field that should not be duplicated. A good example of a unique identifier is a user name or email address – typically fields that should not be duplicated among user accounts.
- The more complete the Active Directory database is, the more information can be automatically populated into ServicePRO fields.
- ServicePRO can be configured to import groups of users and related fields from Active Directory; and you can synchronize the update of user information from Active Directory on a regular basis.
