Service Requests
Return to Service Management
- 1. Overview
- 2. Creating Service Requests from the Workbench
- 3. Workspace
- 4. Ribbon Toolbar
- 5. Folder List
- 6. Workspace List
- 7. Preview Pane
- 8. New Service Request Window
- 9. End Users Submitting Service Requests via the Web Portal
- 10. End Users Submitting Service Requests via Email
- 11. Option to not Allow Users to Re-Open Closed Requests
Overview
Service requests can be submitted via three channels:
- End users submit requests via the Web Portal.
- End users email requests to the Help Desk.
- Support Reps submit requests on behalf of end users.
Creating Service Requests from the Workbench
Users are provided two options for creating New Service Requests from the Workbench:
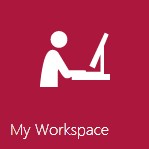
- My Workspace icon – This option will take you to the My Workspace window, where you can create and edit Service Requests.
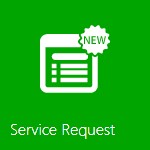
- Service Request icon – This option will take you directly to the New Service Request window.
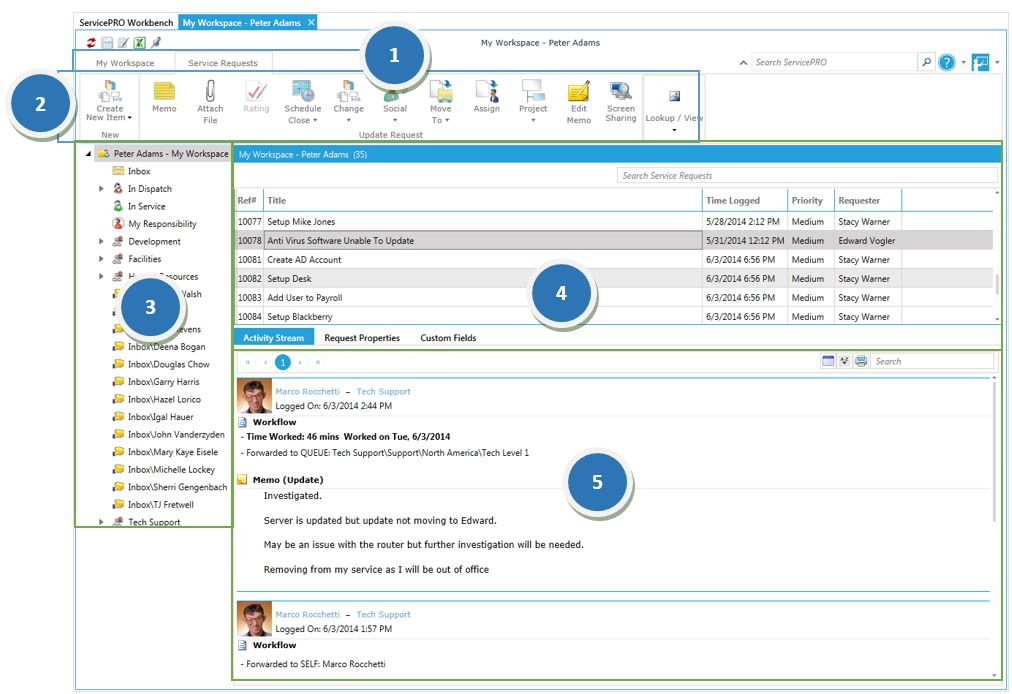
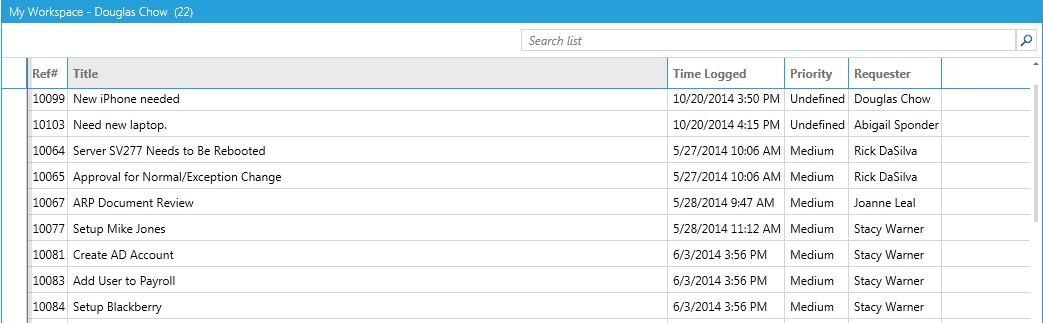
Workspace
The My Workspace page displays a list of all open requests that are assigned to you, requests you are responsible for and requests for which you are the requester. If you have been assigned the “Data Analysis” role, you can view the workspaces of other Support Reps.
The Workspace window contains the following:
- My Workspace and Service Requests tabs
- Ribbon Toolbar
- Folder List
- Workspace List
- Preview Pane
Service Request tabs
- My Workspace – Modify the service request listing
- Service Requests – Tools for creating and updating request
Ribbon Toolbar
My Workspace Ribbon Tab
The Workspace toolbar will present several tabs with varying options to address requests that appear in this view.
Select Task Group
The Select Task Group will allow you to filter Service Requests shown in the Workspace
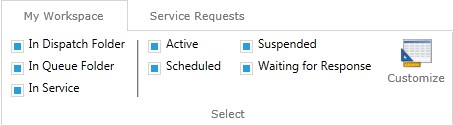
Select – Folder
These requests can be in any one of the following statuses:
- In Dispatch – This section will display all requests with ‘In Dispatch’ status contained in dispatch folder to which you are assigned. This helps you view all requests that are In Dispatch so that you can assign them to specific queues to be worked on by Reps.
- In Queue – This section will display all requests with ‘In Queue’ status in queue folders to which you are assigned. When Support Reps are ready to work on a request, they should move that request into their “In Service” folder, so that only one Support Rep works on a request at any given time.
- In Service – If you are a Support Rep, this section will display a list of all requests for which you are currently responsible in your “In Service” folder. Requests that are ‘In Service’ will only appear in the workspace of the rep who is assigned.
Select – Status of Request
Filters for request statuses are also available from the Select task group.
- Active
- Suspended
- Scheduled
- Waiting for Response
Select - Customize
This will open the Query Designer. Users of the ServicePRO interface can customize the grid in any of their request listings by clicking the "Customize” button. For each specific listing, a user can select which rows (fields) will be displayed in the grid. Also, they can display them in a different order, edit the captions, filter the field criteria, and more.
Preview Pane Task Group
This section allows you to select how you would like to view the Workspace List (grid) and the Workspace Detail.
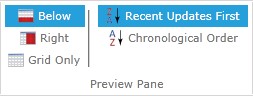
You can select from the following:
- Below – View Workspace Detail below the Workspace List.
- Right – View the Workspace Detail in a panel to the right-hand side of the Workspace List.
- Grid Only – View only the Workspace List.
- Recent Updates First – View most recent updates of the request in the preview pane.
- Chronological Order – View updates to a request in the order in which they were inserted.
Show
In this section, a checkbox is available for showing or hiding Requests in Subfolders. If not checked off, then only requests from the current selected folder will be displayed.

Default Settings
Set a default views for your Workspace upon opening the window.
- Set Current View as Default – Make a customized view the default view for the Workspace window.
- Restore System Defaults – Set the default view to the original system view.

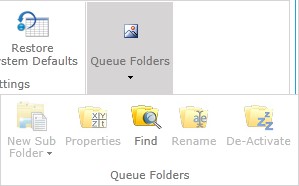
Queue Folders
The following options are used for viewing and editing Queue Folders in the Workspace.
- New Sub Folder – Add a Sub Folder for the Queue Folder.
- Properties – View Queue Folder Properties
- Find – Search for Queue Folders in the listing
- Rename – Rename the selected folder
- De-Activate – Remove the Queue Folder from the listing
Tab 2: Service Requests Ribbon
When working in the Service Requests tab, the following options are available from the Ribbon Toolbar.
New

Update Request

- Create New Item – Create Service Requests, Project Requests, Purchase Requests or Quick Requests from this menu
- Memo – Log a memo update in the selected request.
- Attach File – Add an attachment to the current selected request
- Rating – Rate the quality of a Service Rep’s response
- Schedule Close – Schedule a meeting or appointment and send an invitation or set begin work, due dates, reminders, recurrence, or simply close the request
- Change – Update request fields, such as the title or requester.
- Social – Send Email to the requester or send a Quick Message or Chat invitation to another support rep. You may also send Notifications.
- Move To – Place the request in your own Inbox, another Rep’s Inbox, Dispatch or in a Queue Folder
- Assign – Assign Work or Responsibility in a request to a User or Team
- Project – Create New Child Requests, add additional Folders, Merge requests together, Rearrange the Current Project or split a child request from its parent
- Edit Memo – Edit previous memo entries in the request list
- Screen Sharing – Initiate a Screen Sharing session and send an email invitation to the requester. For more details, view the section on Screen Sharing.
Lookup/View
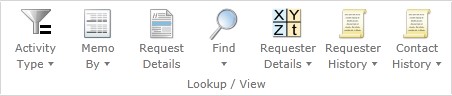
- Activity Type – Filter Activity Types visible in the Activity Stream, such as whether they contain Rules, Emails, Attachments, etc. This can be set for the current request, the current window or permanently.
- Memo By – Filter other users from the Activity Stream.
- Request Details – View details of a Service Request
- Find – Search for Suggested Solutions, or search the Request Database
- Requester Details – View properties of the Requester, or that of their Company or Organizational Unit.
- Requester History – View other requests logged by the Requester, or all requests logged by users in their Company or Organizational Unit.
- Contact History – View all memo updates in requests logged by the Requester, or all memo updates in requests logged by users in their Company or Organizational Unit.
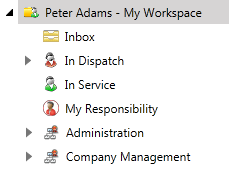
Folder List
View all the queue folders to which the Support Rep is assigned.
Workspace List
This section displays all the requests in the queue folder you selected from the Folder List that meet all the parameters set in the My Workspace task group.
Preview Pane
View request details for the request highlighted in the Request list. View memo updates on the Activity Stream tab, or view the Properties tab for request properties.
New Service Request Window
The ServicePRO Request Screen features the following task/information areas:
- Tabs
- Ribbon Toolbar
- Title
- General Information
- Workflow
- Notification
- Schedule
- Importance
- Memo
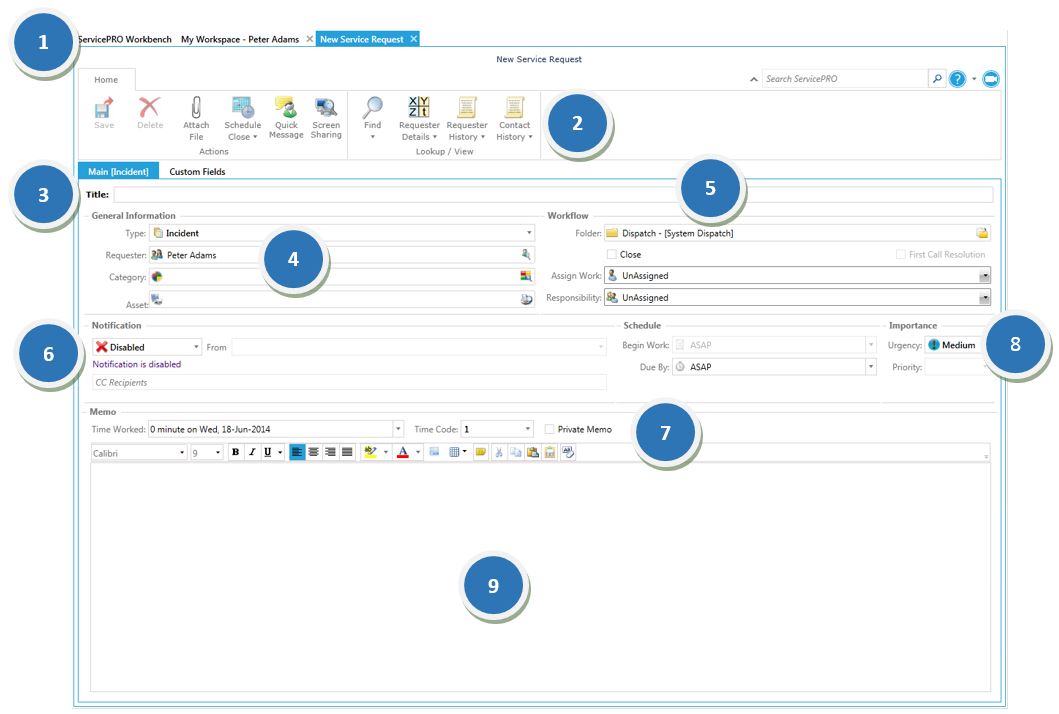
- Tabs
Quickly switch between modules and request windows with tabs above the ribbon toolbar. - Ribbon Toolbar
When creating new requests, you have the following options: - Save – click this option to submit or save updates to a service request.
- Attach File – add a document or file to this service request.
- Schedule – Schedule a meeting or appointment in your calendar and send an invitation to other users. You may also set a reminder for yourself or other Support Reps at a future time.
- Quick Message – Send a message to another support rep within ServicePRO. The quick message creates a conversation thread which then becomes part of the request activity stream. It’s a light-weight communication tool to allow exchange of information between the stakeholders such as requester, support rep and manager while still having all information logged for reference.
- Screen Sharing – Initiate a screen sharing session to remotely assist a user.
- Find – Use Best Solutions to search the knowledge base for an article to help resolve the current incident or problem. You may also search other requests with Request Database.
- Requester Details – View the properties of the requester, or their Company/Organizational Unit.
- Title
- A brief description of the problem/task. The title is visible to all users. This field can assist technicians in obtaining relevant information quickly. It should be as descriptive as possible.
- General Information
- Request Type – Select the desired request type. By default, this will be “Generic Service Request.” Based on the Help/Service Desk needs, you can create different request types. For example, incident request type, new employee onboarding request type, or change management request type using the Custom Object Designer.
- Requester – This field will default to the user logging the request. However, Users with the “Submit” Role can use the “Find the Requester form” to search for the name of the requester who requires service, and log the request on their behalf.
- Category – This required field is used to categorize the request using a drop-down list. Select the category that best fits the request.
- Asset – Associate an asset with the request. This is useful to track troublesome and expensive assets over time. Users can search for valid assets by typing into the field and pressing Enter or selecting on the Search button to open the Asset Selection window for further searching.
- Workflow
- Folder – Select the queue folder where the request will reside. This can be either a dispatch or a generic queue folder.
- Close – This option allows you to indicate that work is completed and close the request.
- First Call Resolution – Indicates that a service request was resolved during first contact
- Assign Work – Assign the request to a support rep or a team. This indicates that the request is being worked on, and hides it from the workspace of other reps.
- Responsibility – this field allows you choose the individual that is responsible for this request, such as a manager or supervisor.
- Notification
- Notification Type – Send the Current Memo or Entire History as an Email Update, or send nothing with Disabled.
- From – this field allows you to set the System Email Account that an Email Update is sent from.
- CC Recipients–this field lists current CC recipients for the Email Update. You may also specify additional CC recipients.
- Schedule
- Begin Work – This field provides four scheduling options:
- ASAP: Work needs to begin as soon as possible.
- Schedule: Work is scheduled to begin at a future date and time.
- Suspend: No work is required at this time; however, the request cannot be closed.
- Waiting for Response: More information is needed from the requester. When the requester updates the request, the request will resume and you will receive an alert.
- Due By – Use this field to set a deadline for request completion. The value for this field can be “ASAP,” or a specific date and time. For example, if you have new employees starting next Monday, you could schedule the “Due By” date for Friday so an alert will notify you to set up workstations for them or complete other preparatory work on Friday.
- Importance
- Urgency – Select from four levels of urgency (Critical, High, Medium and Low). Urgency – defined by the end users – indicates to Support Reps how users view the importance of an issue.
- Priority – Select from four levels of priority (Critical, High, Medium, and Low). Priority is normally set by a Dispatcher or a Support Rep submitting the request. This is the field ServicePRO uses to prioritize workflow.
- Memo
- Time Worked – Time accumulates while the New Request window is open. When solving a problem over the phone, or when Support Reps leave their desks to work on a request, the timer automatically tracks time spent. Update the request when the work is complete. ServicePRO lets you manually override elapsed time by directly entering a date and time in the Time Worked field. You can specify the time worked and select a different date if necessary.
- Time Code – Associated with each Support Rep’s hourly rate, the time code indicates whether the charge for the request is a standard, overtime rate or any other type of rate that is set in the system for tracking hourly charge rates per support rep.
- Private Memo – When this box is checked, the memo is not visible to anyone but those with Support Rep or Request View – All Transactions role in that queue. This can be used to hide sensitive or confidential information from end users. Private memos are not visible on the End-Users and are not emailed, even if Email Current Memo has been selected.
- Memo – Use this area to provide a complete description of the problem, details of the work carried out by Support Reps, and specifics about the problem resolution. It is extremely important that Support Reps update requests with the eventual problem resolutions. This helps build an historical knowledge base that can be easily searched by end users, thus enhancing self-help. Memo templates can be used by clicking the Memo Templates Icon on the ribbon tool bar of the memo section.
- Rich Text Editor – Text added in the Memo field of a request can be formatted using the Rich Text Editor. It provides users the ability to alter the size, font style and color of text used in inserted memos. Also, images and tables can be inserted directly into the memo field of a request.
- Submitting New Service Requests To submit a request, complete the following process:
- From the Service Requests page, click the Request icon in the New task group of the toolbar.
- Enter data in the fields as described above.
- When all information has been entered, click the Save icon in the Ribbon Toolbar.
- ServicePRO displays a confirmation dialog box that says: “Your Request has been logged as reference number ####”. The request is sent to the queue, Support Rep, or Dispatcher as selected.
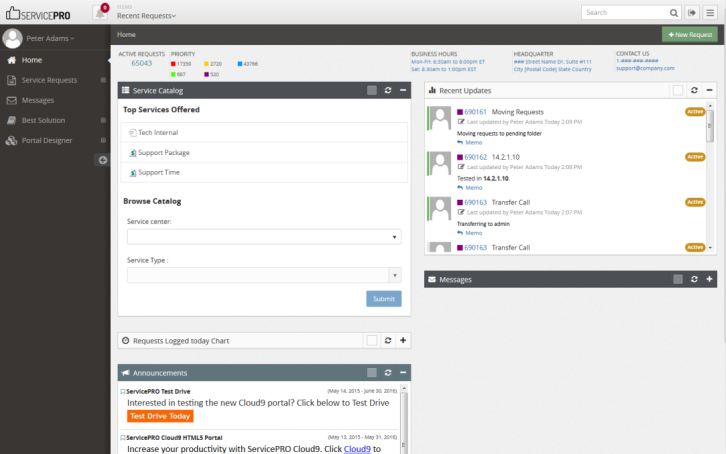
End Users Submitting Service Requests via the Web Portal
End users can submit service requests over the Internet using ServicePRO’s End User Portal.
When end users log in to ServicePRO End User Portal, they see a different user interface. The interface they see looks similar to the one shown in the figure below.
- To log a service request using the Web Portal, launch your browser from any computer.
- Navigate to the URL set up by your company, where you will find the Web Portal login screen.
- Log in to the ServicePRO Web Portal; enter the End User name, password, and select a language.
- Click Login. (End user can skip this step if ServicePRO is configured to use Windows authentication).
- To log a service request, simply click on the New Service Request icon.
- You must also select the Request Type, such as an Incident. A page similar to the one shown below appears
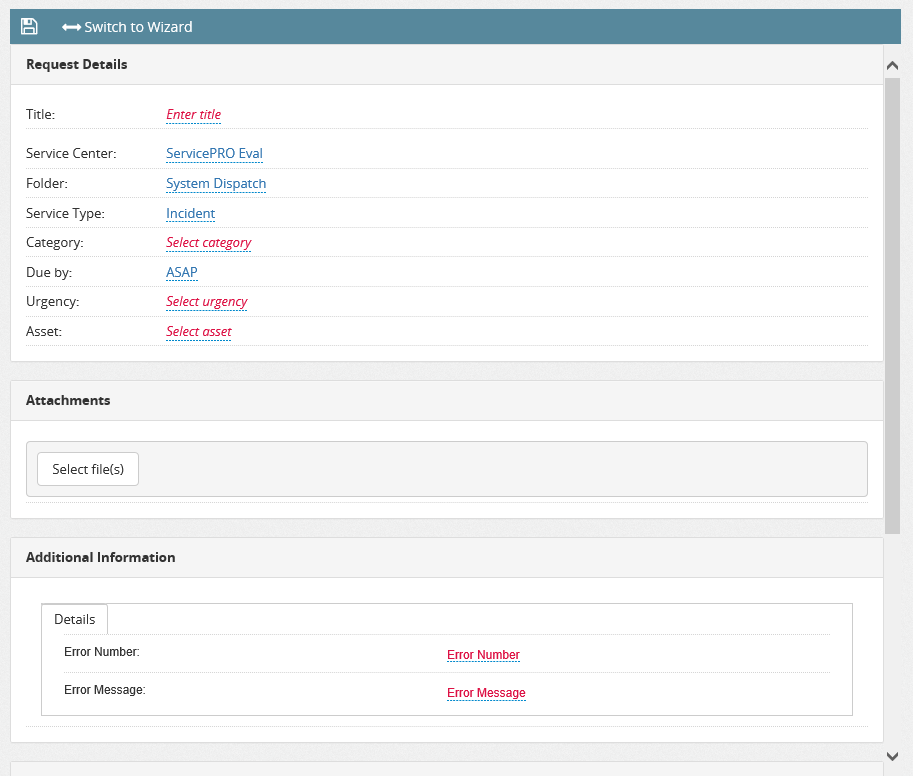
- In this example, you would select a value from the Category drop-down list, enter a name in the Request Title field, and enter other pertinent information in the Memo field.
- You could also modify the value in the Urgency field if needed. (The availability of these fields can be customized by system administrator)
- You can attach files to your request by clicking on the Select File button.
- You can schedule a reminder for yourself by clicking on the Reminder icon.
- You can also select a different custom request type (if any have been created) by clicking on the Request Type drop-down list (currently showing “Incident Request”).
- Click the Save icon on top left of the window to submit your request.
- A dialog box appears to confirm that your request has been logged under a Request Number.
End Users Submitting Service Requests via Email
End users can email a request to the Service Desk. For ServicePRO to process email and convert them into service requests, the administrator must have set up a system email account.
Only emails sent to the configured system email accounts will be processed by ServicePRO.
For example, your email account could be support@mycompany.com.
ServicePRO scans each incoming email to determine the sender’s email address then scans the database to match the email address with a user record. When an email is sent to your Service Desk’s email address, the following occurs:
- Each new request is automatically logged in ServicePRO and placed in Dispatch folder or any other folder if you have Business Rule created to auto-route the request.
- The email subject becomes the service request title.
- The email message becomes the service request memo.
- The requester receives an automatic response confirming receipt of the request and the reference number gets assigned.
Updating Requests Submitted via Email
To update their requests, users can simply reply to the automatic response received from ServicePRO. This ensures the update is attached to the proper request.
Any users who are part of the CC’d list on request notification may also update the request if they have the minimum request view privilege (i.e. ‘Request View - Public Transactions’) on the request. See System Email Accounts section on details on how to enable this feature.
Option to not Allow Users to Re-Open Closed Requests
This feature will allow you to set "Do not re-open" option for closed requests when end users update requests through either emails or ServicePRO Web portal.System Email Account Options – Reopening Request
Under System email account, there is an additional tab to control how requests are reopened for each system email account.

ServicePRO Administrator may configure one of the following options for when users update closed requests through email:
- Allow to Reopen Request Anytime:
Only allows to open the request in the specified folder anytime.
 Allow to Reopen Request Anytime
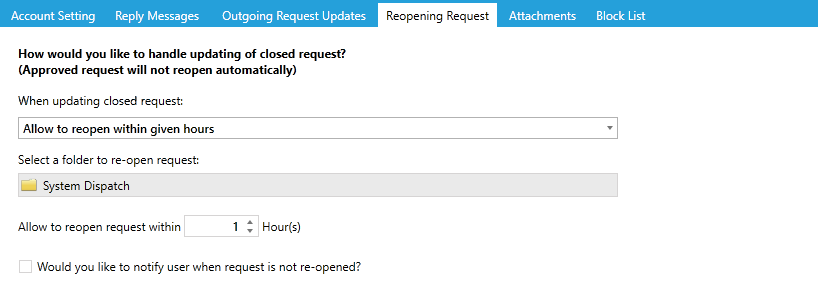
- Allow to Reopen Within Given Hours:
 Allow to Reopen Within Given Hours
 - Option allows to reopen the request in the specified folder.
- Option allows the end user to reopen the request after certain hours and the maximum hours allowed are 672 business hours.
- Option also allows to send a notification to the user that the request is not reopened.
- Do Not Allow to Reopen:
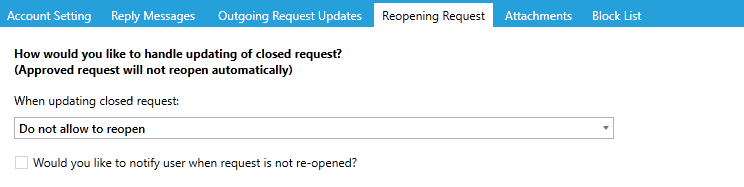 Do Not Allow to Reopen
 - Email content will be added to the existing request as a memo.
- Alerts will be created as follows:
- If request is in dispatch folder then it will generate an alert for all dispatchers on that folder.
- If request is assigned to a support rep then it will generate an alert for the assigned support rep
- If request is assigned to queue then it will generate an alert for all the support reps assigned to that queue folder.
- If System Text Messaging is configured, Support reps will be notified according to the scenarios listed under "Alerts".
- Request will remain closed.
- Do Not Allow to Reopen but Create a New Request:
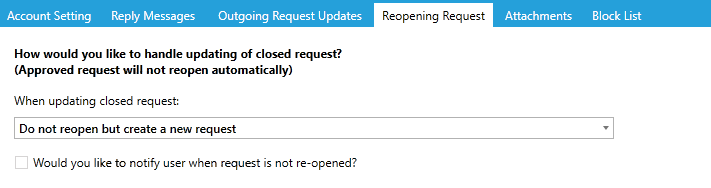 Do Not Allow to Reopen but Create a New Request
ServicePRO Web Portal Designer Options – End User
Option can be specified in the portal designer under End User ‘Request’ tab section.
ServicePRO Administrator has the following options to choose from:
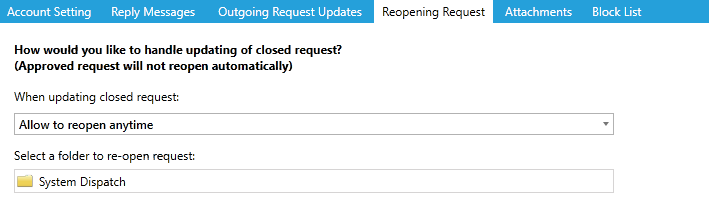
- Allow to reopen anytime
 Allow to reopen anytime
 - Allow to reopen within given hours
Option allows the end user to reopen the request within certain hours and maximum hours allowed are 672 business hours. Allow to reopen within given hours
 - Do not allow to reopen
 Do not allow to reopen
 - Memo will be added to the existing request
- Alerts will be created as follows:
- If request is in dispatch folder then it will generate an alert for all dispatchers on that folder.
- If request is assigned to a support rep then it will generate an alert for the assigned support rep
- If request is assigned to queue then it will generate an alert for all the support reps assigned to that queue folder.
- If System Text Messaging is configured, Support reps will be notified according to the scenarios listed above in step 3.b.
- Request will remain closed