Custom Forms
Return to Service Design
- 1. Custom Forms
- 2. Navigation
- 3. About Custom Forms
- 4. Custom Field Dependencies (FRX)
- 5. Copy-Paste Multiple Custom Fields
- 6. Associate Categories and Teams to a Request Type
- 7. Notes on Specific Types of Custom Fields
- 8. View Options Tab
- 9. Powershell Integration
Custom Forms
With Custom Forms, you can customize ServicePRO to collect information to fulfill your company’s unique processes.
In ServicePRO, you manage various records for your company, such as Users, Categories, Service Requests, Assets, etc. In ServicePRO, these records are called ‘objects.’
Each object within ServicePRO is essentially a unique and standard form for collecting, recording and managing information.
The Form Designer enables you to customize any of the objects by adding your own tabs with fields to them.
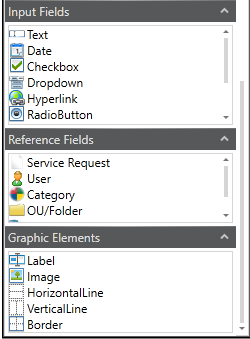
Custom Fields are used to customize ServicePRO to better suit your requirements. You can add Custom Fields to any ServicePRO object:
- Service Requests
- Purchase Requests
- Purchase Orders
- Users
- Organizational Units
- Companies
- Categories
- Assets
- Queues
- Products
- Best Solutions
Navigation
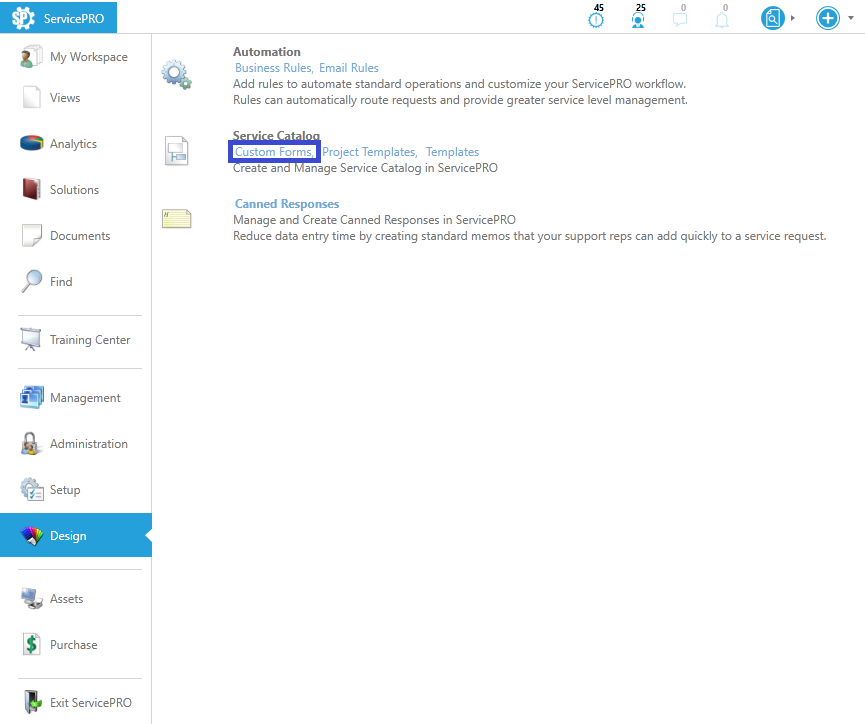
- Navigate to the backstage menu by clicking on the ServicePRO icon.
- From the Design tab, click on the Custom Forms option as highlighted below.
About Custom Forms
The Object Designer role is required to add and modify custom fields. There are no limits to the number of custom fields that can be added to ServicePRO, but to avoid performance problems and possible issues while editing or saving custom object fields, the following are guidelines for the maximum values supported by Form Designer.
- Maximum 100 custom fields per Tab
- Optimally, should NOT exceed 300 fields in all tabs per Custom Object
- Maximum 20 Tabs – 300 fields can be distributed in these 20 Tabs
NOTE: We recommend adding maximum of 100 fields per tab in order to maximize performance. After more than 100 fields are added on one tab, performance may become sluggish.
Every ServicePRO object has a default type, called “Generic,” that includes predefined ServicePRO fields. There are three main considerations when planning custom fields:
- Define the new type for the object to which you are adding the fields.
- Create a tab that will contain the custom fields and add the fields. By default, your first tab on an object will be created for you.
- Define the Roles required to view or enter information into the fields.
NOTE: Plan custom fields carefully. We strongly recommended that you run a complete backup of your ServicePRO database before adding custom fields.
Creating a new Form Type for a Service Request
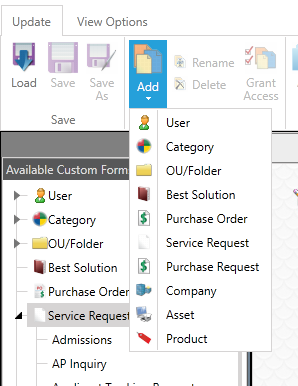
- To add a new service request type, highlight the Service Request object in the Available Custom Forms List. Then, click on the Add icon on the Update tab, Form group. You can also click on the Service Request option on the drop down menu under the Add icon.
 Add New Form
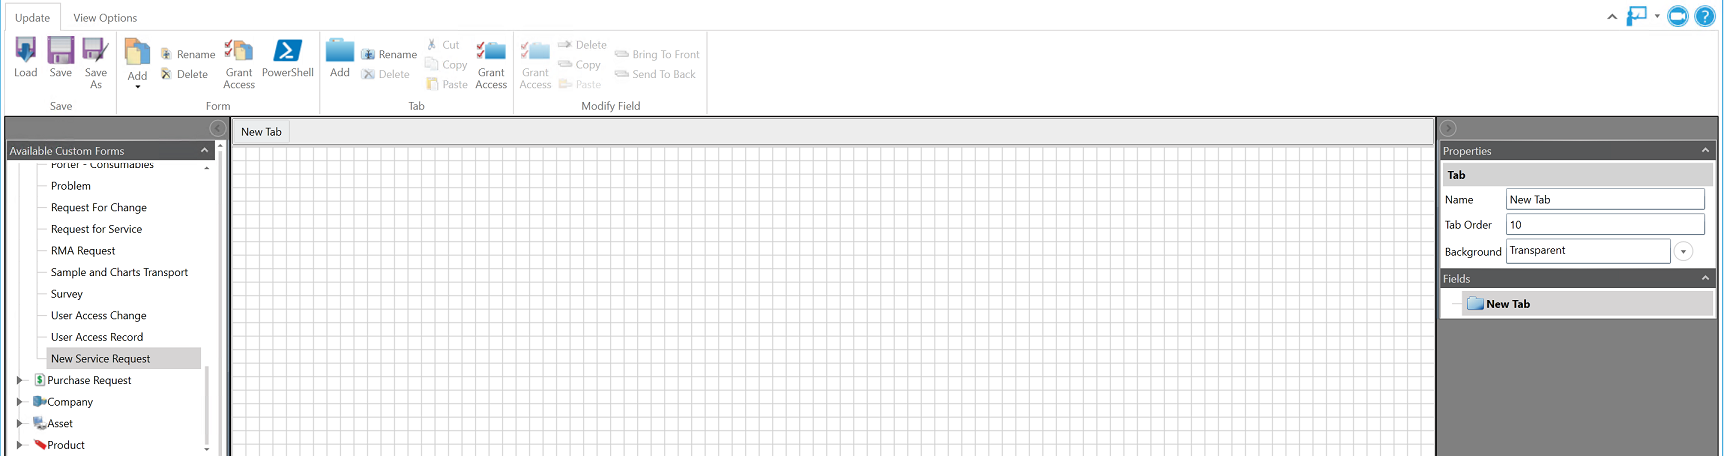
 - Under the Available Custom Forms pane, the new object is added to the list under a generic name. To give it a new name, select the Rename Object option under the Form group of the Ribbon toolbar. The default name for the new type is New [Object Name].
- By default, the first tab in your object will be created for you. In the Properties pane of this tab, enter a name.
 New Service Request Form Added
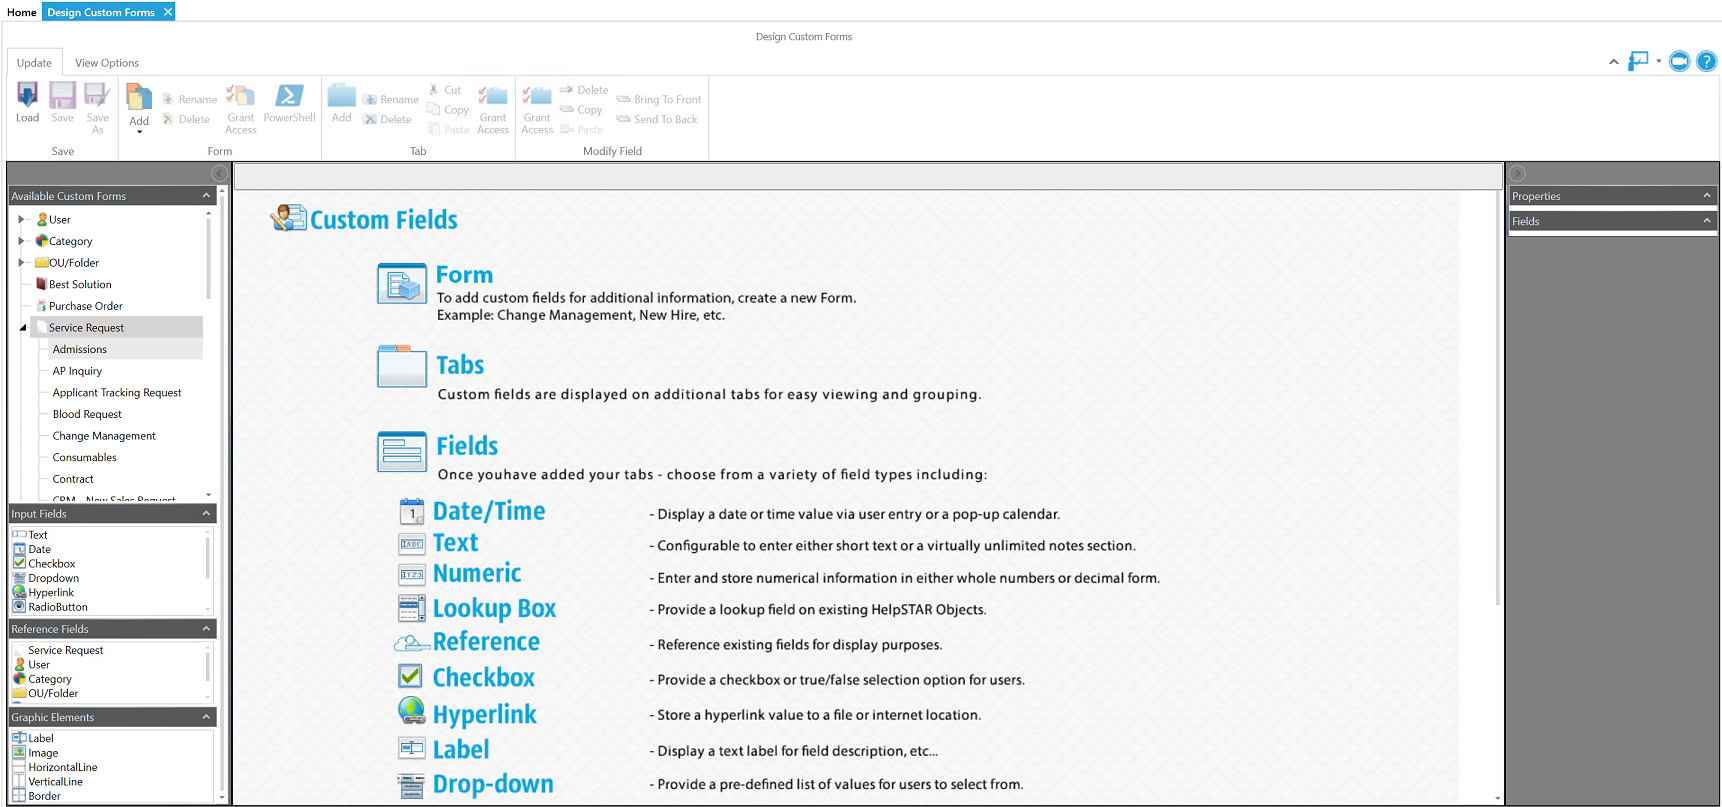
Adding Fields to a Custom Form
- Add a label to the form by selecting Label from the Graphic Elements pane. Drag and drop the Label field into the form at the desired location.
- From the Input Fields pane in the left panel, drag and drop a field type to be added. You can also double-click an Input Field to be added to your tab.
 Available custom fields
 - When a field is in focus, the Properties pane ne the right will reflect your new Custom Field.
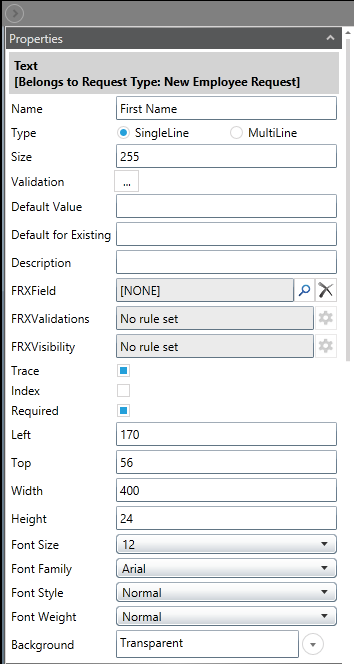
- Enter the new field’s name in the Name field.
- You can use the Description field to explain the field’s purpose. This can be of value to other reps that look at the field in the future and need to understand why it was created.
- Depending on the type selected, you have various options for field size and defaults. The table below provides more information about definitions and field options.
| Type | Definition | Options |
|---|---|---|
| Text | A combination of numbers and text up to a maximum of 255 characters. | • Single or multi-lined - specify if the field should populate a single line or multiple lines • Size - maximum number of characters • Default - available, but not typically applicable to this field type |
| Date | Day, Month, Year. Note that this data type prompts a calendar to select a date from. | • Default - the date the field was created or the current day's date; applies to new records only |
| Checkbox | Checkbox that helps for a single response of either checked or unchecked. | • Default - select "Checked = True" to have the field selected by default for new records |
| Dropdown | A combination of options that are specified for your requirements | • Specify a series of text or numerical values that can be selected in a dropdown list |
| Hyperlink | A URL that a user can launch when updating or viewing an object's details. | • Size - maximum number of characters • Default - a URL that is entered by default during data entry |
| Radio Button | Allows for multiple selection of an options list. | • Can add multiple radio button entries as required by form |
| Masked Entry | Allows you to create a field with a specific format. | • Examples include IP addresses, phone numbers |
| Function | Several formula fields for use. | • Addition, Subtraction, Multiplication and Averages |
| Lookup Box | Create a "Find Object" field based on your existing ServicePRO object tables. | • Can be used with ServicePRO user, category, Organizational Unit, etc. |
| Numeric | Integer, a numeric value with no decimal. | • Default - available, but not typically applicable to this field type |
| Numeric with Decimal | A number with a decimal. | • Size - maximum number of characters • Precision - maximum number of digits to the right of the decimal point • Default - available, but not typically applicable to this field type |
| Date & Time | Date and Time. Will invoke a calendar used to select the date. | • Default - The date the field was created or the current day's date; applies new records only. |
Field Properties
- Click on the Validation button to set rules for the type of data allowed in the field. When you select this option, the Validation Rule tab appears.
- Click on the Index check box to index this field for faster searching. This feature should only be selected for fields that are frequently accessed in ServicePRO searches, queries, and reports.
- The Trace check box is available only for service request custom fields. Click on this check box to have a trace memo created in the request when the related field is changed. The trace memo stores the old and new values.
- Click on the Required checkbox to make the field mandatory. Users will not be able to save a request or another object if this field is not populated with a value. The application will prompt for a value to be entered as a placeholder for empty records.
Note:- The checkbox input field does not have the “Required” property, because it’s a Boolean True / False value field (i.e. when it’s not checked, it is taken as “False” value). This is the same design from earlier versions of ServicePRO. If you would like a Required field with Yes / No as choices, it’s recommended to use EITHER a Dropdown field OR a Radiobutton field, with setting the “Required” property. - The Encrypted checkbox (for text fields only) marks the data in the database as encrypted so it's not in a legible format when accessed directly from the database. When the field is displayed in ServicePRO, ServicePRO Web or in Email Notifications, the data value in the field will be displayed in normal text format.
(Note: - Trace memo shown in the Service Request Activities will not display the data from Encrypted text fields even when trace is enabled on the field. The Trace memo will just state: "UDF [Field Name] is updated by the user"
- Setting Encryption is allowed only for newly created Text fields in the Custom Forms whereas existing Text fields cannot be marked as "Encrypted".
- Once a text custom field is set as encrypted, it cannot be changed back to decrypted and encrypted custom fields cannot be used in blank reports.)
- The Tab Order allows the user to set the tab order for the fields and tabs within the form. By default, "Tab order" property is set to 10 for the first field added within a tab and increments by 10 for every new field added in the specific tab.
Before saving the custom field, follow the next procedure to define the user privileges required for entering and viewing data in this field.
Adding Permissions to Custom Forms, Tabs and Fields
Permission for accessing the form, tab and field is given at the respective levels and is based on user privileges.
By selecting or de-selecting a user privilege, you can specify who can access a custom form/tab/field. The example below explains how to set permissions for a custom field.
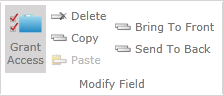
- Select a field in the design area of your tab.
- In the Modify Field task group in the Ribbon Toolbar, click on the Grant Access option to assign the user privileges required to update the data in the related custom field.
- In the View column on the Permissions window, assign the user privileges required to view the data in the related custom field.
- In the Update column, assign the user privileges required to update the data in the related custom field.
NOTE: There is an 'End User Access' Role given in the permission window which will allow you to restrict end users from accessing the custom form at the form/tab/field level.
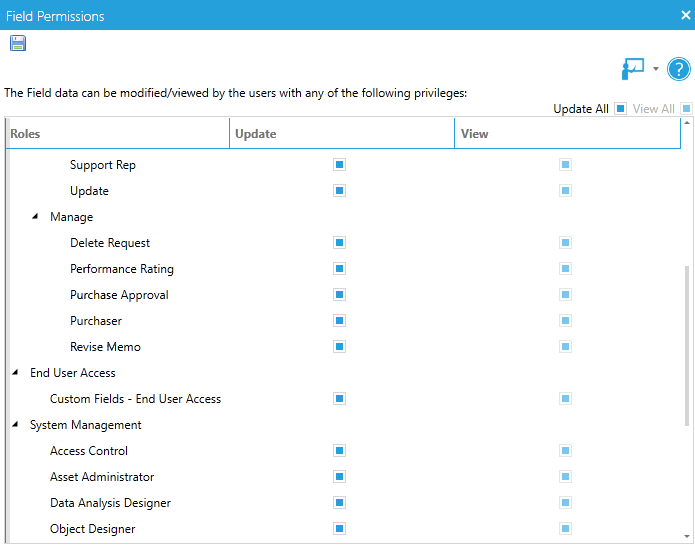 Field Grant Access
Custom Request Types Visibility
Custom Request Types appear based on different criteria in ServicePRO and ServicePRO Web.
| Description | ServicePRO | ServicePRO Web |
|---|---|---|
| When Type is not viewable | Type should not be in the list | Type should not be in the list |
| When Type is Viewable but no tab is viewable | Hide Custom Editor | Hide Custom Editor |
| When Type/Tab is viewable but tab does not contain any field | Hide Custom Editor | Hide Custom Editor |
| Type/Tab is viewable, tab has fields but not viewable | Show custom Editor with tab without any field | Hide custom Editor |
| Type/Tab/Fields is viewable | Show on UI | Show on UI |
Other Field Functions
Validation Field
If you checked the Validation check box when adding a custom field, follow this procedure to define conditions that must be satisfied for data entered in the field. Multiple validation rules can be added.- Move to the Validation Rule tab for the custom field.
- From the Match field, select the basis for the rule:
- Contains – Data entered into the field must contain a specific value.
- Does not contain – Data entered into the field cannot contain a specific value.
- Starts with – Data entered into the field must start with a specific value.
- Ends with – Data entered into the field must end with a specific value.
- In the Value field, enter the required value.
- Click Add to add the rule.
- If this custom field requires multiple rules, repeat steps 2 and 3 to add the next rule.
- Before clicking Add, choose a selection type:
- Or – The default value. If you choose this operator, the data in the custom field can match any one of the specified rules to be considered acceptable.
- And – If you choose this operator, the data in the custom field must match all of the specified rules to be considered acceptable.
- Click Add to add the second rule.
Drop Down Field
A drop down is a custom field type that provides a list of values that a user can select from in the form of a drop down list. To create a static drop down list, complete the following process:- Select Drop down option from the Input Fields pane and drag to your tab.
- Enter a Name for the list in the Properties pane.
- Specify the Type of field you want to create from the following options
- Number
- Number with Decimal
- Date
- Date & Time
- Alphanumeric
- Once you have selected a type, you will be prompted to enter your selections.
- In the Data field, enter a value.
- Click Add, the value will appear in the Choices box.
- Repeat steps 5 and 6 until all values are added for the new field.
- Click OK to save the values.
- Remove – Highlight a value and click Remove to delete it.
- Rename – Highlight a value and click Rename to rename it. The value is removed from the list and appears in the Value field. Enter the new name then click Add to add it to the list.
- Move Up, Move Down – Highlight a value then click the Move Up or Move Down button to re-position the value in the list.
Lookup Field
A lookup is a custom field type that provides a list of values that a user can select from in the form of a drop down list or find window. These lookup values are primarily generated from the ServicePRO Database, which provides a list of existing values in ServicePRO.To create a lookup list from existing ServicePRO values, complete the following process:
- Select LookupBox option from the Input Fields pane and drag to your tab.
- Select the ServicePRO Object Type and the specific Property of the object this lookup field will be searching .
- Enter a Name for the field and a Description.
Reference Fields
Use this function to have custom fields derive values from an existing ServicePRO field. For example, you could add a custom field that displays the requester’s Email Address, as described below:- From the Reference Fields pane, select User and drag to your tab.
- You will be prompted to select 'Requester' or 'Support Rep'. This is because service requests can have these two types of users associated with it. In this case you will select 'Requester'.
- Next you will be prompted to select the specific property about the user that should be referenced in the service request custom field. In this case we will select 'Email Address'.
- Update the properties for this field in the Properties pane and Save.
Graphic Element Fields
Use the graphic element fields to add static content to the Custom Object.- Label
- Image
- Horizontal Line
- Vertical Lline
- Border
Custom Field Dependencies (FRX)
ServicePRO Form Designer now has the ability to define custom fields with dependencies for visibility and validation control. Custom field dependencies allow fields to be validated, populated and made visible based on parent field values.FRX fields are created on a one parent dependant, many children structure, with cascading support of parent-child structures. Validations can be run on the children based on the values selected on the dependent parent field. The child field can also have the value pre-populated with default(s) based on parent values. Visibility of child fields can also be controlled via FRX.
FRX Field Properties
When we select any of the valid data fields or a graphic element to be designated as child FRX field, the following section will appear in the right side pane properties section. FRXField, FRXValidations and FRXVisibility options will be available, with exception of graphic elements, which do not have FRXValidations.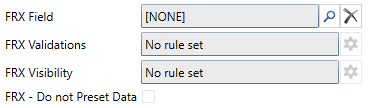

FRXField
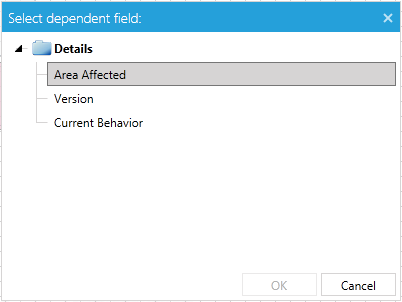
From here, the parent FRX field can be defined by clicking the find button. This first needs to be selected before the FRXValidation and FRXVisibility field rules can be set. The validations and visibility filters will be looking at the value of this field to validate/show/hide the child field(s)

Clicking on the find button will open a selection list that lists all valid fields for selection on current request type.
To clear the FRXField assignment, click on the x delete button to remove the field from FRXField.

FRXValidations
These rules when set on an input field will determine the value(s) that appear in the field or appear for selection based on the condition(s) set in the parent field. The validation rules can be defined here. These will be based on the current parent field value defined under FRXField.

Click on the gear to open the Setup conditions dialog.
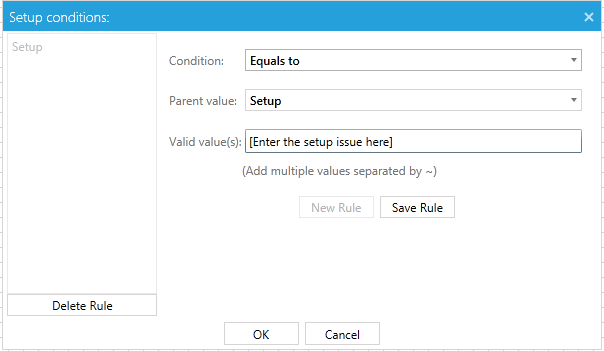
From here you can define condition(s) for parent value. Parent value field will populate based on the parent field type. Enter or select a value.
Under Valid value(s), enter a string or multiple strings separated by a ~ character. If the parent condition matches, these values will be the validation values for the child field.
Click on Save Rule to add the rule to list. You can have multiple validation rules. Just click on New Rule button to add any additional rules. When done, click on the Ok button to close the Setup conditions dialog.
FRX - Do not Preset Data Checkbox can be used to ensure that the input field that has FRXValidation set on it will not be preset with any data. The user completing the form will be allowed to enter the data instead. This option is especially important to select if the input field is being set as 'Required'.
FRXVisibility
Visibility rule(s) can be defined in the same way as validation rules. If the parent value meets the condition defined here, only then the child field will be made visible in the form, or else it will be hidden.
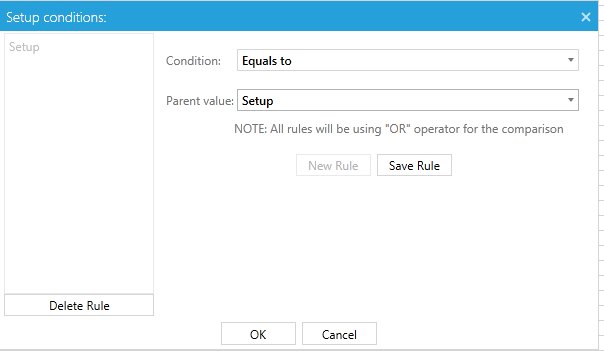
Click on the gear to open the Setup conditions dialog.

From here, you will be able to define a condition for the parent value. Click Save Rule when done. Additional rules can be added by clicking on New Rule button. When completed, click on Ok button to close the dialog.
FRX dependency on requests
Once fields are added to FRXField with validation and visibility conditions, they can be used to validate data entered on requests and other objects. If a field value is not matching the validation rules on parent, it will prompt user to correct the value when a request or object is being saved.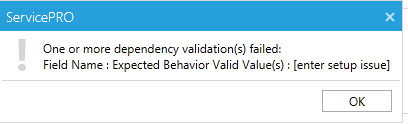
Visibility of fields will also be dynamic based on parent value selection. If FRXVisibility rule conditions match, the field will become visible.
- The following fields cannot be selected as an FRX Field -
- Graphical elements
- A field that has the current field as FRX field
- The following fields cannot have FRX Field set –
- Shared Reference Fields
- If the current field is used in shared reference
- The following fields cannot have FRX validations set –
- Graphical elements
Copy-Paste Multiple Custom Fields
Copy/Paste field(s) is allowed for any type of field including reference, lookup, function fields and legacy labels.- In case of a Function Field, if the destination Custom Form is same as the Source Custom Form, copy/paste is still allowed.
- If Destination and Source Custom forms are not the same, the user will be prompted with a warning message.
- If the copied field contains FRXField property rules (visibility or validation), when the field is pasted the user will be prompted with a warning as Dependency properties are not retained in the destination form.
Associate Categories and Teams to a Request Type
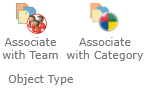
Categories
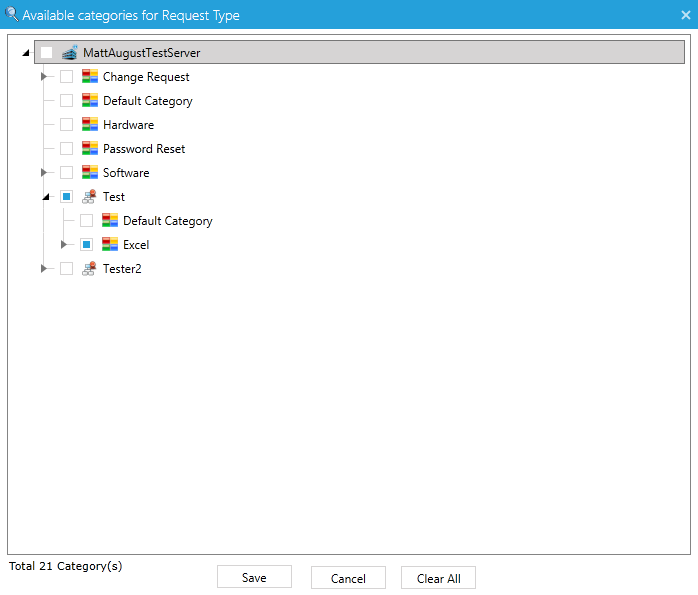
When a Service Request type is created, you can specify which categories will be available when it is used. This will allow for relevant relationships to be created between a category and a Service Request.
Note: In ServicePRO Enterprise, category selection will also determine under which Service Centers the service request form will be available.
Team
Service Request form types can also be associated with specific teams. Only users within those teams will have the ability to log, update or view these types of requests.

Notes on Specific Types of Custom Fields
Custom Fields for Assets
Custom fields can be created for assets in the same manner as other ServicePRO objects. ServicePRO includes three predefined asset types. You can add custom asset types as needed.
You can add asset types to ServicePRO without creating custom fields for them. An asset type is added to a drop-down list of available types when creating or updating an asset. The Asset Type field can filter assets when you search for them. ServicePRO also generates two reports that group assets by asset type.
Custom Fields for Products
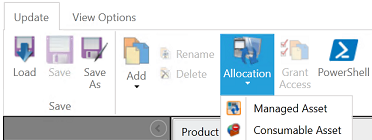
Custom fields can be created for products in the same manner as other ServicePRO objects. ServicePRO includes three predefined product types: Generic Product, Hardware, and Software.When a product is received via the purchase order process, it can be allocated to the requester for whom it was ordered. For the allocation to occur automatically the product must be designated as a "Managed Asset" – the default.
You can define a product as “Consumable.” These products (for example, expendable items such as printer cartridges and paper) will not be allocated when they are received. Asset administrators can select this product type when creating products that they do not want to allocate when their orders are received. The Consumable Asset allocation, shown below, is available when you add a new product type in the Custom fields window.
You can add product types to ServicePRO without having to create custom fields for them. These types are added to the list of product types that ship with ServicePRO, available when you add/update a product.
Custom Fields for Companies
Custom fields can be created for companies in the same manner as other ServicePRO objects.Three default company types (Default, Manufacturer, and Vendor) are predefined in ServicePRO. You can define additional types and any company can be assigned multiple Company Types. If you define other company types, an Other drop-down list appears in line with the Manufacturer and Vendor check boxes for Company Type as shown below. If you do not define other company types, the Other drop-down list does not appear.
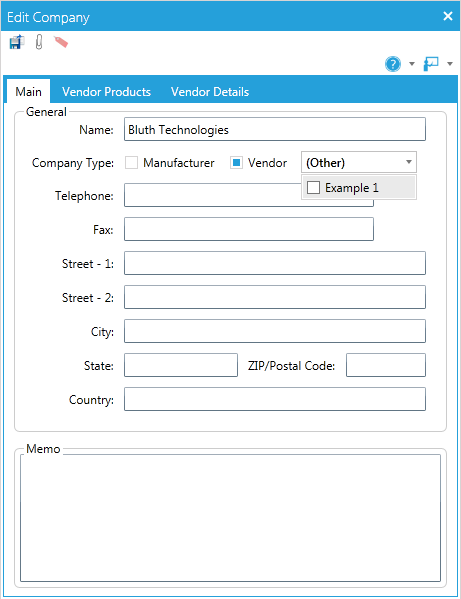
Company types can be added to ServicePRO without creating custom fields for them. Companies can be sorted by Company Type when searching.
View Options Tab
Next to the Update tab is the View Options Tab. This will allow you to change the view of the Form Designer interface.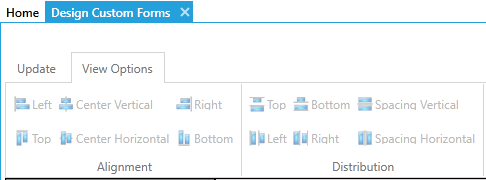
Alignment
When you select more than one Field on the grid with your mouse, and click on an Alignment icon, you position the Fields so that they correspond on the grid.
Distribution
You select a Field and click on a Distribution icon to position the Field pixel by pixel to its place on the grid.
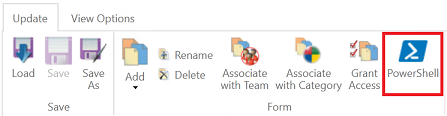
Powershell Integration
ServicePRO’s PowerShell integration feature allows administrators to integrate ServicePRO with an external system for automation. When a new user is created in ServicePRO, using the PowerShell integration feature, the same user can be created in Active Directory with a mailbox. This feature has been added to the Custom Form Designer, therefore it allows the PowerShell script to access custom fields for the automation.One or more PowerShell scripts can be configured to execute either at the time of creating a new custom entity (ie. User, Request, Queue etc.), or at the time of updating an existing custom entity or both. It is also possible to configure email notification when setting PowerShell script with a custom form so that the recipient can receive an email with the results from the specific PowerShell script execution.
Powershell can be accessed the ribbon menu to facilitate the association of a new or an existing PowerShell script to the selected custom form.
Script Association
When the user clicks on the “PowerShell” option after editing any custom form, it opens the below PowerShell pop-up window which lists all PowerShell scripts.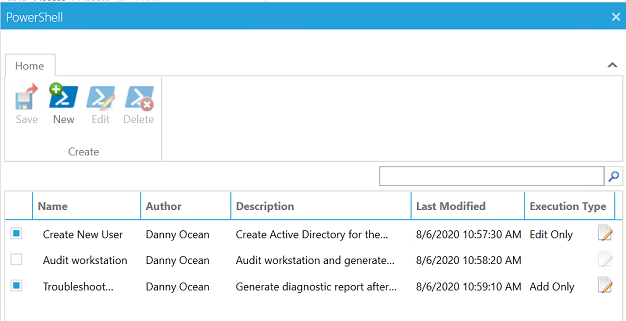
The “PowerShell” window has the following menu options:
- New: User can create a new PowerShell script
- Edit: User can edit the selected PowerShell script
- Delete: User can delete the selected PowerShell script
- Save: Saves the PowerShell Script associations set for the currently selected Custom Form
The user can associate one or more PowerShell script(s) in the list to the selected custom form by selecting the checkbox next to the name of the script. When the checkbox is checked for a script, then the PowerShell script is associated to the custom form and it will prompt the user to select an execution type:
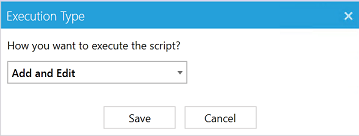
User can select one of the following options from the dropdown list to indicate when to execute the PowerShell script:
- Add only: Execute PowerShell scriptat the time of creating an entity/object (For e.g.: while creating a new request or a new user)
- Edit only: Execute PowerShell script at the time of updating an entity/object (For e.g.: while updating an existing request or user)
- Add and Edit: Execute the PowerShell script in both the cases: Creating an entity and updating an entity
"Search box in the PowerShell List" –This facilitates the searching for a script in the list of available PowerShell Scripts. It searches on the following fields: Script Name, Script Author, Script Description, and Last Modified.
New/Edit PowerShell Script
When the user clicks on the "New" option in the PowerShell window, the below "New PowerShell Script" will be displayed. In this window, user can enter all the details for the new script including the script itself, its parameters, and notifications and save the script.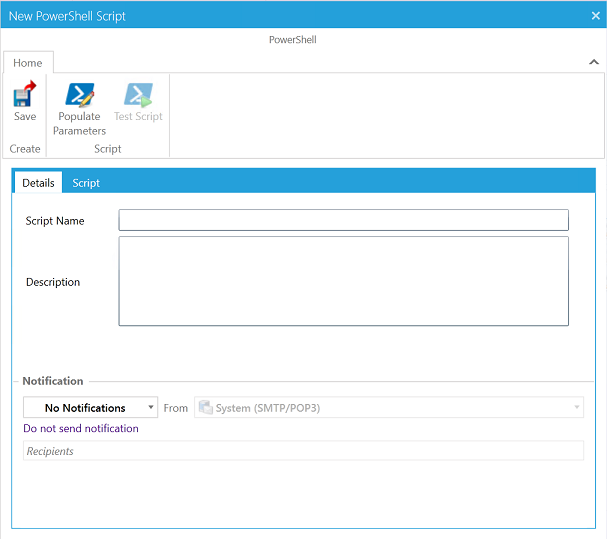
Under Details tab, the user should enter the script details such as Script Name, Description, and Notification. Email notification can be set using one of the following options:
- No Notification: Notification will not be sent
- Failed notification: Send only failure notification (when PowerShell script resulted to an error)
- All notification: Send failure or success notification
When "Failed Notification" or "All Notification" option is selected, in the Recipients autocomplete text box, the user can add multiple users who should be notified.
Sample Email Notification
Email Subject: FYI: ServicePRO PowerShell: Create New User
Email Attachment Name: "Create New User-YYYY-MM-DD-HH-MM.txt"
Email Body:
Hi {Recipient Name},
Please be informed that ServicePRO executed Create New User PowerShell script when adding service request. Execution log is attached with this email for more details.
Entity Name: Service Request
Operation: adding
This email is generated by ServicePRO PowerShell integration module. Please do not reply to this email as it may not be monitored.
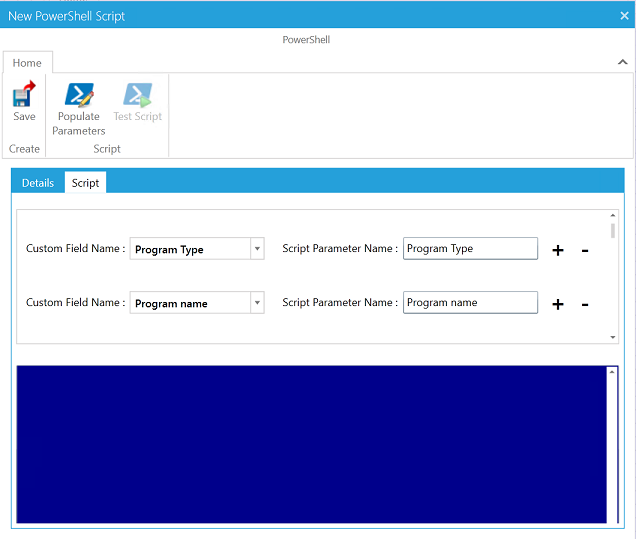
Powershell Script - Script tab
Under “Script” tab, there are 2 sections:- Top section - Parameters List: The user can add or delete parameters which are required to execute the script along with the ServicePRO fields from where the parameter value should be passed. (i.e. a mapping between ServicePRO Fields and PowerShell Script Parameters)
By default, there will be an empty row to start adding parameters. User can add or delete parameters by clicking plus (+) or minus (-) buttons in the end of each item.
In the parameter list, “Custom Field Name” drop down choices are populated from the name of input fields in the selected custom form and a set of regular base fields for the specific object/entity. The user must choose the name of the ServicePRO field from which the Script Parametervalue should be passed. In the “Script Parameter Name” text box, the user should specify the name of the actual PowerShell Script parameter. - Bottom Section - PowerShell Script: The user should enter the actual PowerShell script in the multi-line text box with blue background color at the bottom.
 New Powershell script
Populate Parameters Menu Option
When the user clicks on “Populate Parameters” option, the application populates the Parameters list with one item each for all the allowed regular fields for the entity and for all custom input fields based on theselected custom form. The user can delete the unwanted items in this list and plan to map only the needed fields to the appropriate PowerShell Script Parameters by entering the “Script Parameter Name” in the particular row.
The input custom fields like Checkbox, Date, Dropdown, Formula, Hyperlink, LookUpBox, MaskedEntry, Numeric, Radio Button, Text are considered for populating parameters to the PowerShell script. Along with these custom fields, the regular ServicePRO fields as listed in the table below will also populated, according to the object selected:
| User | Category | OU/Folder | Best Solutions | Purchase Order | Service Request | Purchase Request | Company | Asset | Product |
| ID | CategoryID | Queue ID | ID | N/A | Request ID | Request ID | ID | ID | ID |
| Name | Category Name | Queue Name | Title | Title | Title | Name | Name | Name | |
| Status | Status | ||||||||
| Phone | Queue ID | QueueID | |||||||
| Mobile | Queue Name | Queue Name | |||||||
| Request Type Id | Request Type Id | ||||||||
| Request Type | Request Type | ||||||||
| Urgency | Urgency | ||||||||
| Priority | Priority | ||||||||
| Category Id | Requester Id | ||||||||
| Category Name | Requester Name | ||||||||
| Requester Id | Requester Email | ||||||||
| Requester Name | Support Rep Id | ||||||||
| Requester Email | Support Rep Name | ||||||||
| Support Rep Id | Support Rep Email | ||||||||
| Support Rep Name | Requester Mobile | ||||||||
| Support Rep Email | Support Rep Mobile | ||||||||
| Requester Mobile | |||||||||
| Support Rep Mobile |
After the user keys in a PowerShell script in the Script section, the "Test Script" option will be enabled. User can test the PowerShell script by clicking the “Test Script” option. This helps to make sure that the script works without any errors.
When the user clicks on “Test Script” option, the below “Test PowerShell Script” window will popup, where the user can enter the values for the Script parameters.
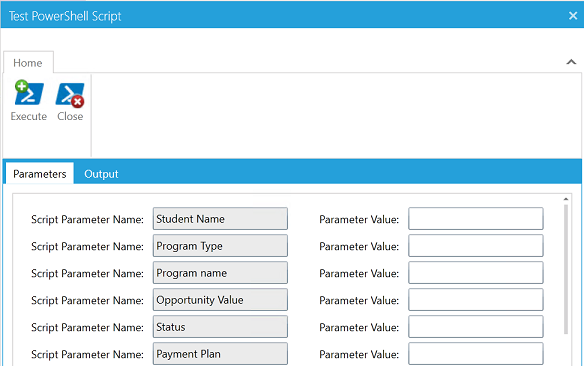
Once the parameter values are entered, the user can click on the “Execute” button to test the execution of the script. While executing the PowerShell script, the form will be disabled and will display the status as “Executing..”. After the completion of Script execution, the results of the execution will be displayed in the “Output” tab. And also, the configured email notifications for the Script will be sent out to the specified recipients.